Quantcast
Channel: ASP.NET Hacker
Viewing all 490 articles
Browse latest View live

Connecting to a Windows 10 IoT device

$
0
0

While playing around with Windows 10 IoT on a Raspberry PI 2, I found different ways to connect to the device to setup and manage it. Some other tools, mentioned in the getting started tutorial seem not to work on my machine. This post shows, how I setup and manage my Windows IoT devices.

Setup the SD Card

In the getting started tutorial there is a tool mentioned called Windows 10 IoT Core Dashboard. This tool should show you all your running Windows 10 IoT devices in your network and with this tool you should be able to setup a new device. This tool looks almost like this (screenshot in German):

This tool downloads the latest image of Windows 10 IoT and installed it on the SD Cards. Pretty useful and hopefully it doesn't download that image every time you need to setup a new SD Card ;)

If you already downloaded and installed the latest Windows 10 IoT for the Raspberry PI (or even every other Board) on your machine, you are able to Setup the SD Card directly using. Using the Windows Explorer just go to C:\Program Files (x86)\Microsoft IoT\ and start the IoTCoreImageHelper.exe. This is a small tool called Windows IoT Core Image Helper which uses the dism.exe to copy the FFU image to your SD card.

If you like to use command line tools, you're able to use the dism.exe directly which is located in the dism folder under C:\Program Files (x86)\Microsoft IoT\ ;)

Setup the Raspberry PI

This is just about the hardware. Plug-in a screen, mouse, keyboard and network cable or alternatively a WiFi adapter. (I use the original Raspberry PI WiFi adapter). Put you SD card with the Windows 10 IoT image in the SD card slot and plugin the power cable to switch the device on.

Now you just need to follow the wizard to setup your device. Usually the device will find your network and you're able to connect to the device. In case of WiFi you need to enter the WiFi key to connect to your network.

Connecting to the Raspberry PI

The already mentioned Windows 10 IoT Core Dashboard on your computer should find all the devices in your network, but it doesn't on my computer.

Maybe this happens also to you, or maybe this is really a problem on OSI Layer 8, as mentioned by Hannes Preishuber in his always friendly manner ;)

Anyway, there is another option to see all your devices from your computer. Again, go to the folder C:\Program Files (x86)\Microsoft IoT\ and start the WindowsIoTCoreWatcher.exe. This installs the Windows IoT Core Watcher which shows you all your devices and additionally the addresses, states and so on.

A right click on a device enables you to copy the physical address, the IP address or to open the web dashboard on that device.

The web dashboard is one of the most important tools, where you can manage your apps, watch the performance, manage your network connections and many more.

Maybe you need to enter a user name and a password to connect to your device. This is initially set to Administrator and p@ssw0rd.

SSH is another option to connect to your device. I usually use Putty to connect connect via SSH:

An additional way is FTP. Using FileZilla it looks like this:

Deploying an app using Visual Studio

You are able to deploy an already published app using the web dashboard of your device. Another easy way while you are developing your app, is to use Visual Studio 2015. This is pretty easy if you know the way to do it ;-)

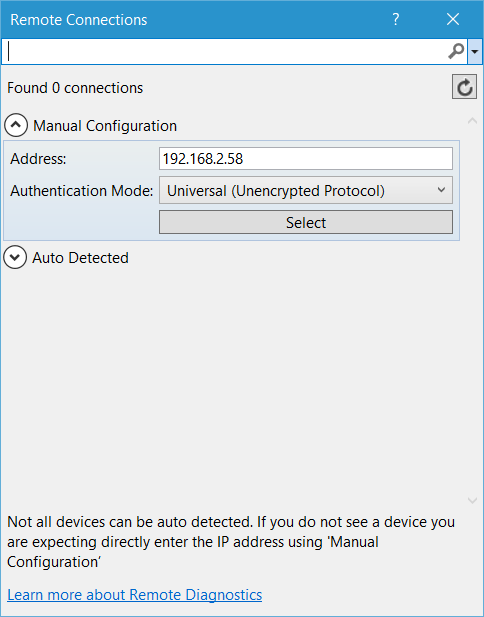
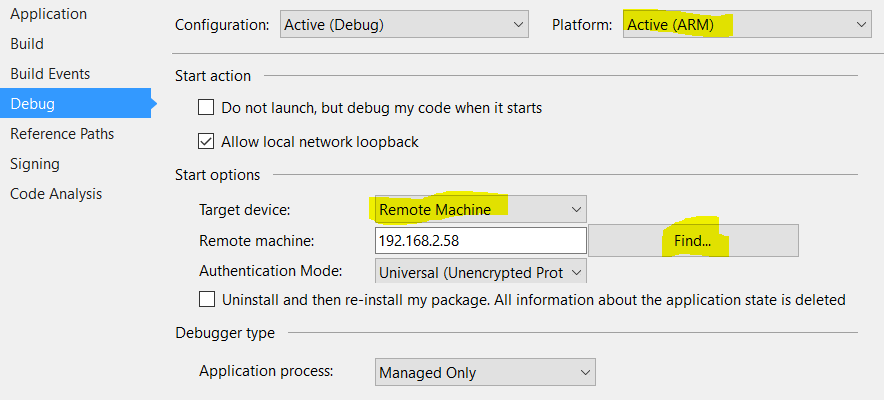
Choose "ARM" as solution platform and Remote Machine as the target. The first time you choose the Remote Machine, the Remote Connections dialog will open. Type in the IP address of your PI and choose the authentication mode Universal. Click select and you are now able to deploy via F5 or via right click and deploy in the context menu of the current project.

To change the Remote Machine settings, just go to the debug settings and reconfigure the settings. I had to change the configuration because I chose the wrong authentication at the first time I tried to deploy:

Conclusion

The Windows 10 IoT Core Dashboard is useless for me, because it doesn't really work on my machine. And it doesn't really bother me why it doesn't work. Because there are some more ways to connect and to deploy to your device. Hope this helps to get a short overview about the setup, about connecting and the deployment to your Windows 10 IoT device.

Did I forgot something? Please drop me a comment and I'll immediately update this post.


Configure your ASP.​NET Core 1.0 Application

$
0
0

The Web.Config is gone and the AppSettings are gone with ASP.NET Core 1.0. How do we configure our ASP.NET Core Application now? With the Web.Config, also the config transform feature is gone. How do we configure a ASP.NET Core Application for specific deployment environments?

Configuring

Unfortunately a newly started ASP.NET Core Application doesn't include a complete configuration as a sample. This makes the jump-start a little difficult. The new Configuration is quite better than the old one and it would make sense to add some settings by default. Anyway, lets start by creating a new Project.

Open the Startup.cs and take a look at the controller. There's already something like a configuration setup. This is exactly what the newly created application needs to run.

public Startup(IHostingEnvironment env)
{
    // Set up configuration sources.
    var builder = new ConfigurationBuilder()
        .AddJsonFile("appsettings.json")
        .AddEnvironmentVariables();

    if (env.IsDevelopment())
    {
        // This will push telemetry data through Application Insights 
        // pipeline faster, allowing you to view results immediately.
        builder.AddApplicationInsightsSettings(developerMode: true);
    }
    Configuration = builder.Build();
}

But in the most cases you need much more configuration. This code creates a ConfigurationBuilder and adds a appsettigns.json and environment variables to the ConfigurationBuilder. In development mode, it also adds ApplicationInsights settings.

If you take a look into the appsettings.json, you'll only find a ApplicationInsights key and some logging specific settings (In case you chose a individual authentication you'll also see a connection string):

{"ApplicationInsights": {"InstrumentationKey": ""
  },"Logging": {"IncludeScopes": false,"LogLevel": {"Default": "Verbose","System": "Information","Microsoft": "Information"
    }
  }
}

Where do we need to store our custom application settings?

We can use this appsettings.json or any other JSON file to store our settings. Let's use the existing one to add a new section called AppSettings:

{
    ..."AppSettings" : {"ApplicationTitle" : "My Application Title","TopItemsOnStart" : 10,"ShowEditLink" : true
    }
}

This looks nice, but how do we read this settings?

In the Startup.cs the Configuration is already built and we could use it like this:

var configurationSection = Configuration.GetSection("AppSettings");
var title = configurationSection.Get<string>("ApplicationTitle");
var topItmes = configurationSection.Get<int>("TopItemsOnStart");
var showLink = configurationSection.Get<bool>("ShowEditLink");

We can also provide a default value in case that item doesn't exist or in case it is null

var topItmes = configurationSection.Get<int>("TopItemsOnStart", 15);

To use it everywhere we need to register the IConfigurationRoot to the dependency injection container:

services.AddInstance<IConfigurationRoot>(Configuration);

But this seems not to be a really useful way to provide the application settings to our application. And it looks almost similar as in the previous ASP.NET Versions. But the new configuration is pretty much better. In previous versions we created a settings facade to encapsulate the settings, to not access the configuration directly and to get typed settings.

No we just need to create a simple POCO to provide access to the settings globally inside the application:

public class AppSettings
{
    public string ApplicationTitle { get; set; }
    public int TopItemsOnStart { get; set; }
    public bool ShowEditLink { get; set; }
}

The properties of this class should match the keys in the configuration section. Is this done we are able to map the section to that AppSettings class:

services.Configure<AppSettings>(Configuration.GetSection("AppSettings"));

This fills our AppSettings class with the values from the configuration section. This code also adds the settings to the IoC container and we are now able to use it everywhere in the application by requesting for the IOptions<AppSettings>:

public class HomeController : Controller
{
    private readonly AppSettings _settings;

    public HomeController(IOptions<AppSettings> settings)
    {
        _settings = settings.Value;
    }

    public IActionResult Index()
    {
        ViewData["Message"] = _settings.ApplicationTitle;
        return View();
    }

Even directly in the view:

@inject IOptions<AppSettings> AppSettings
@{
    ViewData["Title"] = AppSettings.Value.ApplicationTitle;
}<h2>@ViewData["Title"].</h2><ul>
    @for (var i = 0; i < AppSettings.Value.TopItemsOnStart; i++)
    {<li><span>Item no. @i</span><br/>
            @if (AppSettings.Value.ShowEditLink) {<a asp-action="Edit" asp-controller="Home"
                   asp-route-id="@i">Edit</a>
            }</li>
    }</ul>

With this approach, you are able to create as many configuration sections as you need and you are able to provide as many settings objects as you need to your application.

What do you think about it? Please let me know and drop a comment.

Environment specific configuration

Now we need to have differnt configurations per deployment environment. Let's assume we have a production, a staging and a development environment where we run our application. All this environments need another configuration, another connections string, mail settings, Azure access keys, whatever...

Let's go back to the Startup.cs to have a look into the constructor. We can use the IHostingEnvironment to load different appsettings.json files per environment. But we can do this in a pretty elegant way:

.AddJsonFile("appsettings.json")
.AddJsonFile($"appsettings.{env.EnvironmentName}.json", optional: true)

We can just load another JSON file with an environment specific name and with optional set to true. Let's say the appsettings.json contain the production and the default settings and the appsettings.Staging.json contains the staging sepcific settings. It we are running in Staging mode, the second settings file will be loaded and the existing settings will be overridden by the new one. We just need to sepcify the settings we want to override.

Setting the flag optional to true means, the settings file doesn't need to exist. Whith this approatch you can commit some default setings to the source code repository and the top secret access keys and connections string, could be stored in an appsettings.Development.json, an appsettings.staging.json and an appsettings.Production.json on the buildserver or on the webserver directly.

Conclusion

As you can see, configuration in ASP.NET Core is pretty easy. You just need to know how to do it. Because it is not directly visible in a new project, it is a bit difficult to find the way to start.

ASP.​NET Core and Angular2 - Part 1

$
0
0

Important Note: This blog series is pretty much out of date. It uses an older beta version of Angular2 and the RC2 release of ASP.NET Core. Please have a look int the new posts about Angular2 and ASP.NET Core using the latest versions:

The last weeks I played around with Angular2 in a ASP.NET Core application. To start writing Angular 2 components, it needs some preparation. In the first part of this small Angular2 series I'm going to show you how to prepare your project to start working with Angular2.

Since I'm one of the leads of INETA Germany and responsible for the speakers and the user groups, I need a small tool to manage the speakers, the groups and the events where the speakers are talking. I also want to manage and send some newsletters to the speakers and the groups.

Sure, I could use Excel and Outlook, but it seems to be too easy and I need some new challenges. This is why I want to write a small INETA Admin tool, using ASP.NET Core, Typescript and Angular 2. Maybe later I'll host it on an Azure WebSite. This is why I want to prepare the Application to work on Azure.

Prerequisites

I try to create a real single page application (SPA) what is really easy with Angular2. This is why I create an empty ASP.NET Project without any controllers, views and other stuff in it. It only contains a Startup.cs project.json and a Project_Readme.html. I'll create some API Controllers later on to provide some data to Angular2

In this and in future posts, I use some interfaces from a small library, which I always use to connect to Azure Table Storage. The first interface is the IItem to mark objects as an object to use in a GenericTableEntity. The other interface is the ITableClient which is something similar to the EntityContext, to connect to the Azure Table Storage and read objects out of it. In this posts I'll just use a mock of that interface, which will provide objects generated by GenFu.

Let's start

Lets create a new empty ASP.NET Core project. We don't need any views, but just a single Index.html in the wwwroot folder. This file will be the host of our single page application.

The nuGet dependencies

We also need some NuGet dependencies in our project:

"dependencies": {"Microsoft.AspNet.IISPlatformHandler": "1.0.0-rc1-final","Microsoft.AspNet.Server.Kestrel": "1.0.0-rc1-final","Microsoft.AspNet.Mvc": "6.0.0-rc1-final","Microsoft.AspNet.StaticFiles": "1.0.0-rc1-final","Microsoft.Extensions.CodeGenerators.Mvc": "1.0.0-rc1-final","Microsoft.Extensions.Configuration.FileProviderExtensions": "1.0.0-rc1-final","Microsoft.Extensions.Configuration.Json": "1.0.0-rc1-final","Microsoft.Extensions.Logging": "1.0.0-rc1-final","Microsoft.Extensions.Logging.Console": "1.0.0-rc1-final","Microsoft.Extensions.Logging.Debug": "1.0.0-rc1-final","GenFu": "1.0.4","Gos.Tools.Azure": "1.0.0-*","Gos.Tools.Cqs": "1.0.0-*"
},

We need MVC just for the Web API to provide the data. The StaticFiles library is needed to serve the Index.html and all the CSS, images and JavaScript files to run the SPA. We also need some logging and configuration.

  • GenFu is just used to generate some mock data.
  • Gos.Tools.Azure is the already mentioned Azure library to wrap the connection to the Azure Table Storage.
  • Gos.Tools.Cqs is a small library which provides the infrastructure to use the "Command & Query Segregation" pattern in your app. This three libraries are not yet relevant for the part one of this series.

Prepare the Startup.cs

To get the static files (Index.html, CSS, images and JavaScripts) we need to add the needed MiddleWares

app.UseDefaultFiles();
app.UseStaticFiles();

app.UseMvcWithDefaultRoute();

We also need to add MVC with the default routes to activate the Web PI. Because we'll use attribute routing, we don't need to configure a special routing here.

To enable Angular2 routing and deep links in our SPA, we need a separate error handling: In case of any 404 Exception we need to call the Index.html because the called URL could be a Angular2 route. We need to ensure the SPA host (index.html) is called to handle that route:

app.Use(async (context, next) =>
{
    await next();

    if (context.Response.StatusCode == 404 && !Path.HasExtension(context.Request.Path.Value))
    {
        context.Request.Path = "/index.html"; // Put your Angular root page here 
        await next();
    }
});

This code sets the requested path to the index.html, in case we get an 404 status and if there's no call to a file (!Path.HasExtension()) and than we start the pipeline again.

I placed this code before the previously mentioned MiddleWares to provide the static files.

I also need to add MVC to the services in the ConfigureServices method:

services.AddMvc();

bower dependencies

To get a pretty nice looking application I want to use bootstrap. I add a new bower configuration to the project:

{"name": "ASP.NET","private": true,"dependencies": {"bootstrap": "3.3.6","jquery": "2.2.2"
  }
}

After saving this file Visual Studio 2015 starts downloading the dependencies.

NPM dependencies

Now we need to add Angular2 and its dependencies and gulp to prepare our scripts. To do this, I added a NPM configuration file called package.json:

{"version": "1.0.0","name": "ASP.NET","private": true,"dependencies": {"angular2": "2.0.0-beta.11","systemjs": "0.19.24","es6-promise": "3.1.2","es6-shim": "0.35.0","reflect-metadata": "0.1.3","rxjs": "5.0.0-beta.3","zone.js": "0.6.5"
  },"devDependencies": {"gulp": "3.9.1","gulp-concat": "2.6.0","gulp-cssmin": "0.1.7","gulp-uglify": "1.5.3","rimraf": "2.5.2"
  }
}

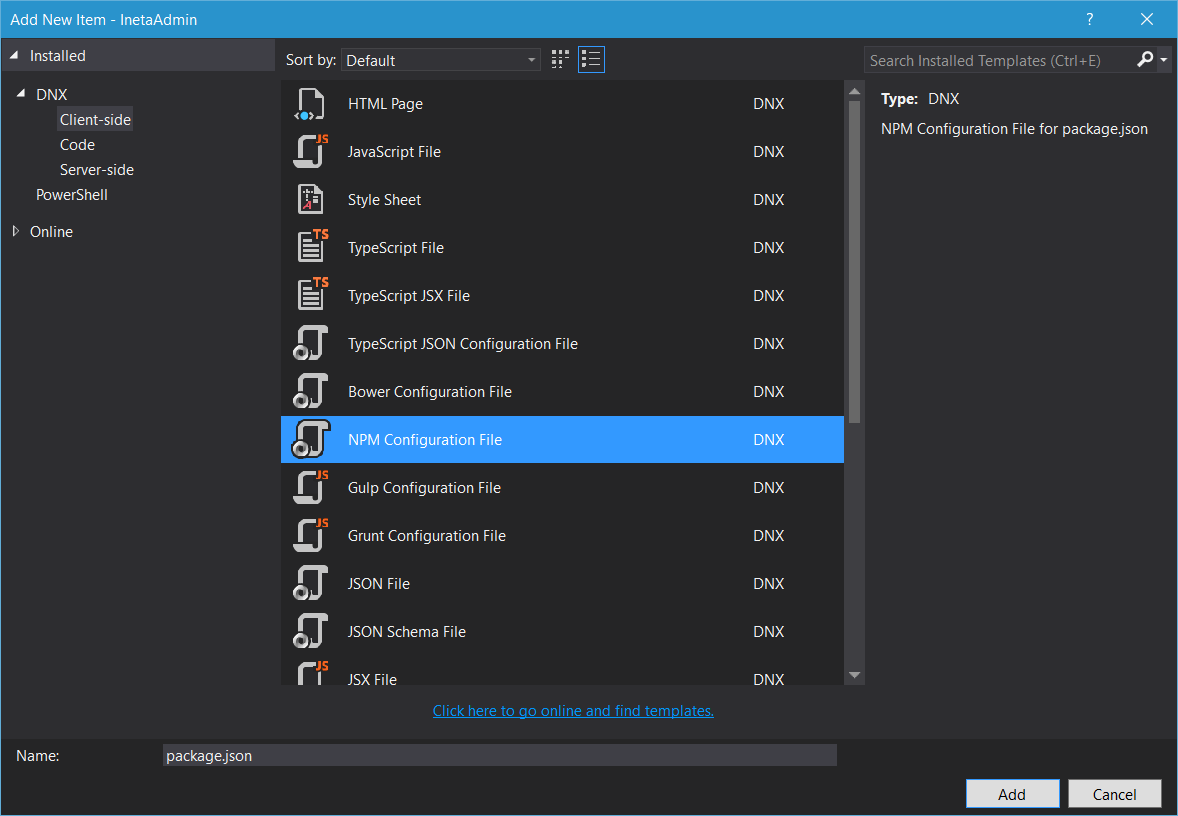
BTW: If you add a new file in Visual Studio, you can easily select predefined files for client side techniques in the "add new items" dialog:

Visual Studio 2015 also starts downloading the dependencies just after saving the file. NPM needs some more time to download all the dependencies.

Preparing the JavaScripts

Bower will load the dependencies into the lib folder in the wwwroot. NPM stores the files outside the wwwroot in the Node_Modules. We want to move just the needed files to the wwwroot, too. To get this done we use Gulp. Just create a new gulpfile.js with the "add new items" dialog and add the following lines in it:

/*
This file in the main entry point for defining Gulp tasks and using Gulp plugins.
Click here to learn more. http://go.microsoft.com/fwlink/?LinkId=518007
*/

var gulp = require('gulp');

gulp.task('default', function () {
    // place code for your default task here
});

var paths = {};
paths.webroot = "wwwroot/";
paths.npmSrc = "./node_modules/";
paths.npmLibs = paths.webroot + "lib/npmlibs/";

gulp.task("copy-deps:systemjs", function () {
    return gulp.src(paths.npmSrc + '/systemjs/dist/**/*.*', { base: paths.npmSrc + '/systemjs/dist/' })
         .pipe(gulp.dest(paths.npmLibs + '/systemjs/'));
});

gulp.task("copy-deps:angular2", function () {
    return gulp.src(paths.npmSrc + '/angular2/bundles/**/*.js', { base: paths.npmSrc + '/angular2/bundles/' })
         .pipe(gulp.dest(paths.npmLibs + '/angular2/'));
});

gulp.task("copy-deps:es6-shim", function () {
    return gulp.src(paths.npmSrc + '/es6-shim/es6-sh*', { base: paths.npmSrc + '/es6-shim/' })
         .pipe(gulp.dest(paths.npmLibs + '/es6-shim/'));

});
gulp.task("copy-deps:es6-promise", function () {
    return gulp.src(paths.npmSrc + '/es6-promise/dist/**/*.*', { base: paths.npmSrc + '/es6-promise/dist/' })
         .pipe(gulp.dest(paths.npmLibs + '/es6-promise/'));
});

gulp.task("copy-deps:rxjs", function () {
    return gulp.src(paths.npmSrc + '/rxjs/bundles/*.*', { base: paths.npmSrc + '/rxjs/bundles/' })
         .pipe(gulp.dest(paths.npmLibs + '/rxjs/'));
});

gulp.task("copy-deps", ["copy-deps:rxjs", 'copy-deps:angular2', 'copy-deps:systemjs', 'copy-deps:es6-shim', 'copy-deps:es6-promise']);

Now you can use the Task Runner Explorer in Visual Studio 2015 to run the "copy-deps" task to get the files to the right location.

Preparing the Index.html

In the header of the Index.html we just need a meaningfull title, a base href to get the Angular routing working and a refernce to the bootstrap css:

<base href="/" /><link rel="stylesheet" href="lib/bootstrap/dist/css/bootstrap.css" />

At the end of the body we need a little more. Add the following JavaScript references:

<script src="lib/npmlibs/es6-shim/es6-shim.js"></script><script src="lib/npmlibs/es6-promise/es6-promise.js"></script><script src="lib/npmlibs/systemjs/system-polyfills.src.js"></script><script src="lib/npmlibs/angular2/angular2-polyfills.js"></script><script src="lib/npmlibs/systemjs/system.src.js"></script><script src="lib/npmlibs/rxjs/Rx.js"></script><script src="lib/npmlibs/angular2/angular2.js"></script><script src="lib/npmlibs/angular2/router.js"></script><script src="lib/npmlibs/angular2/http.js"></script><script src="lib/jquery/dist/jquery.js"></script><script src="lib/bootstrap/dist/js/bootstrap.js"></script>

After that, we have to add some configuration and to initialize our Angular2 app:

<script>
    System.config({
        packages: {'app': { defaultExtension: 'js' },'lib': { defaultExtension: 'js' },
        }
    });

    System.import('app/boot')
        .then(null, console.error.bind(console));</script>

This code calls a boot.js in the folder app inside the wwwroot. This file is the Angular2 bootstrap we need to create later on.

Just after the starting body, we need to call the directive of our first Angular2 component:

<my-app>Loading...</my-app>

The string "Loading..." will be displayed until the Angular2 app is loaded. I'll show the Angular2 code a little later.

Configure TypeScript

Since the AngularJS team is using TypeScript to create Angular2, it makes a lot sence to write the app using TypeScript instead of plain JavaScript. TypeScript is an superset of JavaScript to use future technologies. TypeScript will be transpiled (translated/compiled) to JavaScript while compiling the entire application, if the TypeScript support in Visual Studio 2015 is enabled.

In some tutorials they proposed to store the TypeScript files in the wwwroot to. I prefer to work in a separate Scripts folder outside the wwwroot and to transpile the JavaScripts into the wwwroot/app folder. To do this we need a TypeScript configuration called tsconfig.json. This file tells the TypeScript compiler how to compile where to place the results:

{"compilerOptions": {"emitDecoratorMetadata": true,"experimentalDecorators": true,"module": "commonjs","noEmitOnError": true,"noImplicitAny": false,"outDir": "../wwwroot/app/","removeComments": false,"sourceMap": true,"target": "es5"
  },"exclude": ["node_modules"
  ]
}

I placed this file in a folder called scripts which is in the root of the project. I will add all the TypeScript files inside this folder.

Enable ES6

To use Ecma-Script 6 features in TypeScript we need to add the es6-shim definition to the scripts folder. Just download it from the DefinitelyTyped repository on GitHub.

That's pretty much it to start working with Angular2, TypeScript and ASP.NET Core. We haven't seen very much ASP.NET Core stuff until yet, but we will see some more things in one of the next posts about it.

Let's create the first app.

No we have the project set up, to write write Angular2 components using TypeScript and to use the transpiled code in the Index.html, which hosts the app.

As already mentioned we first need to bootstrap the application. I did this by creating a file called boot.ts inside the scripts folder. This files contains just four lines of code:

///<reference path="../node_modules/angular2/typings/browser.d.ts"/>
import {bootstrap}              from 'angular2/platform/browser'
import {AppComponent}           from './app'

bootstrap(AppComponent);

It references and imports the angular2/plattform/browser component and the AppComponent which needs to be created in the next step.

The last line starts the Angular2 App by passing the root component to the bootstrap method.

The AppComponent is in another TypeScript file called app.ts:

import {Component} from 'angular2/core';

@Component({
    selector: 'my-app',
    template: '<p>{​{Title}​}</p>'
})
export class AppComponent {
    Title: string;

    constructor() {
        this.Title = 'Hello World';
    }    
}

This pretty simple component just defines the directive we already used in the Index.html and it contains a simple template. Instead if the string "Loading..." we should see the "Hello World" in the browser after compiling and running the application.

Pressing F5 should compile the ASP.NET Core application and transpile the TypeScript code. In case of compilation errors, we will see the TypeScript errors too. This is very helpful.

If the compilation is done and we still don't see any results, we should have a look into the development console in the browser. Angular2 logs pretty detailed information about problems on the client.

Conclusion

This is just a simple "Hello World" example, but this will show you whether the configuration is working or not.

If this is done and if all is working we can start creating some more complex things. But let me show this in another blog post.

ASP.​NET Core and Angular2 - Part 2

$
0
0

Important Note: This blog series is pretty much out of date. It uses an older beta version of Angular2 and the RC2 release of ASP.NET Core. Please have a look int the new posts about Angular2 and ASP.NET Core using the latest versions:

In the last post, I prepared a ASP.NET Core project to use and build TypeScript and to host a Angular2 single page application. Now, in this second part of the ASP.NET Core and Angular2 series, I'm going to prepare the ASP.NET Core Web API to provide some data to Angular2.

I really like to separate the read and the write logic, to optimize the read and the write stuff in different ways and to keep the code clean and simple. To do this I use the "Command & Query Segregation" pattern and a small library I wrote, to support this pattern. This library provides some interfaces, a QueryProcessor to delegate the queries to the right QueryHandler and a CommandDispatcher to get the right CommandHandler for the specific command.

I also like to use the Azure Table Storage, which is a pretty fast NoSQL storage. This makes sense for the current application, because the data wont change so much. I'll write one or two newsletter per month. I add maybe three events per month, maybe two user groups per year and maybe one speaker every two months. I'll use four tables in the Azure Table Storage: Newsletters, Speakers, Usergroups and Events. The Events table is more like a relation table between the user group and a speaker, containing the date, a title and a short description. This is not an event database for all of the user group events, but a table to store the events, we have to pay travel expenses for the specific speaker.

I'll write a little more in detail about the "Command & Query Segregation" and the Azure Table Storage Client in separate posts. In this post, you'll see the IQueryProcessor and the ICommandDispatcher used in the API controller and simple Query and Command classes which are passed to that services. The queries and the commands will be delegated to the right handlers, which I need to implement and which will contain my business logic. Please look in the GitHub repository to see more details about the handlers. (The details about getting the data from the data source is not really relevant in this post. You are able to use use any data source you want.)

This CQS engine is configured in the Startup.cs by calling services.AddCqsEngine();

services.AddCqsEngine(s =>
{
    s.AddQueryHandlers();
    s.AddCommandHandlers();
});

Registering the handlers in this lambda is optional, but this groups the registration a little bit. I'm also able to register the Handlers directly on the services object.

The methods used to register the Handlers are ExtensionMethods on the ServiceCollection, to keep the Startup.cs clean. I do all the handler registrations in this ExtensionMethod:

public static class ServiceCollectionExtensions
{
    public static IServiceCollection AddQueryHandlers(this IServiceCollection services)
    {
        services.AddTransient<IHandleQueryAsync<AllSpeakersQuery, IEnumerable<Speaker>>, AllSpeakersQueryHandler>();
        services.AddTransient<IHandleQueryAsync<SpeakerByIdQuery, Speaker>, SpeakerByIdQueryHandler>();

        services.AddTransient<IHandleQueryAsync<AllEventsQuery, IEnumerable<Event>>, AllEventsQueryHandler>();
        services.AddTransient<IHandleQueryAsync<EventByIdQuery, Event>, EventByIdQueryHandler>();

        // and many more registrations
        
        return services;
    }
}

The Web API

To provide the fetched data to the Angular2 SPA, I want to use a Web API which is now completely included in ASP.NET Core MVC. Right click the Controllers folder and add a new item. Select "Server-side" and than the "Web API Controller Class". I called it SpeakersController:

[Route("api/[controller]")]
public class SpeakersController : Controller
{
    private readonly IQueryProcessor _queryProcessor;
    private readonly ICommandDispatcher _commandDispatcher;

    public SpeakersController(
        IQueryProcessor queryProcessor,
        ICommandDispatcher commandDispatcher)
    {
        _queryProcessor = queryProcessor;
        _commandDispatcher = commandDispatcher;
    }

    [HttpGet]
    public async Task<IEnumerable<Speaker>> Get()
    {
        var query = new AllSpeakersQuery();
        var speakers = await _queryProcessor.ProcessAsync(query);
        return speakers;
    }

    [HttpGet("{id}")]
    public async Task<Speaker> Get(Guid id)
    {
        var query = new SpeakerByIdQuery(id);
        var speakers = await _queryProcessor.ProcessAsync(query);
        return speakers;
    }

    [HttpPost]
    public async void Post([FromBody]Speaker value)
    {
        var command = new InsertSpeakerCommand(value);
        await _commandDispatcher.DispatchCommandAsync(command);
    }
        
    [HttpPut("{id}")]
    public async void Put(int id, [FromBody]Speaker value)
    {
        var command = new UpdateSpeakerCommand(id, value);
        await _commandDispatcher.DispatchCommandAsync(command);
    }
    [HttpDelete("{id}")]
    public async void Delete(int id)
    {
        var command = new DeleteSpeakerCommand(id);
        await _commandDispatcher.DispatchCommandAsync(command);
    }
}

As you can see in the Controller, I injected a IQueryProcessor and a ICommandDispatcher and I use this services by creating a query or a commend and passed it to the DispatchAsync or ProcessAsync methods

The client side

Ho does it look like to access the Web APIs with Angular2?

First I need to create a service in Angular2. This Service is also a component and exactly this is what I really love with Angular2: Everything is a component and just needs to be stacked together :)

I create a Angular2 service for every entity in the project. First I need to import some Angular2 modules:

  • Http is to call remote resources.
  • Headers need to be send additionally to the server.
  • And we need to work with Responses and RequestsOptions.
  • We get an Observable type from the Http service
  • and we have to import our Speaker type:
import {Injectable, Component} from 'angular2/core';
import {Http, Response, HTTP_PROVIDERS, Headers, RequestOptions} from 'angular2/http';
import {Observable} from 'rxjs/Observable';

import {Speaker} from './speaker';

@Component({
    providers: [Http]
})
@Injectable()
export class SpeakerService {

    constructor(private _http: Http) { }

    private _speakersUrl: string = '/api/speakers/';

	// methods to access the data
}

The Http service gets injected via the constructor and can be used like this:

getSpeakers() {
    let data: Observable<Speaker[]> = this._http.get(this._speakersUrl)
        .map(res => <Speaker[]>res.json())
        .catch(this.handleError);

    return data;
}

getSpeaker(id: string) {
	let data: Observable<Speaker> = this._http.get(this._speakersUrl + id)
        .map(res => <Speaker>res.json())
        .catch(this.handleError);

    return data;
}

private handleError(error: Response) {
    console.error(error);
    return Observable.throw(error.json().error || 'Server error');
}

In both public methods we return an Observable object, which needs special handling in the specific consuming component, because all requests to the server are async. To consume the data, I need to subscribe to that Observable:

this._speakerService.getSpeakers()
    .subscribe(
        speakers => this.speakers = speakers,
        error => this.errorMessage = <any>error);

Subscribe calls the first delegate in case of success and assigns the speaker to the property of the current component. In case of errors the second delegate is executed and the error object gets assigned to the error property.

This is how a complete Angular2 speaker list component looks like:

import {Component, OnInit} from 'angular2/core';
import {HTTP_PROVIDERS} from 'angular2/http';
import {ROUTER_DIRECTIVES} from 'angular2/router';

import {Speaker} from './speaker';
import {SpeakerService} from './speaker.service';

@Component({
    selector: 'speakers-list',
    templateUrl: 'app/speaker/speakers-list.template.html',
    directives: [
        ROUTER_DIRECTIVES
    ],
    providers: [SpeakerService, HTTP_PROVIDERS]
})
export class SpeakersListComponent implements OnInit {

    constructor(private _speakerService: SpeakerService) { }

    speakers: Speaker[];
    errorMessage: any;

    ngOnInit() {
        this._speakerService.getSpeakers()
            .subscribe(
                speakers => this.speakers = speakers,
                error => this.errorMessage = <any>error);
    }
}

To save an entity, I use the post or put method on the Http object, I need to specify the content type and to add the data to the body:

saveSpeaker(speaker: Speaker) {

    let body = JSON.stringify(speaker);

    let headers = new Headers({ 'Content-Type': 'application/json' });
    let options = new RequestOptions({ headers: headers });

    let temp = this._http.post(this._speakersUrl, body, options)
        .map(res => console.info(res))
        .catch(this.handleError);
}

Conclusion

That's about how I provide the data to the client. Maybe the CQS part is not really relevant for you, but this is the way how I usually create the back-ends in my personal projects. The important part is the Web API and only you know the way how you need to access your data inside your API Controller. ;)

In the next blog post, I'm going to show you how I organize the Angular2 app and how I use the Angular2 routing to navigate between different components.

ASP.​NET Core and Angular2 - Part 3

$
0
0

Important Note: This blog series is pretty much out of date. It uses an older beta version of Angular2 and the RC2 release of ASP.NET Core. Please have a look int the new posts about Angular2 and ASP.NET Core using the latest versions:

In the second part of this ASP.NET Core and Angular2 series, I wrote about the back-end to provide the data to the Angular2 Application. In this third part, I'm going to show you how the app is structured and how I used routing to navigate between the different components.

The components

Components in Angular2 in general are ordered hierarchically. You have a root component which is bootstrapped in the HTML page and which hosts the app. As you can see in part one of this series, the index.html calls the app bootstrap and the bootstrap method gets the AppComponent passed in.

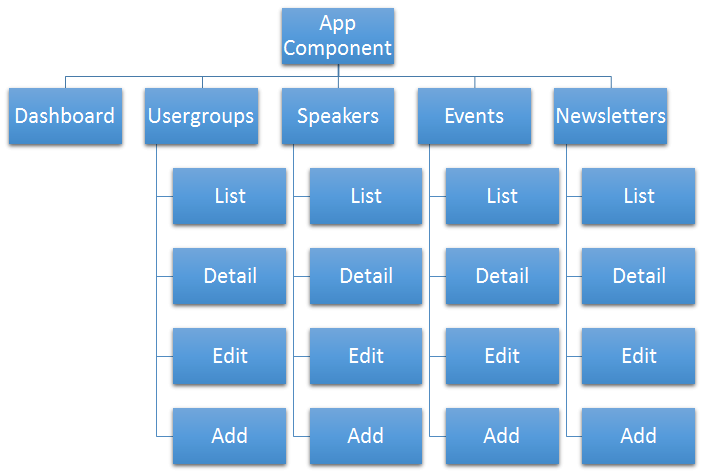
I created five sub-components for the INETA Database:

  1. Dashboard to quick access some most used features
  2. The speakers area
  3. The user groups area
  4. The events area
  5. And the newsletter management

Except the dashboard, all of this sub-components also have sub-components for the CRUD operations:

  1. List
  2. Detail
  3. Add
  4. Edit

(It's not CRUD, but CRU: create, read, update. Delete an item doesn't need a separate view or a separate component.)

With this structure we get a hierarchy of three levels:

Templates used

Level 1 and level 2 doesn't contain any logic. The classes are completely empty. Only the AppComponent, the Dashboard and all of the third level components need a detailed view. The AppComponent view provides the main navigation and a <router-outlet> directive to place the result of the routing. The Dashboard contains a link list to the most used feature. And all of the third level components use a detailed template.

@Component({
    selector: 'speakers-list',
    templateUrl: 'app/speaker/speakers-list.template.html',
    directives: [
        ROUTER_DIRECTIVES
    ],
    providers: [SpeakerService, HTTP_PROVIDERS]
})
export class SpeakersListComponent implements OnInit {
	// add logic here
}

The other second level components have an inline template, which is just the <router-outlet> directive to place the results of their routes:


@Component({
    selector: 'speakers',
    template: `<router-outlet></router-outlet>
    `,
    directives: [
        ROUTER_DIRECTIVES
    ]
})
export class SpeakersComponent { } // doesn't need any logic here

All the detail templates are in separate HTML files, which are directly stored in the /wwwroot/app/ folder in a similar sub folder structure than the components.

routing

Since I'm planning a single page application (SPA) it is pretty clear that I should use routing to navigate between the different areas.

The routes between the second level components are defined in the AppComponent:

// ...

import {Dashboard} from './Dashboard/dashboard.component';
import {SpeakersComponent} from './Speaker/speakers.component';
import {UsergroupsComponent} from './Usergroup/usergroups.component';
import {EventsComponent} from './Event/events.component';
import {NewsletterComponent} from './Newsletter/newsletters.component';

@Component({
    // ...
})
@RouteConfig([
    { path: '/Dashboard', name: 'Dashboard', component: Dashboard, useAsDefault: true },
    { path: '/Speakers/...', name: 'Speakers', component: SpeakersComponent },
    { path: '/Usergroups/...', name: 'Usergroups', component: UsergroupsComponent },
    { path: '/Events/...', name: 'Events', component: EventsComponent },
    { path: '/Newsletter/...', name: 'Newsletter', component: NewsletterComponent },
])
export class AppComponent {}

The route to the dashboard is configured as the default route. With this configuration the URL in the browsers address bar changes immediately to /dashboard when I call this app. The other routes contain three dots (/...) in the path. This is needed, because I want to configure child-routing in the second level components, otherwise child-routing is not possible. All the routes are named and bound to a component. In the templates, the links to the different app areas are created by using the routes with their names:

<ul class="nav navbar-nav"><li><a href="" [routerLink]="['Speakers']">Speakers</a></li><li><a href="" [routerLink]="['Usergroups']">Usergroups</a></li><li><a href="" [routerLink]="['Events']">Events</a></li><li><a href="" [routerLink]="['Newsletter']">Newsletter</a></li></ul>

Inside the second level child-components, I need to access the third level components. This is why I need to configure child-routing inside this components. This child-routing looks a little bit different, because I need to pass entity identifiers to the detail view, or to the edit view component:

// ..

import {SpeakersListComponent} from './speakers-list.component';
import {SpeakersDetailComponent} from './speakers-detail.component';
import {SpeakersEditComponent} from './speakers-edit.component';
import {SpeakersAddComponent} from './speakers-add.component';

@Component({
    // ...
})
@RouteConfig([
    { path: '/', name: 'SpeakersList', component: SpeakersListComponent, useAsDefault: true },
    { path: '/:id', name: 'Speaker', component: SpeakersDetailComponent },
    { path: '/Add', name: 'NewSpeaker', component: SpeakersAddComponent },
    { path: '/Edit/:id', name: 'EditSpeaker', component: SpeakersEditComponent }
])
export class SpeakersComponent { }

The :id tells the route engine, that this is a named placeholder, where we can pass any value (This looks familiar, if you know the ASP.NET MVC routing). The routes are named and bound to the third level components. In this case, the routes to the list components are configured as default routes.

Using the routes in the templates of the specific component, where the route is configured is as easy as shown in the code samples above. But how does it look like, if I need to use a route outside the current context? From the dashboard, I directly want to link to the components to add new entities.

If you carefully read the documentation, you'll see that you can use the herarchy of the reoutes to use it:

<div class="list-group"><a href="" [routerLink]="['Speakers', 'NewSpeaker']" class="list-group-item">Neuen Speaker anlegen</a><a href="" [routerLink]="['Usergroups', 'NewUsergroup']" class="list-group-item">Neue Usergroup anlegen</a><a href="" [routerLink]="['Events', 'NewEvent']" class="list-group-item">Neues Event anlegen</a><a href="" [routerLink]="['Newsletter', 'NewNewsletter']" class="list-group-item">Neuen Newsletter anlegen</a></div>

The syntax is like this:

['base-route-name', 'child-route-name', 'grant-child-route-name', 'and-so-on-route-name']

The templates

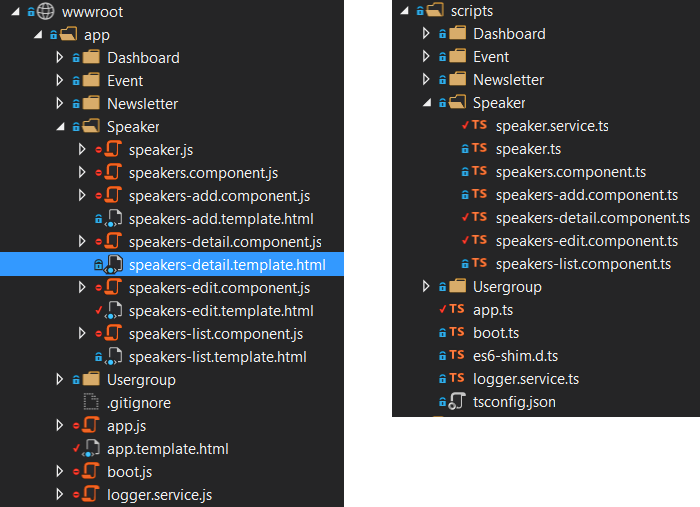
Each of the third level components (even the Dashboard and the root component) are using detailed templates stored in HTML files in the /wwwroot/app/ folder in the same structure as the TypeScript files in the scripts folder. After compiling the TypeScript code, the transpiled JavasSripts are directly beneath the templates:

I don't want to go deep into the templates and binding stuff, but only show you two of the templates. For more details about the bindings, just visit the Angular2 documentation on http://angular.io/

This is the template of the speakers list:

<h1>All speakers</h1><div class="row"><div class="col-md-12"><ul class="list-group"><li class="list-group-item"><span>&nbsp;</span><a href="" [routerLink]="['NewSpeaker']" 
                    class="btn btn-primary btn-xs pull-right">
                    Add new speaker</a></li><li *ngFor="#speaker of speakers" class="list-group-item"><a href="" [routerLink]="['Speaker', {id: speaker.Id}]"></a><a href="" class="btn btn-danger btn-xs pull-right">
                    Delete</a><a href="" [routerLink]="['EditSpeaker', {id: speaker.Id}]" 
                    class="btn btn-primary btn-xs pull-right">
                    Edit</a></li><li class="list-group-item"><span>&nbsp;</span><a href="" [routerLink]="['NewSpeaker']" 
                    class="btn btn-primary btn-xs pull-right">
                    Add new speaker</a></li></ul></div></div>

This templates shows mustache syntax to write out the values of the FirstName and the LastName. This is called "interpolation" and it is a one way binding in the direction from the component to the template.

This templates also uses the routing to create link to the edit view or to the add view. You'll also find the *ngFor, which is the same as the old ng-for. It defines a template to repeat for each item of the speakers. That item will be directly assigned to the variable #speaker

The concepts here are pretty similar to old Angular.JS. Because of the new binding concept, the forms are a bit different:

<h1>Edit speaker</h1><form class="form-horizontal"><div class="form-group"><label for="FirstName" class="col-sm-2 control-label">Firstname</label><div class="col-sm-10"><input id="FirstName" class="form-control" 
                [(ngModel)]="speaker.FirstName" /></div></div><div class="form-group"><label for="LastName" class="col-sm-2 control-label">LastName</label><div class="col-sm-10"><input id="LastName" class="form-control" 
                [(ngModel)]="speaker.LastName" /></div></div><!-- some more fields here--><div class="form-group"><div class="col-sm-offset-2 col-sm-10"><a class="btn btn-default" href="" 
                [routerLink]="['Speaker', {id: speaker.Id}]">Cancel</a><button type="submit" class="btn btn-primary" 
                (click)="saveSpeaker(speaker)">Save</button></div></div></form>

In this template we use different types of binding. The "banana in the box" syntax ([()] called like this by John Papa) defines a two-way binding, which should to be used in forms, to send the users input to the component. For the events we have a one-way binding from the template to the component. This direction is only used for events like this. This is used on the save button.

Conclusion

I'm not completely done with the implementation currently. But I was pretty surprised about how fast I got a running app. Development is pretty fast with Angular2 and you get the first results faster than using the old Angular.JS. Even TypeScript is cool and feels familiar to a C# developer. I'm looking foreward to do a real project with Angular2, TypeScript and ASP.NET Core.

To learn more about the data binding, read excellent the tutorials on http://angular.io/. Another great resource to learn more about Angular2, are the video courses by John Papa on PluralSight.

If you want to go to the details of the INETA Database, please have a look into the GitHub Repository.

An update to the ASP.NET Core & Angular2 series

$
0
0

There was a small but critical mistake in the last series about ASP.NET Core and Angular2. Debugging in the Browser is not possible the way I configured the solution. Fortunately it is pretty simple to fix this problem.

Modern web browsers support debugging typescript sources while running JavaScript. This is a pretty useful browser magic. This works, because there is a mapping file, which contains the info about which line of JavaScript points to the specific line in the TypeScript file. This mapping file is also created by the TypeScript compiler and stored in the output folder.

In my blog series about ASP.NET Core and Angular2, I placed the TypeScript file in a folder called scripts in the root of the project, but outside the wwwroot folder. This was a mistake, because the browsers found the JavaScript and the mapping files, but they didn't find the TapeScript files. Debugging in the browser was not possible with this configuration.

To fix this, I copied all the files inside the scripts folder to the folder /wwwroot/app/

I also needed to change the "outDir" in the tsconfig.json to point to the current directory:

{"compilerOptions": {"emitDecoratorMetadata": true,"experimentalDecorators": true,"module": "commonjs","noEmitOnError": true,"noImplicitAny": false,"outDir": "./","removeComments": false,"sourceMap": true,"target": "es5"
  },"exclude": ["node_modules"
  ]
}

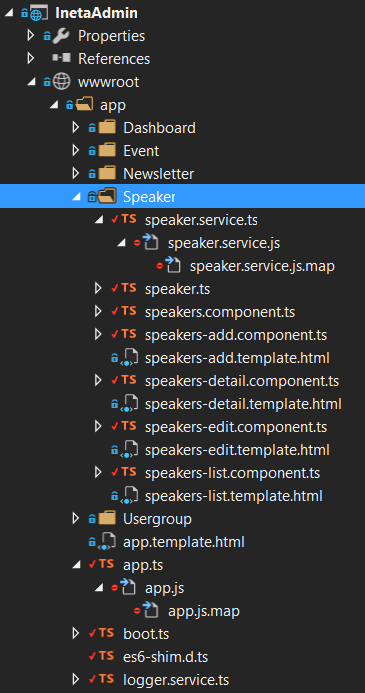
The result looks like this now:

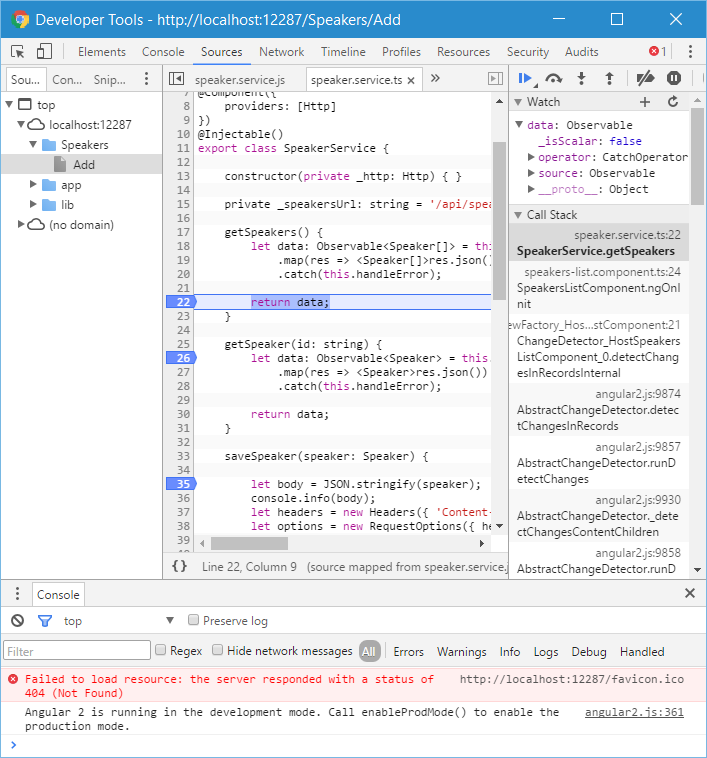
My first Idea was to separate the sources from the output, but I forgot about client side debugging of the TypeScript sources. By making the TypeScript file available to the browsers, I' now able to debug TypeScript in the browsers:

Thanks to Fabian Gosebrink, who points me to that issue. We discussed about that, when we was on the way to the Microsoft Community Open Day 2016 (COD16) in Munich this year.

Finally we got sort of dates

$
0
0

Every time I watch the ASP.NET Community stand-up, I was pretty curious about the delivery date of ASP.NET Core RC2 and RTM. Last Scott Hunter wrote about the status and the road-map of .NET Core and the tooling around it.

  • In the middle of May
    • .NET Core and ASP.NET Core will be RC2
    • The tooling will be in Preview 1
  • By the end of June
    • .NET Core and ASP.NET Core will be RTM
    • The tooling will be in Preview 2

The tooling will be RTM with Visual Studio "15"

Read lot more about it in Scott Hunters post about the Improvements, Schedule and Roadmap of .NET Core.

.NET Core 1.0 RTM and ASP.​NET Core 1.0 RTM was announced

$
0
0

Finally we get .NET Core 1.0 RTM and ASP.​NET Core 1.0 RTM. Yesterday Microsoft announces the release of .NET Core 1.0 and ASP.​NET Core 1.0.

Scott Hanselman posted a great summery about it: .NET Core 1.0 is now released! You'll find more detailed information about .NET Core 1.0 on the .NET Blog in the Post "Announcing .NET Core 1.0" and pretty much detailed information about ASP.​NET Core 1.0 in the .NET Web Development and Tools Blog in the post "Announcing ASP.NET Core 1.0"

Updating exiting .NET Core RC applications to the RTM, needs some attention. (Not as much as from RC1 to RC2, but there is a little bit to do). First of all: The Visual Studio 2015 Update 3 is needed, as pretty much mentioned in all of the Blog posts. To learn more about the need things to do, Rick Strahl posted a great and pretty detailed post about updating an existing application: Upgrading to ASP.NET Core RTM from RC2


How to continuously deploy a ASP.​NET Core 1.0 web app to Microsoft Azure

$
0
0

We started the first real world project with ASP.NET Core RC2 a month ago and we learned a lot of new stuff around ASP.NET Core

  • Continuous Deployment to an Azure Web App
  • Token based authentication with Angular2
  • Setup Angular2 & TypeScript in a ASP.NET Core project
  • Entity Framework Core setup and initial database seeding

In this post, I'm going to show you how we setup a continuous deployment stuff for a ASP.NET Core 1.0 project, without tackling TypeScript and Angular2. Please Remember: The tooling around .NET Core and ASP.NET Core is still in "preview" and will definitely change until RTM. I'll try to keep this post up-to-date. I wont use the direct deployment to an Azure Web App from a git repository because of some reasons, I [mentioned in a previous post] .

I will write some more lines about the other learned stuff in one of the next posts.

Let's start with the build

Building is the easiest part of the entire deployment process. To build a ASP.NET Core 1.0, solution you are able to use MSBuild.exe. Just pass the solution file to MSBuild and it will build all projects in the solution.

The *.xproj files use specific targets, which will wrap and use the dotnet CLI. You are also able to use the dotnet CLI directly. Just call dotnet build for each project, or just simpler: call dotnet build in the solution folder and the tools will recursively go threw all sub-folders, to look for project.json files and build all the projects in the right build order.

Usually I define an output path to build all the projects into a specific folder. This makes it a lot easier for the next step:

Test the code

Some months ago, I wrote about unit testing DNX libraries (Xunit, NUnit). This didn't really change in .NET Core 1.0. Depending on the Test Framework, a test library could be a console application, which can be called directly. In other cases the test runner is called, which gets the test libraries passed as arguments. We use NUnit to create our unit tests, which doesn't provide a separate runner yet for .NET Core. All of the test libraries are console apps and will build to a .exe file. So we are searching the build output folder for our test libraries and call them one by one. We also pass the test output file name to that libraries, to get detailed test results.

This is pretty much all to run the unit tests.

Throw it to the clouds

Deployment was a little more tricky. But we learned how to do it, from the Visual Studio output. If you do a manual publish with Visual Studio, the output window will tell you how the deployment needs to be done. This are just two steps:

###1. publish to a specific folder using the "dotnet publish" command We are calling dotnet publish with this arguments:

Shell.Exec("dotnet", "publish \"" + webPath + "\" --framework net461 --output \"" + 
    publishFolder + "\" --configuration " + buildConf, ".");
  • webPath contains the path to the web project which needs to be deployed
  • publishFolder is the publish target folder
  • buildConf defines the Debug or Release build (we build with Debug in dev environments)

###2. use msdeploy.exe to publish the complete publish folder to a remote machine. The remote machine in our case, is an instance of an Azure Web App, but could also be any other target machine. msdeploy.exe is not a new tool, but is still working, even with ASP.NET Core 1.0.

So we just need to call msdeploy.exe like this:

Shell.Exec(msdeploy, "-source:contentPath=\"" + publishFolder + "\" -dest:contentPath=" + 
    publishWebName + ",ComputerName=" + computerName + ",UserName=" + username + ",Password=" + publishPassword + ",IncludeAcls='False',AuthType='Basic' -verb:sync -" + "enablerule:AppOffline -enableRule:DoNotDeleteRule -retryAttempts:20",".")
  • msdeploy containes the path to the msdeploy.exe which is usually C:\Program Files (x86)\IIS\Microsoft Web Deploy V3\msdeploy.exe.
  • publishFolder is the publish target folder from the previous command.
  • publishWebName is the name of the Azure Web App name, which also is the target content path.
  • computername is the name/URL of the remote machine. In our case "https://" + publishWebName + ".scm.azurewebsites.net/msdeploy.axd"
  • username and password are the deployment credentials. the password is hashed, as in the publish profile that you can download from Azure. Just copy paste the hashed password.

conclusion

I didn't mention all the work that needs to be done to prepare the web app. We also use Angular2 with TypeScript. So we also need to get all the NPM dependencies, we need to move the needed files to the wwwroot folder and we need to bundle and to minify all the JavaScript files. This is also done in our build & deployment chain. But in this post, it should be enough to describe just the basic steps for a usual ASP.NET Core 1.0 app.

Writing blog posts using Pretzel

$
0
0

Until yet I wrote more than 30 blog posts with Pretzel and it works pretty well. From my current perspective it was a good decision, to do this huge change, to move to that pretty cool and lightweight system.

I'm using MarkdownPad 2 to write the posts. Writing goes much easier. The process is now simplified and publishing is almost automated. I also added my blog CSS to that editor to have a nice preview.

The process of writing and publishing new posts goes like this:

  1. Creating a new draft article and save it in the _drafts folder
  2. Working on that draft
  3. Move the finished article to the _posts folder
  4. Commit and push that post to GitHub
  5. Around 30 seconds later the post is published on Azure

This process allows me to write offline in the train, while traveling to the Office in Basel. This is the most important thing to me.

The other big change, was switching to English. I now get more readers and feedback from around the world. Now the most readers are from the US, UK, India and Russia. But also from the other European countries, Australia, Middle East (and Cluj in Romania).

Maybe I lost some readers from the German speaking Area (Germany, Switzerland and Austria) who liked to read my posts in German (I need to find a good translation service to integrate) and I got some more from around the world.

Writing feels good in both, English and in the MarkdownPad :) From my perspective it was a good decision to change the blog system and even the language.

to learn more about Pretzel, have look into my previous post about using pretzel.

How web development changed for me over the last 20 years

$
0
0

The web changed pretty fast within the last 20 years. More and more logic moves from the server side to the client side. More complex JavaScript needs to be written on the client side. And something freaky things happened the last years: JavaScript was moving to the server and Web technology was moving to the desktop. That is nothing new, but who was thinking about that 20 years ago?

The web changed, but also my technology stack. It seems my stack changed back to the roots. 20 years ago, I started with HTML and JavaScript, moving forward to classic ASP using VBScript. In 2001 I started playing around with ASP.NET and VB.NET and used it in in production until the end of 2006. In 2007 I started writing ASP.NET using C#. HTML and JavaScript was still involved, but more or less wrapped in third party controls and jQuery was an alias for JavaScript that time. All about JavaScript was just jQuery. ASP.NET WebForms felled pretty huge and not really flexible, but it worked. Later - in 2010 - I also did many stuff with SilverLight, WinForms, WPF.

ASP.NET MVC came up and the web stuff starts to feel little more naturally again, than ASP.NET WebForms. From an ASP.NET developer perspective, the web changed back to get better, more clean, more flexible, more lightweight and even more naturally.

But there was something new coming up. Things from outside the ASP.NET world. Strong JavaScript libraries, like KnockOut, Backbone and later on Angular and React. The First Single Page Application frameworks (sorry, I don't wanted to mention the crappy ASP.NET Ajax thing...) came up, and the UI logic moves from the server to the client. (Well, we did a pretty cool SPA back in 2005, but we didn't thought about to create a framework out of it.)

NodeJS change the world again, by using JavaScript on the server. You just need two different languages (HTML and JavaScript) to create cool web applications. I didn't really care about NodeJS, except using it in the back, because some tools are based on it. Maybe that was a mistake, who knows... ;)

Now we got ASP.NET Core, which feels a lot more naturally than the classic ASP.NET MVC.

Naturally in this case means, it feels almost the same as writing classic ASP. It means using the stateless web and working with the stateless web, instead of trying to fix it. Working with the Request and Response more directly, than with the classic ASP.NET MVC and even more than in ASP.NET WebForms. It doesn't mean to write the same unstructured, crappy shit than with classic ASP. ;)

Since we got the pretty cool client side JavaScript frameworks and simplified, minimalistic server side frameworks, the server part was reduced to just serve static files and to serve data over RESTish services.

This is the time where it makes sense to have a deeper look into TypeScript. Until now it didn't makes sense to me. I was writing JavaScript for around 20 years, more and less complex scripts, but I never wrote so much JavaScript within a single project, than as I started using AngularJS last years. Angular2 also was the reason to have a deep look into TypeScript, 'cause now it is completely written in Typescript. And it makes absolutely sense to use it.

A few weeks ago I started the first real NodeJS project. A desktop application which uses NodeJS to provide a high flexible scripting run-time for the users. NodeJS provides the functionality and the UI to the users. All written in TypeScript, instead of plain JavaScript. Why? Because TypeScript has a lot of unexpected benefits:

  • You are still able to write JavaScript ;)
  • It helps you to write small modules and structured code
  • it helps you to write NodeJS compatible modules
  • In general you don't need to write all the JavaScript overhead code for every module
  • You will just focus on the features you need to write

This is why TypeScript got a great benefit to me. Sure a typed language is also useful in many cases, but - working with JS for 20 years - I also like the flexibility of the implicit typed JavaScript and I'm pretty familiar with it. that means, from my perspective the Good thing about TypeScript is, I am still able to write implicit typed code in TypeScript and to use the flexibility of JavaScript. This is why I wrote "You are still able to write JavaScript"

The web technology changed, my technology stack changed and the tooling changed. All the stuff goes more lightweight, even the tools. The console comes back and the IDEs changed back to the roots: Just being text editors with some benefits like syntax highlighting and IntelliSense. Currently I prefer to use the "Swiss army knife" Visual Studio Code or Adobe Brackets, depending on the type of project. Both are starting pretty fast and include nice features.

Using that light weight IDEs is pure fun. Everything is fast, because the machines resource could be used by the apps I need to develop, instead by the IDE I need to use to develop the apps. This makes development a lot faster.

Starting the IDE today means, starting cmder (my favorite console on windows). changing to the project folder, starting a console command to watch the typescript files, to compile after save. Starting another console to use the tools like NPM, gulp, typings, dotnet CLI, NodeJS, and so on. Starting my favorite light weight editor to write some code. :)

Working with user secrets in ASP.​NET Core applications.

$
0
0

In the past there was a study about critical data in GitHub projects. They wrote a crawler to find passwords, user names and other secret stuff in projects on GitHub. And they found a lot of such data in public projects, even in projects of huge companies, which should pretty much care about security.

The most of this credentials are stored in .config files. For sure, you need to configure the access to a database somewhere, you also need to configure the credentials to storages, mail servers, ftp, what ever. In many cases this credentials are used for development, with lot more rights than the production credentials.

Fact is: Secret information shouldn't be pushed to any public source code repository. Even better: not pushed to any source code repository.

But what is the solution? How should we tell our app where to get this secret information?

On Azure, you are able to configure your settings directly in the application settings of your web app. This overrides the settings of your config file. It doesn't matter if it's a web.config or an appsettings.json.

But we can't do the same on the local development machine. There is no configuration like this. How and where do we save secret credentials?

With .Core, there is something similar now. There is a SecretManager tool, provided by the .NET Core SDK (Microsoft.Extensions.SecretManager.Tools), which you can access with the dotnet CLI.

This tool stores your secrets locally on your machine. This is not a high secure password manager like keypass. It is not really high secure, but on your development machine, it provides the possibility NOT to store your secrets in a config file inside your project. And this is the important thing here.

To use the SecretManager tool, you need to add that tool in the "Tools" section of your project.json, like this:

"Microsoft.Extensions.SecretManager.Tools": {"version": "1.0.0-preview2-final","imports": "portable-net45+win8+dnxcore50"
},

Be sure you have a userSecretsId in your project.json. With this ID the SecretManager tool assigns the user secrets to your app:

"userSecretsId": "aspnet-UserSecretDemo-79c563d8-751d-48e5-a5b1-d0ec19e5d2b0",

If you create a new ASP.NET Core project with Visual Studio, the SecretManager tool is already added.

Now you just need to access your secrets inside your app. In a new Visual Studio project, this should also already done and look like this:

public Startup(IHostingEnvironment env)
{
    _hostingEnvironment = env;

    var builder = new ConfigurationBuilder()
        .SetBasePath(env.ContentRootPath)
        .AddJsonFile("appsettings.json", optional: true, reloadOnChange: true)
        .AddJsonFile($"appsettings.{env.EnvironmentName}.json", optional: true);

    if (env.IsDevelopment())
    {
        // For more details on using the user secret store see 
        // http://go.microsoft.com/fwlink/?LinkID=532709
        builder.AddUserSecrets();

        // This will push telemetry data through Application 
        // Insights pipeline faster, allowing you to view results 
        // immediately.
        builder.AddApplicationInsightsSettings(developerMode: true);
    }

    builder.AddEnvironmentVariables();
    Configuration = builder.Build();
}

If not arr a NuGet reference to Microsoft.Extensions.Configuration.UserSecrets 1.0.0 in your project.json and add builder.AddUserSecrets(); as shown here.

The Extension Method AddUserSecrets() loads the secret information of that project into the ConfigurationBuilder. If the keys of the secrets are equal to the keys in the previously defined appsettings.json, the app settings will be overwritten.

If this all is done you are able to use the tool to store new secrets:

dotnet user-secrets set key value

If you create a separate section in your appsettings.config as equal to the existing settings, you need to combine the user secret key with the sections name and the settings name, separated by a colon.

I created settings like this:

"AppSettings": {"MySecretKey": "Hallo from AppSettings","MyTopSecretKey": "Hallo from AppSettings"
},

To overwrite the keys with the values from the SecretManager tool, I need to create entries like this:

dotnet user-secrets set AppSettings:MySecretKey "Hello from UserSecretStore"
dotnet user-secrets set AppSettings:MyTopSecretKey "Hello from UserSecretStore"

BTW: to override existing keys with new values, just call set the secret again with the same key and the new value.

This way to handle secret data works pretty fine for me.

The SecretManager tool knows three more commands:

  • dotnet user-secrets clear: removes all secrets from the store
  • dotnet user-secrets list: shows you all existing keys
  • dotnet user-secrets remove <key>: removes the specific key

Just type dotnet user-secrets --help to see more information about the existing commands.

If you need to handle some more secrets in your project, it possibly makes sense to create a small batch file to add the keys, or to share the settings with build and test environments. But never ever push this file to the source code repository ;)

Add HTTP headers to static files in ASP.​NET Core

$
0
0

Usually, static files like JavaScript, CSS, images and so on, are cached on the client after the first request. But sometimes, you need to disable the cache or to add a special cache handling.

To provide static files in a ASP.NET Core application, you use the StaticFileMiddleware:

app.UseStaticFiles();

This extension method has two overloads. One of them needs a StaticFileOptions instance, which is our friend in this case. This options has a property called OnPrepareResponse of type Action<StaticFileResponseContext>. Inside this Action, you have access to the HttpContext and many more. Let's see how it looks like to set the cache life time to 12 hours:

app.UseStaticFiles(new StaticFileOptions()
{
    OnPrepareResponse = context =>
    {
        context.Context.Response.Headers["Cache-Control"] = "private, max-age=43200";

        context.Context.Response.Headers["Expires"] = 
                DateTime.UtcNow.AddHours(12).ToString("R");
    }
});

With the StaticFileResponseContext, you also have access to the file of the currently handled file. With this info, it is possible to manipulate the HTTP headers just for a specific file or file type.

This approach ensures, that the client doesn't use pretty much outdated files, but use cached versions while working with it. We use this in a ASP.NET Core single page application, which uses many JavaScript, and HTML template files. In combination with continuous deployment, we need to ensure the Application uses the latest files.

Setup Angular2 & TypeScript in a ASP.​NET Core project using Visual Studio

$
0
0

In this post I try to explain, how to setup a ASP.NET Core project with Angular2 and typescript in Visual Studio 2015.

UPDATE This post is now updated to ASP.NET Core 1.0 and Angular2 final. I had troubles to create a ASP.NET Core app using .NET Core 1.0.1 in Visual Studio. This is why it still uses 1.0. The most changes are done in the Angular2 part with the new Module and some other Angular2 dependencies. I also changed the gulpfile.js to move the needed data in a cleaner way. You will find a working project on GitHub: https://github.com/JuergenGutsch/angular2-aspnetcore-vs

There are two ways to setup an Angular2 Application: The most preferred way is to use angular-cli, which is pretty simple. Unfortunately the Angular CLI doesn't use the latest version . The other way is to follow the tutorial on angular.io, which sets-up a basic starting point, but this needs a lot of manually steps. There are also two ways to setup the way you want to develop your app with ASP.NET Core: One way is to separate the client app completely from the server part. It is pretty useful to decouple the server and the client, to create almost independent applications and to host it on different machines. The other way is to host the client app inside the server app. This is useful for small applications, to have all that stuff in one place and it is easy to deploy on a single server.

In this post I'm going to show you, how you can setup Angular2 app, which will be hosted inside an ASP.NET Core application using Visual Studio 2015. Using this way, the Angular-CLI is not the right choice, because it already sets up a development environment for you and all that stuff is configured a little bit different. The effort to move this to Visual Studio would be to much. I will almost follow the tutorial on http://angular.io/. But we need to change some small things to get that stuff working in Visual Studio 2015.

Configure the ASP.NET Core project

Let's start with a new ASP.NET Core project based on .NET Core. (The name doesn't matter, so "WebApplication391" is fine). We need to choose a Web API project, because the client side Angular2 App will probably communicate with that API and we don't need all the predefined MVC stuff.

A Web API project can't serve static files like JavaScripts, CSS styles, images, or even HTML files. Therefore we need to add a reference to Microsoft.AspNetCore.StaticFiles in the project.json:

"Microsoft.AspNetCore.StaticFiles": "1.0.0 ",

And in the startup.cs, we need to add the following line, just before the call of `UseMvc()

app.UseStaticFiles();

Another important thing we need to do in the startup.cs, is to support the Routing of Angular2. If the Browser calls a URL which doesn't exists on the server, it could be a Angular route. Especially if the URL doesn't contain a file extension.

This means we need to handle the 404 error, which will occur in such cases. We need to serve the index.html to the client, if there was an 404 error, on requests without extensions. To do this we just need a simple lambda based MiddleWare, just before we call UseStaticFiles():

app.Use(async (context, next) =>
{
    await next();

    if (context.Response.StatusCode == 404
        && !Path.HasExtension(context.Request.Path.Value))
    {
        context.Request.Path = "/index.html";
        await next();
    }
});

Inside the properties folder we'll find a file called launchSettings.json. This file is used to configure the behavior of visual Studio 2015, when we press F5 to run the application. Remove all strings "api/values" from this file. Because Visual Studio will always call that specific Web API, every time you press F5.

Now we prepared the ASP.NET Core application to start to follow the angular.io tutorial.:

Let's start with the NodeJS packages. Using Visual Studio we can create a new "npm Configuration file" called package.json. Just copy the stuff from the tutorial:

{"name": "angular-quickstart","version": "1.0.0","scripts": {"start": "tsc && concurrently \"tsc -w\" \"lite-server\" ","lite": "lite-server","postinstall": "typings install && gulp restore","tsc": "tsc","tsc:w": "tsc -w","typings": "typings"
  },"licenses": [
    {"type": "MIT","url": "https://github.com/angular/angular.io/blob/master/LICENSE"
    }
  ],"dependencies": {"@angular/common": "2.0.2","@angular/compiler": "2.0.2","@angular/core": "2.0.2","@angular/forms": "2.0.2","@angular/http": "2.0.2","@angular/platform-browser": "2.0.2","@angular/platform-browser-dynamic": "2.0.2","@angular/router": "3.0.2","@angular/upgrade": "2.0.2","angular-in-memory-web-api": "0.1.5","bootstrap": "3.3.7","core-js": "2.4.1","reflect-metadata": "0.1.8","rxjs": "5.0.0-beta.12","systemjs": "0.19.39","zone.js": "0.6.25"
  },"devDependencies": {"concurrently": "3.0.0","lite-server": "2.2.2","gulp": "^3.9.1","typescript": "2.0.3","typings":"1.4.0"
  }
}

In this listing, I changed a few things:

  • I added "&& gulp restore" to the postinstall script
  • I also added Gulp to the devDependency to typings

After the file is saved, Visual Studio tryies to load all the packages. This works, but VS shows a yellow exclemation mark because of any arror. Until yet, I didn't figure out what is going wrong here. To be sure all packages are propery installed, use the console, change directory to the current project and type npm install

The post install will possibly faile because gulp is not yet configured. We need gulp to copy the dependencies to the right location inside the wwwroot folder, because static files will only be loaded from that location. This is not part of the tutorial on angular.io, but is needed to fit the client stuff into Visual Studio. Using Visual Studio we need to create a new "gulp Configuration file" with the name gulpfile.js:

var gulp = require('gulp');

var libs = './wwwroot/libs/';

gulp.task('default', function () {
    // place code for your default task here
});

gulp.task('restore:core-js', function() {
    gulp.src(['node_modules/core-js/client/*.js'
    ]).pipe(gulp.dest(libs + 'core-js'));
});
gulp.task('restore:zone.js', function () {
    gulp.src(['node_modules/zone.js/dist/*.js'
    ]).pipe(gulp.dest(libs + 'zone.js'));
});
gulp.task('restore:reflect-metadata', function () {
    gulp.src(['node_modules/reflect-metadata/reflect.js'
    ]).pipe(gulp.dest(libs + 'reflect-metadata'));
});
gulp.task('restore:systemjs', function () {
    gulp.src(['node_modules/systemjs/dist/*.js'
    ]).pipe(gulp.dest(libs + 'systemjs'));
});
gulp.task('restore:rxjs', function () {
    gulp.src(['node_modules/rxjs/**/*.js'
    ]).pipe(gulp.dest(libs + 'rxjs'));
});
gulp.task('restore:angular-in-memory-web-api', function () {
    gulp.src(['node_modules/angular-in-memory-web-api/**/*.js'
    ]).pipe(gulp.dest(libs + 'angular-in-memory-web-api'));
});

gulp.task('restore:angular', function () {
    gulp.src(['node_modules/@angular/**/*.js'
    ]).pipe(gulp.dest(libs + '@angular'));
});

gulp.task('restore:bootstrap', function () {
    gulp.src(['node_modules/bootstrap/dist/**/*.*'
    ]).pipe(gulp.dest(libs + 'bootstrap'));
});

gulp.task('restore', ['restore:core-js','restore:zone.js','restore:reflect-metadata','restore:systemjs','restore:rxjs','restore:angular-in-memory-web-api','restore:angular','restore:bootstrap'
]);

The task restore, copies all the needed files to the Folder ./wwwroot/libs

TypeScript needs some type definitions to get the types and API definitions of the libraries, which are not written in TypeScript or not available in TypeScript. To load this, we use another tool, called "typings". This is already installed with NPM. This tool is a package manager for type definition files. We need to configure this tool with a typings.json

{"globalDependencies": {"core-js": "registry:dt/core-js#0.0.0+20160725163759","jasmine": "registry:dt/jasmine#2.2.0+20160621224255","node": "registry:dt/node#6.0.0+20160909174046"
  }
}

No we have to configure typescript itself. We can also add a new item, using Visual Studio to create a TyoeScript configuration file. I would suggest not to use the default content, but the contents from the angular.io tutorial.

{"compileOnSave": true,"compilerOptions": {"target": "es5","module": "commonjs","moduleResolution": "node","sourceMap": true,"emitDecoratorMetadata": true,"experimentalDecorators": true,"removeComments": false,"noImplicitAny": false
  },"exclude": ["node_modules"
  ]
}

The only things I did with this file, is to add the "compileOnSave" flag and to exclude the "node_modules" folder from the TypeScript build, because we don't need to build containing the TypeScript files and because we moved the needed JavaScripts to ./wwwroot/libs.

If you use Git or any other source code repository, you should ignore the files generated out of our TypeScript files. In case of Git, I simply add another .gitignore to the ./wwwroot/app folder

#remove generated files
*.js
*.map

We do this becasue the JavaScript files are only relevant to run the applicaiton and should be created automatically in the development environment or on a build server, befor deploying the app.

The first app

That is all to prepare a ASP.NET Core project in Visual Studio 2015. Let's start to create the Angular app. The first step is to create a index.html in the folder wwwroot:

<html><head><title>Angular QuickStart</title><meta charset="UTF-8"><meta name="viewport" content="width=device-width, initial-scale=1"><link rel="stylesheet" href="styles.css"><!-- 1. Load libraries --><!-- Polyfill(s) for older browsers --><script src="libs/core-js/shim.min.js"></script><script src="libs/zone.js/zone.js"></script><script src="libs/reflect-metadata/Reflect.js"></script><script src="libs/systemjs/system.src.js"></script><!-- 2. Configure SystemJS --><script src="systemjs.config.js"></script><script>
        System.import('app').catch(function (err) { console.error(err); });</script></head><!-- 3. Display the application --><body><my-app>Loading...</my-app></body></html>

As you can see, we load almost all JavaScript files from the libs folder. Except a systemjs.config.js. This file is needed to configure Angular2, to define which module is needed, where to find dependencies an so on. Create a new JavaScript file, call it systemjs.config.js and paste the following content into it:

/**
 * System configuration for Angular samples
 * Adjust as necessary for your application needs.
 */
(function (global) {
    System.config({
        paths: {
            // paths serve as alias'npm:': 'libs/'
        },
        // map tells the System loader where to look for things
        map: {
            // our app is within the app folder
            app: 'app',
            // angular bundles'@angular/core': 'npm:@angular/core/bundles/core.umd.js','@angular/common': 'npm:@angular/common/bundles/common.umd.js','@angular/compiler': 'npm:@angular/compiler/bundles/compiler.umd.js','@angular/platform-browser': 'npm:@angular/platform-browser/bundles/platform-browser.umd.js','@angular/platform-browser-dynamic': 'npm:@angular/platform-browser-dynamic/bundles/platform-browser-dynamic.umd.js','@angular/http': 'npm:@angular/http/bundles/http.umd.js','@angular/router': 'npm:@angular/router/bundles/router.umd.js','@angular/forms': 'npm:@angular/forms/bundles/forms.umd.js',
            // other libraries'rxjs': 'npm:rxjs','angular-in-memory-web-api': 'npm:angular-in-memory-web-api',
        },
        // packages tells the System loader how to load when no filename and/or no extension
        packages: {
            app: {
                main: './main.js',
                defaultExtension: 'js'
            },
            rxjs: {
                defaultExtension: 'js'
            },'angular-in-memory-web-api': {
                main: './index.js',
                defaultExtension: 'js'
            }
        }
    });
})(this);

This file also defines a main entry point which is a main.js. This file is the transpiled TypeScript file main.ts we need to create in the next step. The main.ts bootstraps our Angular2 app:

import { platformBrowserDynamic } from '@angular/platform-browser-dynamic';
import { AppModule } from './app.module';

const platform = platformBrowserDynamic();

platform.bootstrapModule(AppModule);

Since Angular2 RC6, there is an app-Module needed, which should be placed inside an app.module.ts file:

import { NgModule }      from '@angular/core';
import { BrowserModule } from '@angular/platform-browser';
import { AppComponent }   from './app.component';

@NgModule({
    imports:      [ BrowserModule ],
    declarations: [ AppComponent ],
    bootstrap:    [ AppComponent ]
})
export class AppModule { }

We also need to create our first Angular2 component. Create a TypeScript file with the name app.component.ts inside the app folder:

import { Component } from '@angular/core';

@Component({
    selector: 'my-app',
    template: '<h1>My First Angular App</h1>'
})
export class AppComponent { }

If all works fine, Visual Studio should have created a JavaScript file for each TypeScript file. Also the build should run. Pressing F5 should start the Application and a Browser should open.

A short moment the Loading... is visible in the browser. After the app is initialized and all the Angular2 magic happened, you'll see the contents of the template defined in the app.component.ts.

Checkout the working project on GitHub: https://github.com/JuergenGutsch/angular2-aspnetcore-vs

Conclusion

I propose to use VisualStudio just for small single page applications, because it gets slower the more dynamic files need to be handled. ASP.NET Core is pretty cool to handle dynamically generated files, but Visual Studio still is not. VS tries to track and manage all the files inside the project, which slows down a lot. One solution is to disable source control in Visual Studio and use an external tool to manage the sources.

Another - even better - solution is not to use Visual Studio for front-end development. In a new project, I propose to separate front-end and back-end development and to use Visual Studio Code for the front-end development or even both. You need to learn a few things about NPM, Gulp and you need to use a console in this case, but web development will be a lot faster and a lot more lightweight with this approach. In one of the next posts, I'll show how I currently work with Angular2.

ASP.​NET Core and Angular2 using dotnet CLI and Visual Studio Code

$
0
0

This is another post about ASP.NET Core and Angular2. This time I use a cleaner and more light weight way to host a Angular2 App inside an ASP.NET Core Web. I'm going to use dotnet CLI and Visual Studio Code.

A few days ago there was an update for ASP.NET Core announced. This is not a big one, but a important run-time update. You should install it, if you already use ASP.NET Core 1.0. If you install it the first time (loaded from http://get.asp.net/), the update is already included. Also since a few days, the final version of Angular2 was announced. So, we will use Angular 2.0.0 and ASP.NET Core 1.0.1.

This post is structured into nine steps:

#1 Create the ASP.NET Core web

The first step is to create the ASP.NET Core web application this is the easiest thing using the dotnet CLI. After downloading it from http://get.asp.net and installing it, you are directly able to use it. Choose any console you like and g to your working folder.

Type the following line to create a new web application inside that working folder:

> dotnet new -t web

If you used the dotnet CLI for the first time it will take a few seconds. After the first time it is pretty fast.

Now you have a complete ASP.NET Core quick-start application. Almost the same thing you get, if you create a new application in Visual Studio 2015.

Now we need to restore the NuGet packages, which contains all the .NET Core and ASP.NET dependencies

> dotnet restore

This takes a few seconds, depending in the amount of packages or on the internet connection.

If this is done, type dotnet run to start the app. You will see an URL in the console. Copy this URL and paste it into the browsers address bar. As you can see, you just need three console commands to create a working ASP.NET application.

#2 Setup the ASP.NET Core web

To support a Angular2 single page application we need to prepare the Startup.cs a little bit. Because we don't want to use MVC, but just the web API, we need to remove the configured default route.

To support Angular routing, we need to handle 404 errors: In case a requested resource was not found on the server, it could be a Angular route. This means we should redirect request, which results in a error 404, to the index.html. We need to create this file in the wwwroot folder later on.

The Configure method in the Startup.cs now looks like this:

public void Configure(IApplicationBuilder app, IHostingEnvironment env, ILoggerFactory loggerFactory)
{
    loggerFactory.AddConsole(Configuration.GetSection("Logging"));
    loggerFactory.AddDebug();

    if (env.IsDevelopment())
    {
        app.UseDeveloperExceptionPage();
        app.UseDatabaseErrorPage();
        app.UseBrowserLink();
    }
    else
    {
        app.UseExceptionHandler("/Home/Error");
    }

    app.Use(async (context, next) =>
    {
        await next();

        if (context.Response.StatusCode == 404
            && !Path.HasExtension(context.Request.Path.Value))
        {
            context.Request.Path = "/index.html";
            await next();
        }
    });

    app.UseStaticFiles();

    app.UseIdentity();

    app.UseMvc();
}

#3 The front-end dependencies

To develop the front-end with Angular 2, we need some tools, like TypeScript, Webpack and NPM. We use TypeScript to write the client code, which will be transpiled to JavaScript using Webpack. We use Webpack with a simple Webpack configuration to transpile the TypeScript code to JavaScript and to copy the dependencies to the wwwroot folder.

NPM is used to get all that stuff, including Angular itself, to the development machine. We need to configure the package.json a little bit. The easiest way is to use the same configuration as in the ANgular2 quick-start tutorial on angular.io

You need to have Node.JS installed on your machine, To get all the tools working.

{"name": "webapplication","version": "0.0.0","private": true,"scripts": {"start": "tsc && concurrently \"npm run tsc:w\" \"npm run lite\" ","lite": "lite-server","postinstall": "typings install","tsc": "tsc","tsc:w": "tsc -w","typings": "typings"
  },"dependencies": {"@angular/common": "2.0.0","@angular/compiler": "2.0.0","@angular/core": "2.0.0","@angular/forms": "2.0.0","@angular/http": "2.0.0","@angular/platform-browser": "2.0.0","@angular/platform-browser-dynamic": "2.0.0","@angular/router": "3.0.0","@angular/upgrade": "2.0.0","core-js": "2.4.1","reflect-metadata": "0.1.3","rxjs": "5.0.0-beta.12","systemjs": "0.19.27","zone.js": "0.6.21","bootstrap": "3.3.6"
  },"devDependencies": {"ts-loader": "0.8.2","ts-node": "0.5.5","typescript": "1.8.10","typings": "1.3.2","webpack": "1.13.2"
  }
}

You should also install Webpack, Typings and TypeScript globaly on your machine:

> npm install -g typescript> npm install -g typings> npm install -g webpack

The TypeScript build needs a configuration, to know how to build that code. This is why we need a tsconfig.json:

{"compilerOptions": {"target": "es5","module": "commonjs","moduleResolution": "node","sourceMap": true,"emitDecoratorMetadata": true,"experimentalDecorators": true,"removeComments": false,"noImplicitAny": false
  }
}

And TypeScript needs type defintions for all the used libraries, which are not written in TypeScript. This is where Typings is used. Typings is a kind of a package manager for TypeScript type definitions, which also needs a configuration:

{"globalDependencies": {"core-js": "registry:dt/core-js#0.0.0+20160725163759","jasmine": "registry:dt/jasmine#2.2.0+20160621224255","node": "registry:dt/node#6.0.0+20160909174046"
  }
}

Now we can use npm install in the console to load all that stuff. This command automatically calls typings install as a NPM post install event.

#4 Setup the single page

The Angular2 app is hosted on a single HTML page inside the wwwroot folder of the ASP.NET Core web. Add a new index.html and add it to the wwwroot folder:

<html><head><title>Angular 2 QuickStart</title><meta charset="UTF-8"><meta name="viewport" content="width=device-width, initial-scale=1"><link rel="stylesheet" href="css/site.css"><!-- 1. Load libraries --><script src="js/core.js"></script><script src="js/zone.js"></script><script src="js/reflect.js"></script><script src="js/system.js"></script><!-- 2. Configure SystemJS --><script src="systemjs.config.js"></script><script>
          System.import('app').catch(function(err){ console.error(err); });</script></head><!-- 3. Display the application --><body><my-app>Loading...</my-app></body></html>

Currently we don't have the JavaSript dependencies configured. This is what we will do in the next step

#5 configure webpack

Webpack has two tasks in this simple tutorial. The first thing is to copy some dependencies out of the node_modules folder into the wwwroot folder, because static files will only be provided out of this special folder. We need Core.JS, Zone.JS, Reflect-Metadata and System.JS. The second task is to build and bundle the Angular2 application (which is not yet written) and all it's dependencies.

Let's see how this simple Webpack configuration (webpack.config.js) looks like:

module.exports = [
  {
    entry: {
      core: './node_modules/core-js/client/shim.min.js',
      zone: './node_modules/zone.js/dist/zone.js',
      reflect: './node_modules/reflect-metadata/Reflect.js',
      system: './node_modules/systemjs/dist/system.src.js'
    },
    output: {
      filename: './wwwroot/js/[name].js'
    },
    target: 'web',
    node: {
      fs: "empty"
    }
  },
  {
    entry: {
      app: './wwwroot/app/main.ts'
    },
    output: {
      filename: './wwwroot/app/bundle.js'
    },
    devtool: 'source-map',
    resolve: {
      extensions: ['', '.webpack.js', '.web.js', '.ts', '.js']
    },
    module: {
      loaders: [
        { test: /\.ts$/, loader: 'ts-loader' }
      ]
    }
  }];

We have two separate configurations for the mentioned tasks. This is not the best way how to configure Webpack. E.g. the Angular2 Webpack Starter or the latest Angular CLI, do the whole stuff with a more complex Webpack configuration.

To run this configuration, just type webpack in the console. The first configuration writes out a few warnings, but will work anyway. The second config should fail, because we don't have the Angular2 app yet.

#6 Configure the App

We now need to load the Angular2 app and it's dependencies. This is done with System.JS which also needs a ocnfiguration. We need a systemjs.config.js:

/**
 * System configuration for Angular 2 samples
 * Adjust as necessary for your application needs.
 */
(function (global) {
    System.config({
        paths: {
            // paths serve as alias'npm:': '../node_modules/'
        },
        // map tells the System loader where to look for things
        map: {
            // our app is within the app folder
            app: 'app',
            // angular bundles'@angular/core': 'npm:@angular/core/bundles/core.umd.js','@angular/common': 'npm:@angular/common/bundles/common.umd.js','@angular/compiler': 'npm:@angular/compiler/bundles/compiler.umd.js','@angular/platform-browser': 'npm:@angular/platform-browser/bundles/platform-browser.umd.js','@angular/platform-browser-dynamic': 'npm:@angular/platform-browser-dynamic/bundles/platform-browser-dynamic.umd.js','@angular/http': 'npm:@angular/http/bundles/http.umd.js','@angular/router': 'npm:@angular/router/bundles/router.umd.js','@angular/forms': 'npm:@angular/forms/bundles/forms.umd.js',
            // other libraries'rxjs': 'npm:rxjs',
        },
        meta: {'./app/bundle.js': {
                format: 'global'
            }
        },
        // packages tells the System loader how to load when no filename and/or no extension
        packages: {
            app: {
                main: './bundle.js',
                defaultExtension: 'js'
            },
            rxjs: {
                defaultExtension: 'js'
            }
        }
    });
})(this);

This file is almost equal to the file from the angular.io quick-start tutorial. We just need to change a few things:

The first thing is the path to the node_modules which is not on the same level as usual. So we need to change the path to ../node_modules/, we also need to tell System.js that the bundle is not a commonjs module. this is doen with the meta property. I also changed the app main path to ./bundle.js, instead of main.js

#7 Create the app

Inside the wwwroot folder, create a new folder called app. Inside this new folder we need to create a first TypeScript file called main.ts:

import { platformBrowserDynamic } from '@angular/platform-browser-dynamic';
import { AppModule } from './app.module';

const platform = platformBrowserDynamic();
platform.bootstrapModule(AppModule);

This script calls the app.module.ts, which is the entry point to the app:

import { NgModule } from '@angular/core';
import { HttpModule } from '@angular/http';
import { FormsModule } from '@angular/forms';
import { BrowserModule } from '@angular/platform-browser';

import { AppComponent } from './app.component';
import { PersonService } from './person.service';

@NgModule({
    imports: [
        BrowserModule,
        FormsModule,
        HttpModule],
    declarations: [AppComponent],
    providers: [
        PersonService,
    ],
    bootstrap: [AppComponent]
})
export class AppModule { }

The module collects all the parts of our app and puts all the components and services together.

This is a small component with a small inline template:

import { Component, OnInit } from '@angular/core';
import { PersonService, Person } from './person.service';

@Component({
    selector: 'my-app',
    template: `<h1>My First Angular 2 App</h1><ul><li *ngFor="let person of persons"><strong></strong><br>
    from: <br>
    date of birth: </li></ul>
    `,
    providers: [
        PersonService
    ]
})
export class AppComponent extends OnInit {

    constructor(private _service: PersonService) {
        super();
    }

    ngOnInit() {
        this._service.loadData().then(data => {
            this.persons = data;
        })
    }

    persons: Person[] = [];
}

At least, we need to create a service which calls a ASP.NET Core web api. We need to create the API later on.

import { Injectable } from '@angular/core';
import { Http, Response } from '@angular/http';
import { Observable } from 'rxjs/Rx';
import 'rxjs/add/operator/toPromise';

@Injectable()
export class PersonService {
    constructor(private _http: Http) { }

    loadData(): Promise<Person[]> {
        return this._http.get('/api/persons')
            .toPromise()
            .then(response => this.extractArray(response))
            .catch(this.handleErrorPromise);
    }    

    protected extractArray(res: Response, showprogress: boolean = true) {
        let data = res.json();
        return data || [];
    }

    protected handleErrorPromise(error: any): Promise<void> {
        try {
            error = JSON.parse(error._body);
        } catch (e) {
        }

        let errMsg = error.errorMessage
            ? error.errorMessage
            : error.message
                ? error.message
                : error._body
                    ? error._body
                    : error.status
                        ? `${error.status} - ${error.statusText}`
                        : 'unknown server error';

        console.error(errMsg);
        return Promise.reject(errMsg);
    }
}
export interface Person {
    name: string;
    city: string;
    dob: Date;
}

#8 The web API

The web api is pretty simple in this demo, just to show how it works:

using System;
using System.Collections.Generic;
using Microsoft.AspNetCore.Mvc;

namespace demo
{
    [Route("api/persons")]
    [ResponseCache(Location = ResponseCacheLocation.None, NoStore = true, Duration = -1)]
    public class PersonsController : Controller
    {
        [HttpGet]
        public IEnumerable<Person> GetPersons()
        {
            return new List<Person>
            {
                new Person{Name = "Max Musterman", City="Naustadt", Dob=new DateTime(1978, 07, 29)},
                new Person{Name = "Maria Musterfrau", City="London", Dob=new DateTime(1979, 08, 30)},
                new Person{Name = "John Doe", City="Los Angeles", Dob=new DateTime(1980, 09, 01)}
            };
        }
    }

    public class Person
    {
        public string Name { get; set; }
        public string City { get; set; }
        public DateTime Dob { get; set; }
    }

}

If you start the app using dotnet run you can call the API using that URL: http://localhost:5000/api/persons/, you'll see the three persons in the browser as a JSON result.

#9 That's it. Run the app.

Type webpack and dotnet run in the console to compile and pack the client app and to start the application. After that call the URL http://localhost:5000/ in a browser:

Conclusion

As you can see, hosting an Angular2 app inside ASP.NET Core web using this way is pretty much easier and much more light weight than using Visual Studio 2015.

Aniway, this is the last post about combining this two technologies. Because this is just a good way, if you write a small application. For bigger applications you should separate the client application from the server part. The Angular2 app should be written using Anngular CLI. Working like this both parts are completely independent and it is much easier to setup and to deploy.

I pushed the demo code to GitHub. Try it out, play around with it and give mes some feedback about it :)


Authentication in ASP.​NET Core for your Web API and Angular2

$
0
0

Authentication in a single page application is a bit more special, if you just know the traditional ASP.NET way. To imagine that the app is a completely independent app like a mobile app helps. Token based authentication is the best solution for this kind of apps. In this post I'm going to try to describe a high level overview and to show a simple solution.

Intro

As written in my last posts about Angular2 and ASP.NET Core, I reduced ASP.NET Core to just a HTTP Service, to provide JSON based data to an Angular2 client. Some of my readers, asked me about how the Authentication is done in that case. I don't use any server generated log-in page, registration page or something like this. So the ASP.NET Core part only provides the web API and the static files for the client application.

There are many ways to protect your application out there. The simplest one is using an Azure Active Directory. You could also setup a separate authentication server, using IdentityServer4, to manage the users, roles and to provide a token based authentication.

And that's the key word: A Token Based Authentication is the solution for that case.

With the token bases authentication, the client (the web client, the mobile app, and so on) gets a string based encrypted token after a successful log-in. The token also contains some user info and an info about how long the token will be valid. This token needs to be stored on the client side and needs to be submitted to the server every time you request a resource. Usually you use a HTTP header to submit that token. If the token is not longer valid you need to perform a new log-in.

In one of our smaller projects, didn't set-up a different authentication server and we didn't use Azure AD, because we needed a fast and cheap solution. Cheap from the customers perspective.

The Angular2 part

On the client side we used angular2-jwt, which is a Angular2 module that handles authentication tokens. It checks the validity, reads meta information out of it and so on. It also provides a wrapper around the Angular2 HTTP service. With this wrapper you are able to automatically pass that token via a HTTP header back to the server on every single request.

The work flow is like this.

  1. If the token is not valid or doesn't exist on the client, the user gets redirected to the log-in route
  2. The user enters his credentials and presses the log-in button
  3. The date gets posted to the server where a special middle-ware handles that request
    1. The user gets authenticated on the server side
    2. The token, including a validation date and some meta date, gets created
    3. The token gets returned back to the client
  4. the client stores the token in the local storage, cookie or whatever, to use it on every new request.

The angular2-jwt does the most magic on the client for us. We just need to use it, to check the availability and the validity, every time we want to do a request to the server or every time we change the view.

This is a small example (copied from the Github readme) about how the HTTP wrapper is used in Angular2:

import { AuthHttp, AuthConfig, AUTH_PROVIDERS } from 'angular2-jwt';

...

class App {

  thing: string;

  constructor(public authHttp: AuthHttp) {}

  getThing() {
    // this uses authHttp, instead of http
    this.authHttp.get('http://example.com/api/thing')
      .subscribe(
        data => this.thing = data,
        err => console.log(err),
        () => console.log('Request Complete')
      );
  }
}

More samples and details can be found directly on github https://github.com/auth0/angular2-jwt/ and there is also a detailed blog post about using angular2-jwt: https://auth0.com/blog/introducing-angular2-jwt-a-library-for-angular2-authentication/

The ASP.NET part

On the server side we also use a, separate open source project, called SimpleTokenProvider. This is really a pretty simple solution to authenticate the users, using his credentials and to create and provide the token. I would not recommend to use this way in a huge and critical solution, in that case you should choose the IdentiyServer or any other authentication like Azure AD to be more secure. The sources of that project need to be copied into your project and you possibly need to change some lines e. g. to authenticate the users against your database, or whatever you use to store the user data. This project provides a middle-ware, which is listening on a defined path, like /api/tokenauth/. This URL is called with a POST request by the log-in view of the client application.

The authentication for the web API, is just using the token, sent with the current request. This is simply done with the built-in IdentiyMiddleware. That means, if ASP.NET MVC gets a request to a Controller or an Action with an AuthorizeAttribute, it checks the request for incoming Tokens. If the Token is valid, the user is authenticated. If the user is also in the right role, he gets authorized.

We put the users role information as additional claims into the Token, so this information can be extracted out of that token and can be used in the application.

To find the users and to identify the user, we use the given UserManager and SignInManager. These managers are bound to the IdentityDataContext. This classes are already available, when you create a new project with Identiy in Visual Studio.

This way we can authenticate a user on the server side:

public async Task<ClaimsIdentity> GetIdentity(string email, string password)
{
    var result = await _signInManager.PasswordSignInAsync(email, password, false, lockoutOnFailure: false);
    if (result.Succeeded)
    {
        var user = await _userManager.FindByEmailAsync(email);
        var claims = await _userManager.GetClaimsAsync(user);

        return new ClaimsIdentity(new GenericIdentity(email, "Token"), claims);
    }

    // Credentials are invalid, or account doesn't exist
    return null;
}

And this claims will be used to create the Jwt-Token in the TokenAuthentication middle-ware:

var username = context.Request.Form["username"];
var password = context.Request.Form["password"];

var identity = await identityResolver.GetIdentity(username, password);
if (identity == null)
{
    context.Response.StatusCode = 400;
    await context.Response.WriteAsync("Unknown username or password.");
    return;
}

var now = DateTime.UtcNow;

// Specifically add the jti (nonce), iat (issued timestamp), and sub (subject/user) claims.
// You can add other claims here, if you want:
var claims = new[]
{
    new Claim(JwtRegisteredClaimNames.Sub, username),
    new Claim(JwtRegisteredClaimNames.Jti, await _options.NonceGenerator()),
    new Claim(JwtRegisteredClaimNames.Iat, ToUnixEpochDate(now).ToString(), ClaimValueTypes.Integer64)
};

// Create the JWT and write it to a string
var jwt = new JwtSecurityToken(
    issuer: _options.Issuer,
    audience: _options.Audience,
    claims: claims,
    notBefore: now,
    expires: now.Add(_options.Expiration),
    signingCredentials: _options.SigningCredentials);
var encodedJwt = new JwtSecurityTokenHandler().WriteToken(jwt);

var response = new
{
    access_token = encodedJwt,
    expires_in = (int)_options.Expiration.TotalSeconds,
    admin = identity.IsAdministrator(),
    fullname = identity.FullName(),
    username = identity.Name
};

// Serialize and return the response
context.Response.ContentType = "application/json";
await context.Response.WriteAsync(JsonConvert.SerializeObject(response, _serializerSettings));

This code will not work, if you copy and past it in your application, but shows you what needs to be done to create a token and how the token is created and sent to the client. Nate Barbattini wrote a detailed article about how this SimpleTokenProvider is working and how it needs to bes used in his Blog: https://stormpath.com/blog/token-authentication-asp-net-core

Conclusion

This is jsut a small overview. If you want to learn more and detailed information about how ASP.NET Identity works, you should definetly subscribe to the blogs of Dominick Baier and Brock Allen. Even the ASP.NET Docs are good resources to learn more about the ASP.NET Security.

Update: Just a few hours ago Scott Brady wrote an blog post about getting Started with IdentityServer 4

Creating a container component in Angular2

$
0
0

In one of the last projects, I needed a shared reusable component, which needs to be extended with additional contents or functionality by the view who uses this component. In our case, it was a kind of a menu bar used by multiple views. (View in this case means routing targets.)

Creating such components was easier than expected. I anyway spent almost a whole day to find that solution, I played around with view and template providers, tried to access the template and to manipulate the template. I also tried to create an own structural directive.

But you just need to use the directive in the container component.

<nav><div class="navigation pull-left"><ul><!-- the menu items ---></ul></div><div class="pull-right"><ng-content></ng-content></div></nav

That's all. You don't need to write any TypeScript code to get this working. Using this component is now pretty intuitive:

<div class="nav-bar"><app-navigation><button (click)="printDraft($event)">print draft</button><button (click)="openPreview($event)">Show preview</button></app-navigation></div>

The contents of the - the buttons - will now be placed to the place holder.

After spending almost a whole day to get this working my first question was: Is it really that easy? Yes it is. That's all.

Maybe you knew about it. But I wasn't able to find any hint in the docs, on StackOverflow or in any Blog about it. Maybe this requirement isn't used needed often. At least I stumbled upon a documentation where ng-content as used and I decided to write about it. Hope it will help someone else. :)

Contributing to OSS projects on GitHub using fork and upstream

$
0
0

Intro

Some days ago, Damien Bowden wrote a pretty cool post about, how to contribute to an open source software project hosted on GitHub, like the AspLabs. He uses Git Extensions in his great and pretty detailed post. Also a nice fact about this post is, that he uses a AspLabs as the demo project. Because we both worked on that on the hackathon at the MVP Summit 2016, together with Glen Condron and Andrew Stanton-Nurse from the ASP.NET Team.

At that Hackathon we worked on the HealthChecks for ASP.NET Core. The HealthChecks can be used to check the heath state of dependent sub systems in an e. g. micro service environment, or in any other environment where you need to know the health of depending systems. A depending systems could be a SQL Server, an Azure Storage service, the Hard drive, a Web-/REST-Service, or anything else you need to run your application. Using the HealthChecks you are able to do something, if a service is not available or unhealthy.

BTW: The HealthChecks are mentioned by Damian Edwards in this ASP.NET Community Standup: https://youtu.be/hjwT0av9gzU?list=PL0M0zPgJ3HSftTAAHttA3JQU4vOjXFquF

Because Damien Bowden also worked on that project, my idea was to do the same post. So asked him to "fork" the original post, but use the Git CLI in the console instead of Git Extensions. Because this is a fork, some original words are used in this post ;)

Why using the console? Because I'm a console junkie since a few years and from my perspective, no Git UI is as good as the simple and clean Git CLI :) Anyway, feel free to use the tool that fits your needs. Maybe someone will write the same post using SourceTree or using the Visual Studio Git integration. ;)

As a result this post is a also simple guideline on how you could contribute to OSS projects hosted on GitHub using fork and upstream. This is even not the only way to do it. In this demo I'm going to use the console and the basic git commands. As same as Damien did, I'll also use the aspnet/AspLabs project from Microsoft as the target Repository.

True words by Damien: So you have something to contribute, cool, that’s the hard part.

Setup your fork

Before you can make your contribution, you need to create a fork of the repository where you want to make your contribution. Open the project on GitHub, and click the "Fork" button in the top right corner.

Now clone your forked repository. Click the "Clone and download" button and copy the clone URL to the clipboard.

Open a console and cd to the location where you want to place your projects. It is c:\git\ in my case. Write git clone followed by the URL to the repository and press enter.

Now you have a local master branch and also a server master branch (remote) of your forked repository. The next step is to configure the remote upstream branch to the original repository. This is required to synchronize with the parent repository, as you might not be the only person contributing to the repository. This is done by adding another remote to that git repository. On GitHub copy the clone URL the the original repository aspnet/AspLabs. Go back to the console and type git remote add upstream followed by the URL of the original repository:

To check if anything is done right, type git remote -v, to see all existing remotes. It should look like this:

Now you can pull from the upstream repository. You pull the latest changes from the upstream/master branch to your local master branch. Due to this you should NEVER work on your master branch. Then you can also configure your git to rebase the local master with the upstream master if preferred.

Start working on the code

Once you have pulled from the upstream, you can push to your remote master, i. e. the forked master. Just to mention it again, NEVER WORK ON YOUR LOCAL FORKED MASTER, and you will save yourself hassle.

Now you’re ready to work. Create a new branch. A good recommendation is to use the following pattern for naming:

<gitHub username>/<reason-for-the-branch>

Here’s an example:

JuergenGutsch/add-healthcheck-groups

By using your GitHub username, it makes it easier for the person reviewing the pull request.

To create that branch in the console, use the git checkout -b command followed by the branch name. This creates the branch and checks it out immediately:

Creating pull requests

When your work is finished on the branch, you need to push your branch to your remote repository by calling git push Now you are ready to create a pull request. Go to your repository on GitHub, select your branch and and click on the "Compare & pull request" button:

Check if the working branch and the target branch are fine. The target branch is usually the master of the upstream repo.

NOTE: If your branch was created from an older master commit than the actual master on the parent, you need to pull from the upstream and rebase your branch to the latest commit. This is easy as you do not work on the local master. Or update your local master with the latest changes from the upstream, push it to your remote and merge your local master into your feature branch.

If you are contributing to any Microsoft repository, you will need to sign an electronic contribution license agreement before you can contribute. This is pretty easy and done in a few minutes.

If you are working together with a maintainer of the repository, or your pull request is the result of an issue, you could add a comment with the GitHub name of the person that will review and merge, so that he or she will be notified that you are ready. They will receive a notification on GitHub as soon as you save the pull request.

Add a meaningful description. Tell the reviewer what they need to know about your changes. and save the pull request.

Now just wait and fix the issues as required. Once the pull request is merged, you need to pull from the upstream on your local forked repository and rebase if necessary to continue with you next pull request.

And who knows, you might even get a coin from Microsoft. ;)

The console I use

I often get the question what type console I use. I have four consoles installed on my machine, in addition to the cmd.exe and PowerShell. I also installed the bash for Windows. But my favorite console is the Cmder, which is a pretty nice ConEmu implementation. I like this console because it is easy to use, easy to customize and it has a nice color theme too.

Thanks

Thanks to Andrew Stanton-Nurse for his tips. Thanks to Glen Condron for the reviews. thanks Damien Bowden for the original blog post ;)

I'd also be happy for tips from anyone on how to improve this guideline.

A small library to support the CQS pattern.

$
0
0

The last years, I loved to use the Command and Query Segregation pattern. Using this pattern in every new project, requires to have the same infrastructure classes in this projects. This is why I started to create a small and reusable library, which now supports ASP.NET Core and is written to match .NET Standard 1.6.

About that CQS

The idea behind CQS is to separate the query part (the read part / fetching-the-data-part) from the command part (the write part / doing-things-with-the-data-part). This enables you to optimize both parts in different ways. You are able to split the data flow into different optimized pipes.

From my perspective, the other most important benefit of it is, that this approach enforce you, to split your business logic into pretty small peaces of code. This is because each command and each query only does one single thing:

  • fetching a specific set of data
  • executing a specific command

E. g. if you press a button, you probably want to save some data. You will create a SaveDataCommand with the data to save in it. You'll pass that command to the CommandDispatcher and this guy will delegate the command to the right CommandHandler, which is just responsible to save that specific data to the database, or what ever you want to do with that data. You think you'll also add a log entry with the same command? No problem: Just create another CommandHandler using the same command. With this approach you'll have two small components, one to save the data and another one to add a log entry, which are completely independent and can be tested separately.

What about fetching the data? Just create a "Query" with the data used as a filter criteria. Pass the Query to the QueryProcessor, which delegates the Query to the right QueryHandler. in this QueryHandler, you are able to select the data from the data source, map it to the result you expect and return it back.

Sounds easy? It really is as easy.

Each Handler, both the QuerHandlers and the CommandHandlers, are isolated peaces of code, if you use Dependency Injection in it. This means unit tests are as easy as the implementation itself.

What is inside the library?

This library contains a CommandDispatcher and a QueryProcessor to delegate commands and queries to the right handlers. The library helps you to write your own commands and queries, as well as your own command handlers and query handlers. There are two main NameSpaces inside the library: Command and Query

The Command part contains the CommandDispatcher, an ICommand interface and two more interfaces to define command handlers (ICommandHandler<in TCommand>) and async command handlers (IAsyncCommandHandler<in TCommand>):

The CommandDispatcher interface looks like this:

public interface ICommandDispatcher
{
    void DispatchCommand<TCommand>(TCommand command) where TCommand : ICommand;
    Task DispatchCommandAsync<TCommand>(TCommand command) where TCommand : ICommand;
}

The Query part contains the QueryProcessor, a generic IQuery, which defines the result in the generic argument and two different QueryHandlers. It also contains two more interfaces to define query handlers (IHandleQuery<in TQuery, TResult>) and async query handlers (IHandleQueryAsync<in TQuery, TResult>)

public interface IQueryProcessor
    {
        TResult Process<TResult>(IQuery<TResult> query);
        Task<TResult> ProcessAsync<TResult>(IQuery<TResult> query);
    }

Using the library

For the following examples, I'll reuse the speaker database I already used in previous blog posts.

After you installed the library using Nuget, you need to register the the QueryProcessor and the CommandDispatcher to the dependency injection. You can do it manually in the ConfigureSerices method or just by using AddCqsEngine()

public void ConfigureServices(IServiceCollection services)
{
	services.AddMvc(),

	services.AddCqsEngine();

	services.AddQueryHandlers();
	services.AddCommandHandlers();
}

The methods AddQueryHandlers and AddCommandHandlers are just methods to encapsulate the registrtion of your Handlers, and are propably written by you as a user of this library. The method could look like this:

public static IServiceCollection AddQueryHandlers(this IServiceCollection services)
{
	services.AddTransient<IHandleQueryAsync<AllSpeakersQuery, IEnumerable<Speaker>>, SpeakerQueryHandler>();
	services.AddTransient<IHandleQueryAsync<SpeakerByIdQuery, Speaker>, SpeakerQueryHandler>();

	services.AddTransient<IHandleQueryAsync<AllEventsQuery, IEnumerable<Event>>, EventQueryHandler>();
	services.AddTransient<IHandleQueryAsync<SingleEventByIdQuery, Event>, EventQueryHandler>();

	services.AddTransient<IHandleQueryAsync<AllUsergroupsQuery, IEnumerable<Usergroup>>, UsergroupQueryHandler>();
	services.AddTransient<IHandleQueryAsync<SingleUsergroupByIdQuery, Usergroup>, UsergroupQueryHandler>();

	services.AddTransient<IHandleQueryAsync<AllNewslettersQuery, IEnumerable<Newsletter>>, NewsletterQueryHandler>();
	services.AddTransient<IHandleQueryAsync<SingleNewsletterByIdQuery, Newsletter>, NewsletterQueryHandler>();
	return services;
}

Usually you will place this method near you handlers.

The method AddCqsEngine is overloaded to add your QueryHandlers and yor CommandHandlers to the dependnecy injection. There is no real magic behind that method. It is just to group the additional dependencies:

services.AddCqsEngine(s =>
	{
		s.AddQueryHandlers();
		s.AddCommandHandlers();
	});

The parameter s is the same Seervicecollection as the one in the ConfigureServices method.

This library makes heavily use of dependency injection and uses the IServiceProvider, which is used and provided in ASP.NET Core. If you replace the built in DI container with different one, you should ensure that the IServiceProvider is implemented and registered with that container.

Query the data

Getting all the speakers out of the storage is a pretty small example. I just need to create a small class called AllSpeakersQuery and to implement the generic interface IQuery:

public class AllSpeakersQuery : IQuery<IEnumerable<Speaker>>
{
}

The generic argument of the IQuery interface defines the value we want to retrieve from the storage. In this case it is a IEnumerable of speakers.

Querying a single speaker looks like this:

public class SpeakerByIdQuery : IQuery<Speaker>
{
    public SingleSpeakerByIdQuery(Guid id)
    {
        Id = id;
    }

    public Guid Id { get; private set; }
}

The query contains the speakers Id and defines the return value of a single Speaker.

Once you got the QueryProcessor from the dependency injection, you just need to pass the queries to it and retrieve the data:

// sync
var speaker = _queryProcessor.Process(new SpeakerByIdQuery(speakerId));
// async
var speakers = await _queryProcessor.ProcessAsync(new AllSpeakersQuery());

Now let's have a look into the QueryHandlers, which are called by the QueryProcessor. This handlers will contain your business logic. This are small classes, implementing the IHandleQuery<in TQuery, TResult> interface or the IHandleQueryAsync<in TQuery, TResult> interface, where TQuery is a IQuery<TResult>. This class usually retrieves a data source via dependency injection and an Execute or ExecuteAsync method, with the specific Query as argument:

public class AllSpeakersQueryHandler :
    IHandleQuery<AllSpeakersQuery, IEnumerable<Speaker>>
{
    private readonly ITableClient _tableClient;

    public SpeakerQueryHandler(ITableClient tableClient)
    {
        _tableClient = tableClient;
    }

    public Task<IEnumerable<Speaker>> Execute(AllSpeakersQuery query)
    {
        var result = _tableClient.GetItemsOf<Speaker>();
        return result;
    }
}

public class SpeakerByIdQueryQueryHandler :
    IHandleQueryAsync<SpeakerByIdQuery, Speaker>
{
    private readonly ITableClient _tableClient;

    public SpeakerQueryHandler(ITableClient tableClient)
    {
        _tableClient = tableClient;
    }
    
    public async Task<Speaker> ExecuteAsync(SpeakerByIdQuery query)
    {
        var result = await _tableClient.GetItemOf<Speaker>(query.Id);
        return result;
    }
}

Sometimes I handle multiple queries in a single class, this is possible by just implementing multiple IHandleQuery interfaces. I would propose to do this only, if you have really small Execute methods.

Executing Commands

Let's have a quick look into the commands too.

Let's assume we need to create a new speaker and we need to update a speakers email address. To do this we need to define two specific commands

public class AddSpeakerCommand : ICommand
{
    AddSpeakerCommand(Speaker speaker)
    {
        Speaker = speaker;
    }

    public Speaker Speaker { get; private set; }
]

public class UpdateSpeakersEmailCommand : ICommand
{
    UpdateSpeakersEmailCommand(int speakerId, string email)
    {
        SpeakerId = speakerId;
        Email = email;
    }

    public int SpeakerId { get; private set; }

    public string Email { get; private set; }
}

As equal to the queries, the commands need to be passed to the CommandDispatcher, which is registered in the DI container.

// sync
_commandDispatcher.DispatchCommand(new AddSpeakerCommand(myNewSpeaker));
// async
await _commandDispatcher.DispatchCommandasync(new UpdateSpeakersEmailCommand(speakerId, newEmail));

The CommandHandlers are small classes which are implementing the ICommandHandler or the IAsyncCommandHandler where TCommand is a ICommand. Thise handlers contain a Handle or a HandleAync method with the specific Command as argument. As equal to the query part, you usually will also get a data source from the dependency injection:

public class AddSpeakerCommandHandler : ICommandHandler<AddSpeakerCommand>
{
	private readonly ITableClient _tableClient;

	public AddSpeakerCommandHandler(ITableClient tableClient)
	{
		_tableClient = tableClient;
	}

	public void Handle(AddSpeakerCommand command)
	{
		_tableClient.SaveItemOf<Speaker>(command.Speaker);
	}
}

Command validation

What about validatig the commands? Sometimes it is needed to check authorization or to validate the command values before executing the commands. You can do the checks inside the handlers, but this is not always a good idea. This increases the size and the complexity of the handlers and the validation logic is not reusable like this.

This is why the CommandDispatcher supports precondition checks. As equal to the command handlers, you just need to write command preconditions (ICommandPrecondition<in TCommand>) od async command preconditions (ICommandPrecondition<in TCommand>). This interfaces contain a Chack or ChackAsync method which will be executed before the command handlers are executed. You can hava as many preconditions as you want for a single command. If you register the preconditions to the DI container, the command dispatcher will find and execute them:

public class ValidateChangeUsersNameCommandPrecondition : ICommandPrecondition<ChangeUsersNameCommand>
{
    public void Check(ChangeUsersNameCommand command)
    {
        if (command.UserId == Guid.Empty)
        {
            throw new ArgumentException("UserId cannot be empty");
        }
        if (String.IsNullOrWhiteSpace(command.Name))
        {
            throw new ArgumentNullException("Name cannot be null");
        }
    }
}

In case of errors, the command dispatcher will throw an AggregateException with all the possible exceptions in it.

Conclusion

The whole speaker database application is built like this: Using handlers to create small components, which are handling queries to fetch data or which are executing commands to do something with the data.

What do you think? Does it make sense to you? Would it be useful for your projects? Please drop some lines and tell me about your opinion :)

This library is hosted on GitHub in the "develop" branch. I would be happy about any type contribution on GitHub. Feel free to try id out and let me know about issues, tips and improvements :)

Using Dependency Injection in .NET Core Console Apps

$
0
0

The Dependency Injection (DI) Container used in ASP.NET Core is not limited to ASP.NET Core. You are able to use it in any kind of .NET Project. This post shows how to use it in an .NET Core Console application.

Create a Console Application using the dotnet CLI or Visual Studio 2017. The DI Container is not available by default, bit the IServiceProvider is. If you want to use an Custom or third party DI Container, you should provide an implementation if an IServiceProvider, as an encapsulation of a DI Container.

In this post I want to use the DI Container used in the ASP.NET Core projects. This needs an additional NuGet package "Microsoft.Extensions.DependencyInjection" (currently it is version 1.1.0)

Since this library is a .NET Standard Library, it should also work in a .NET 4.6 application. You just need to add a reference to "Microsoft.Extensions.DependencyInjection"

After adding that package we can start to use it. I created two simple classes which are dependent to each other, to show the how it works in a simple way:

public class Service1 : IDisposable
{
  private readonly Service2 _child;
  public Service1(Service2 child)
  {
    Console.WriteLine("Constructor Service1");
    _child = child;
  }

  public void Dispose()
  {
    Console.WriteLine("Dispose Service1");
    _child.Dispose();
  }
}

public class Service2 : IDisposable
{
  public Service2()
  {
    Console.WriteLine("Constructor Service2");
  }

  public void Dispose()
  {
    Console.WriteLine("Dispose Service2");
  }
}

Usually you would also use interfaces and create the relationship between this two classes, instead of the concrete implementation. Anyway, we just want to test if it works.

In the static void Main of the console app, we create a new ServiceCollection and register the classes in a transient scope:

var services = new ServiceCollection();
services.AddTransient<Service2>();
services.AddTransient<Service1>();

This ServiceCollection comes from the added NuGet package. Your favorite DI container possibly uses another way to register the services. You could now share the ServiceCollection to additional components, who wants to share some more services, in the same way ASP.NET Core does it with the AddSomething (e. g. AddMvc()) extension methods.

Now we need to create the ServiceContainer out of that collection:

var provider = services.BuildServiceProvider();

We can also share the ServiceProvider in our application to retrieve the services, but the proper way is to use it only on a single entry point:

using (var service1 = provider.GetService<Service1>())
{
  // so something with the class
}

Now, let's start the console app and look at the console output:

As you can see, this DI container is working in any .NET Core app.

Viewing all 490 articles
Browse latest View live