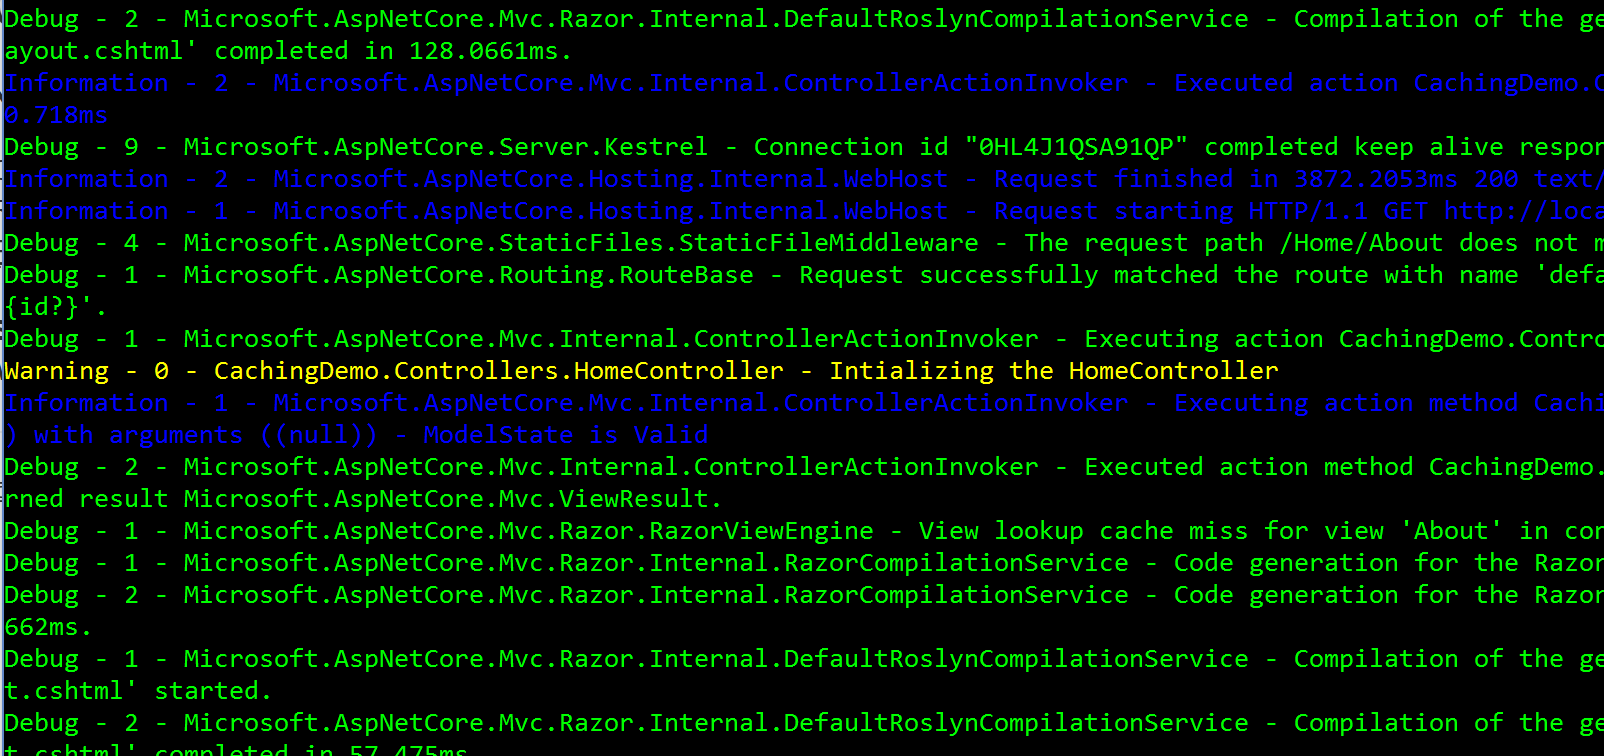
Using the latest bits of Visual Studio 2017 and the latest SDK of .NET Core, you will possibly get an error while starting your ASP.NET Core Web in Visual Studio 2017 or using dotnet run.
In Visual Studio 2017 the browser opens on pressing F5, but with wired HTML code in the address bar. Debugging starts and stops a few seconds later. Using the console you'l get a more meaningful error message:
Image may be NSFW. Clik here to view.
This error means, something is missing the system.runtime.dll ("System.Runtime, Version=4.2.0.0") which is not referenced or used somewhere directly. I had a deeper look into the NuGet references and couldn't found it.
Because I often had problems with BrowserLink in the past, I removed the NuGet reference from the project and all worked fine. I added it again, to be sure that the removal didn't clean up anything. The error happened again.
It seams that the current Version of BrowserLink is referencing a library which is not supported by the app. Remove it, if you get the same or a similar error.
BrowserLink in general is a pretty cool feature, it refreshes the browser magically if anything changes on the server. With this tool, you are able to edit your CSS files and preview it directly in the browser without doing a manual refresh. It is a VisualStudio Add-in and uses NuGet-Packages to extend your app to support it.
In one of the ASP.NET Core projects we did in the last year, we created an OutputFormatter to provide a Word documents as printable reports via ASP.NET Core Web API. Well, this formatter wasn't done by me, but done by a fellow software developer Jakob Wolf at the yooapps.com. I told him to write about it, but he hadn't enough time to do it yet, so I'm going to do it for him. Maybe you know about him on Twitter. Maybe not, but he is one of the best ASP.NET and Angular developers I ever met.
About OutputFormatters
In ASP.NET you are able to have many different formatters. The best known built-in formatter is the JsonOutputFormatter which is used as the default OutputFormatter in ASP.NET Web API.
By using the AddMvcOptions() you are able to add new Formatters or to manage the existing formatters:
As you can see in the snippet above, we add the Word document formatter (called WordOutputFormatter to provide the Word documents if the requested type is "application/ms-word".
You are able to add whatever formatter you need, provided on whatever media type you want to support.
Let's have a look how a output formatter looks like:
public class MyFormatter : IOutputFormatter
{
  public bool CanWriteResult(OutputFormatterCanWriteContext context)
  {
    // check whether to write or not
    throw new NotImplementedException();
  }

  public async Task WriteAsync(OutputFormatterWriteContext context)
  {
    // write the formatted contents to the response stream.
    throw new NotImplementedException();
  }
}
You have one method to check whether the data can be written to the expected format or not. The other async method does the job to format and output the data to the response stream, which comes with the context.
This way needs to do some things manually. A more comfortable way to implement an OutputFormatter is to inherit from the OutputFormatter base class directly:
public class WordOutputFormatter : OutputFormatter
{
  public string ContentType { get; }

  public WordOutputFormatter()
  {
    ContentType = "application/ms-word";
    SupportedMediaTypes.Add(MediaTypeHeaderValue.Parse(ContentType));
  }

  // optional, but makes sense to restrict to a specific condition
  protected override bool CanWriteType(Type type)
  {
    if (type == null)
    {
      throw new ArgumentNullException(nameof(type));
    }

    // only one ViewModel type is allowed
    return type == typeof(DocumentContentsViewModel);
  }

  // this needs to be overwritten
  public override Task WriteResponseBodyAsync(OutputFormatterWriteContext context)
  {
    // Format and write the document outputs here
    throw new NotImplementedException();
  }
}
The base class does some things for you. For example to write the correct HTTP headers.
Creating Word documents
To create Word documents you need to add a reference to the Open XML SDK. We used the OpenXMLSDK-MOT with the version 2.6.0, which cannot used with .NET Core. This is why we run that specific ASP.NET Core project on .NET 4.6.
Version 2.7.0 is available as a .NET Standard 1.3 library and can be used in .NET Core. Unfortunately this version isn't yet available in the default NuGet Feed. To install the latest Version, follow the instructions on GitHub: https://github.com/officedev/open-xml-sd Currently there is a mess with the NuGet package IDs and versions on NuGet and MyGet. Use the MyGet feed, mentioned on the GitHub page to install the latest version. The package ID here is DocumentFormat.OpenXml and the latest stable Version is 2.7.1
In this post, I don't want to go threw all the word processing stuff , because it is too specific to our implementation. I just show you how it works in general. The Open XML SDK is pretty well documented, so you can use this as an entry point to create your own specific WordOutputFormatter:
public override async Task WriteResponseBodyAsync(OutputFormatterWriteContext context)
{
  var response = context.HttpContext.Response;
  var filePath = Path.GetTempFileName();

  var viewModel = context.Object as DocumentContentsViewModel;
  if (viewModel == null)
  {
    throw new ArgumentNullException(nameof(viewModel));
  }

  using (var wordprocessingDocument = WordprocessingDocument
         .Create(filePath, WordprocessingDocumentType.Document))
  {
    // start creating the documents and the main parts of it
    wordprocessingDocument.AddMainDocumentPart();

    var styleDefinitionPart = wordprocessingDocument.MainDocumentPart
      .AddNewPart<StyleDefinitionsPart>();
    var styles = new Styles();
    styles.Save(styleDefinitionPart);

    wordprocessingDocument.MainDocumentPart.Document = new Document
    {
      Body = new Body()
    };
    var body = wordprocessingDocument.MainDocumentPart.Document.Body;

    // call a helper method to set default styles
    AddStyles(styleDefinitionPart);
    // call a helper method set the document to landscape mode
    SetLandscape(body);

    foreach (var institution in viewModel.Items)
    {
      // iterate threw some data of the viewmodel
      // and create the elements you need

      // ... more word processing stuff here

    }

    await response.SendFileAsync(filePath);
  }
}
The VewModel with the data to format, is in the Object property of the OutputFormatterWriteContext. We do a save cast and check for null before we continue. The Open XML SDK works based on files. This is why we need to create a temp file name and let the SDK use this file path. Because of that fact - at the end - we send the file out to the response stream using the response.SendFileAsync() method. I personally prefer to work on the OutputStream directly, to have less file operations and to be a little bit faster. The other thing is, we need to cleanup the temp files.
After the file is created, we work on this file and create the document, custom styles and layouts and the document body, which will contain the formatted data. Inside the loop we are only working on that Body object. We created helper methods to add formatted values, tables and so on...
Conclusion
OutputFormatters are pretty useful to create almost any kind of content out of any kind of data. Instead of hacking around in the specific Web API actions, you should always use the OutputFormatters to have reusable components.
The OutputFormatter we build, is not really reusable or even generic, because it was created for a specific kind of a report. But with this starting point, we are able to make it generic. We could pass a template document to the formatter, which knows the properties of the ViewModel, this way it is possible to create almost all kind of Word documents.
I recently read the pretty cool blog post by Ben Cull about the IsActiveRoute TagHelper: http://benjii.me/2017/01/is-active-route-tag-helper-asp-net-mvc-core/. This TagHelper adds a css class to an element, if the specified route or route parts are in the current active route. This is pretty useful, if you want to highlight an active item in a menu.
Inspired by this idea, I created a different TagHelper, which shows or hide contents, if the specified route or route parts are in the current route. This could be useful, e.g. if you don't want to have a link in an active menu item.
From the perspective of an semantic web, it doesn't make sense to link to the current page. That means, the menu item that points to the current page should not be a link.
As you may see on the a-Tag, multiple TagHelper can work on a single Tag. In this case the built in AnchorTagHelper and the ActiveRouteTagHelper are manipulating the Tag. The a-Tag will be hidden if the specified route is active and the span-Tag is shown in that case.
If you now navigate to the About page, the a-Tag is removed from the specific menu item and the span-Tag is shown. The HTML result of the menu now looks pretty clean:
Using this approach for the menu, we don't need Ben Culls TagHelper here to add a special CSS class. The style for the active item can be set via the selection of that list item with just the span in it:
.nav.navbar-nav li > a { ... }
.nav.navbar-nav li > a > span { ... }
.nav.navbar-nav li > span { ... } /* this is the active item*/
This CSS is based on the default Bootstrap based template in a new ASP.NET Core project. If you use another template, just replace the CSS class which identifies the menu with your specific identifier.
That means, to get that active menu item looking nice, you may just add a CSS like this:
To get this working, we need to implement the TagHelper. I just created a new class in the project and called it ActiveRouteTagHelper and added the needed properties:
[HtmlTargetElement(Attributes = "asp-active-route")]
public class ActiveRouteTagHelper : TagHelper
{
  [HtmlAttributeName("asp-controller")]
  public string Controller { get; set; }

  [HtmlAttributeName("asp-action")]
  public string Action { get; set; }

  [HtmlAttributeName("asp-hide-if-active")]
  public bool HideIfActive { get; set; }
}
That class inherits the TagHelper base class. To use it on any HTML tag, I defined a attribute name which is needed to on the HTML we want to manipulate. I used the name "asp-active-route". Also the attributes getting a specific name. I could use the default name, without the leading "asp" prefix, but I thouhgt it would make sense to share the Controller and Action properties with the built-in AnchorTagHelper. And to be consistent, I use the prefix in all cases.
Now we need to override the Process method to actually manipulate the specific HTML tag:
public override void Process(TagHelperContext context, TagHelperOutput output)
{
  if (!CanShow())
  {
    output.SuppressOutput();
  }

  var attribute = output.Attributes.First(x => x.Name == "asp-active-route");
  output.Attributes.Remove(attribute);
}
If I cannot show the Tag because of the conditions in the CahShow() method, I completely suppress the output. Nothing is generated in that case. Not the contents and not the HTML tag itself.
At the end of the method, I remove the identifying attribute, which is used to activate this TagHelper, because this attribute will be kept usually.
To get the RouteData of the current route, we cant use the TagHelperContext or the TagHelperOutput. We need to add the inject the ViewContext:
[HtmlAttributeNotBound]
[ViewContext]
public ViewContext ViewContext { get; set; }
Now we are able to access the route data and get the needed information about the current route:
private bool CanShow()
{
  var currentController = ViewContext.RouteData.Values["Controller"].ToString();
  var currentAction = ViewContext.RouteData.Values["Action"].ToString();

  var show = false;
  if (!String.IsNullOrWhiteSpace(Controller) &&
      Controller.Equals(currentController, StringComparison.CurrentCultureIgnoreCase))
  {
    show = true;
  }
  if (show &&
      !String.IsNullOrWhiteSpace(Action) &&
      Action.Equals(currentAction, StringComparison.CurrentCultureIgnoreCase))
  {
    show = true;
  }
  else
  {
    show = false;
  }

  if (HideIfActive)
  {
    show = !show;
  }

  return show;
}
One last step you need to do, is to register your own TagHelpers. In Visual Studio open the _ViewImports.cshtml and add the following line of code:
@addTagHelper *, CoreWebApplication
Where CoreWebApplication is the assembly name of your project. * means use all TagHelpers in that library
Conclusion
I hope this makes sense to you and helps you a little more to get into the TagHelpers.
I always have fun, creating a new TagHelper. With less code, I'm able to extend the View engine the way I need.
I always focus on semantic HTML, if possible. Because it makes the Web a little more accessible to other devices and engines than we usually use. This could be screen readers for blind people, as well as search engines. Maybe I can do some more posts about accessibility in ASP.NET Core applications.
One of my last post was about Dependency Injection (DI) in .NET Core Console Applications. Some days after that post was published, I got a question about how to use the IServiceCollection in multiple projects. In this post I'm going to try to explain, how to use the IServiceCollection in a Solution with more projects.
Setup
To demonstrate that, I created a Solutions with two .NET Core Console apps and two .NET Standard libraries. One of the console apps uses two of the libraries and the other one is just using on. Each library provides some services which need to be registered to the DI container. Also the console apps provide some services to add.
We now have four projects like this:
DiDemo.SmallClient
.NET Core Console app
includes a WriteSimpleDataService
references DiDemo.CsvFileConnector
DiDemo.BigClient
.NET Core Console app
includes a WriteExtendedDataService
includes a NormalizedDataService
references DiDemo.SqlDatabaseConnector
references DiDemo.CsvFileConnector
DiDemo.SqlDatabaseConnector
.NET Standard library
includes a SqlDataService
includes a SqlDataProvider used by the service
DiDemo.CsvFileConnector
.NET Standard library
includes a CsvDataService
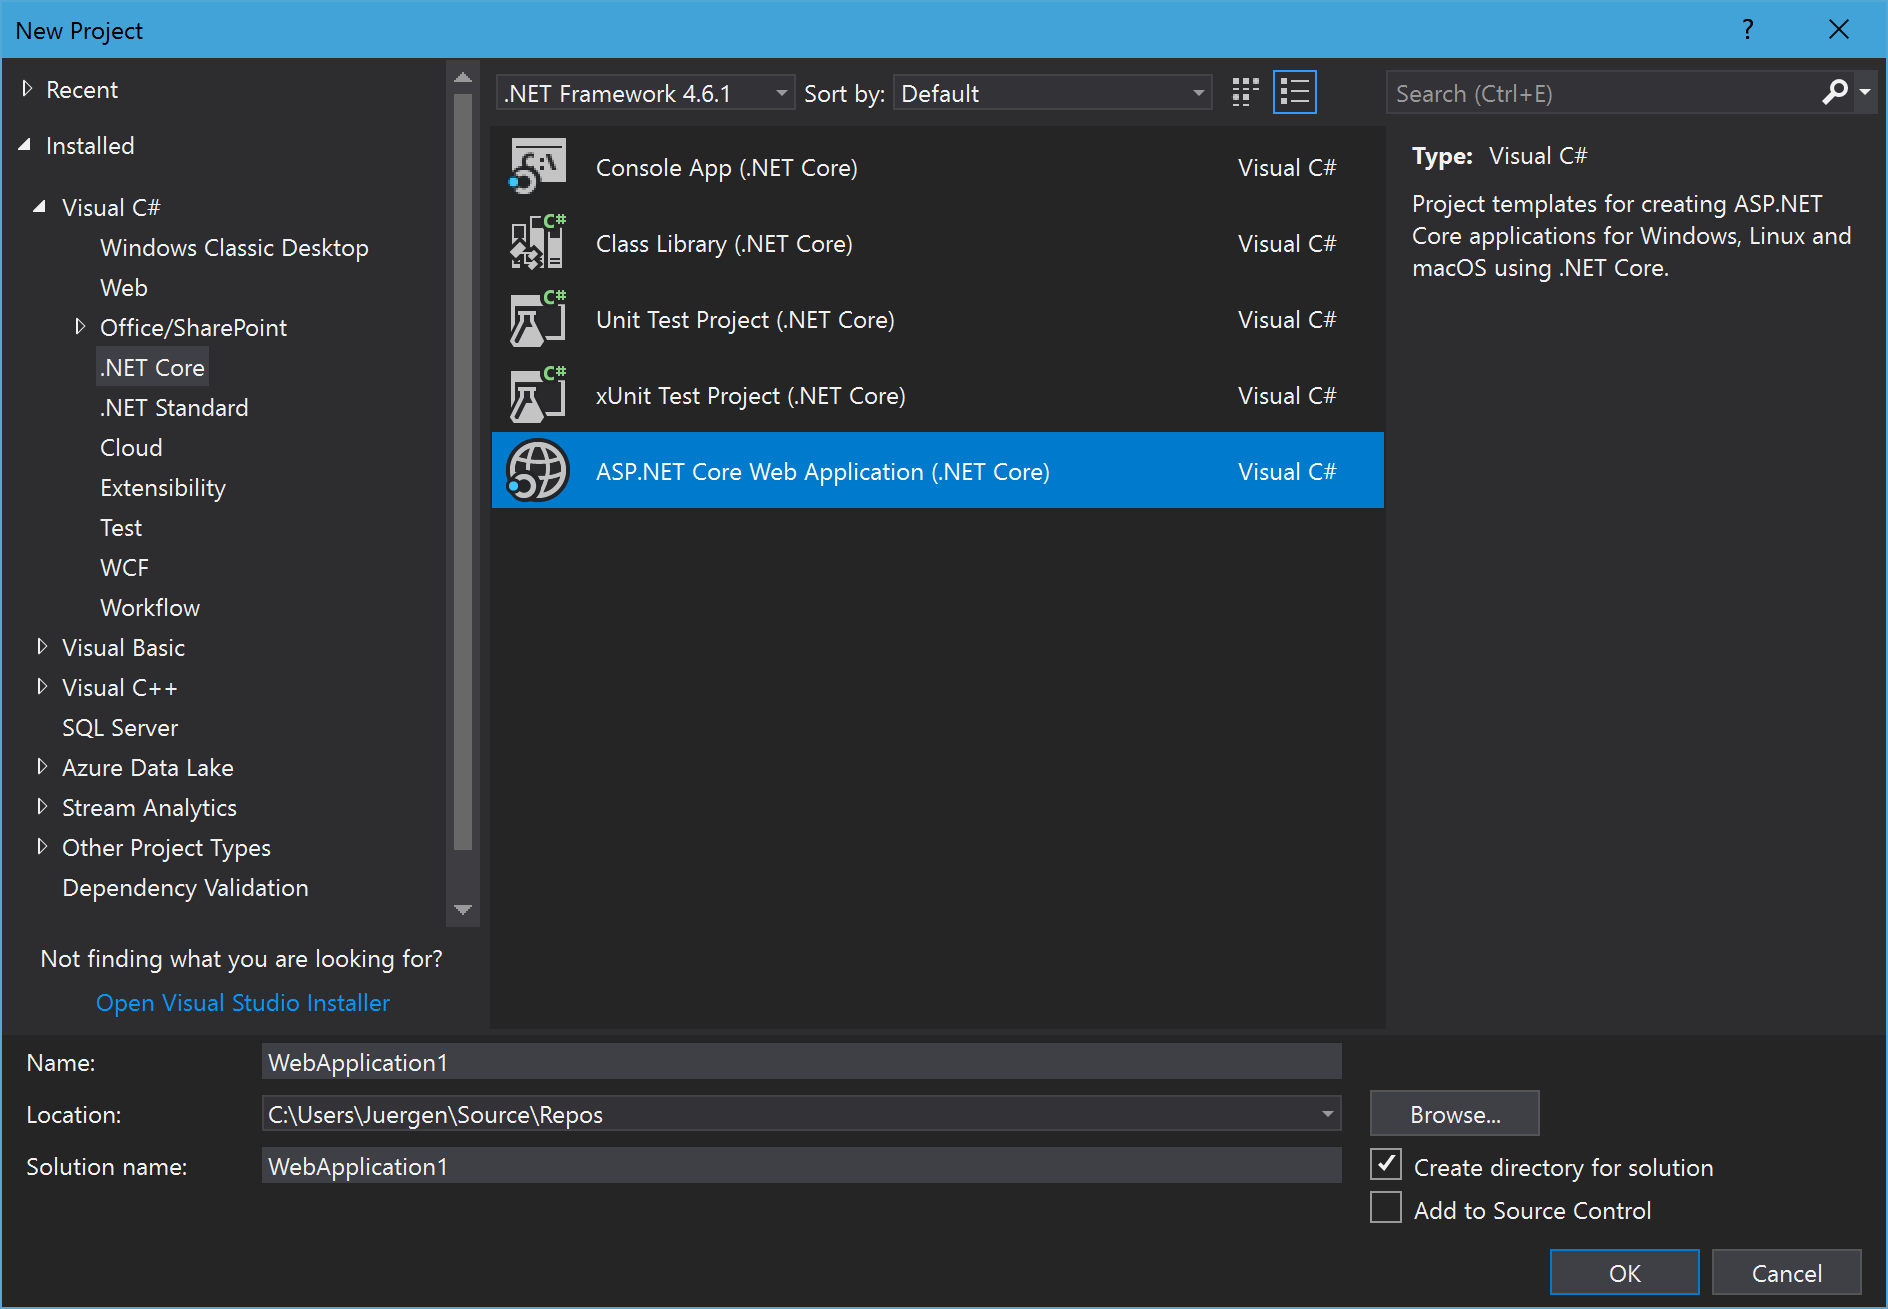
BTW: Since one of the latest updates the "Class Libraries (.NET Standard)" project disappeared from the ".NET Core" node in the "Add New Project" dialogue and the "Class Library (.NET Core)" is back again. The "Class Libraries (.NET Standard)" is now in the ".NET Standard" node under the "Visual C#" node.
In the most cases it doesn't really makes sense to create a .NET Core class library. The difference here is, that the Class Library (.NET Core) has some .NET Core related references. They targeting the netcoreapp1.x instead of the netstandard1.x. This means they have a lot of references, which are not needed in a class library in the most cases, e. g. the Libuv and the .NET Core runtime.
The WriteExtendedDataService uses a INormalizedDataService to get the data and writes it to the console. The NormalizedDataService fetches the data from the CsvDataService and from the SqlDataService and normalize it, to make it usable in the WriteExtendedDataService.
The WriteSimpleDataService uses only the ICsvDataService and writes the data out to the console.
Setup the DI container
Let's setup the DI container for the SmallClient app. Currently it looks like this:
var services = new ServiceCollection();
services.AddTransient<IWriteSimpleDataService, WriteSimpleDataService>();
services.AddTransient<ICsvDataService, CsvDataService>();

var provider = services.BuildServiceProvider();

var writer = provider.GetService<IWriteSimpleDataService>();
writer.write();
That doesn't really look wrong, but what happens if the app grows and gets a lot more services to add to the DI container? The CsvDataService is not in the app directly, but it is in the separate library. Usually I don't want to map all the services of the external library. I just want to use the library and I don't want to know anything about the internal stuff. This is why we should set-up the mapping for the DI container also in the external library.
Let's plug things together
The .NET Standard libraries should reference the Microsoft.Extensions.DependencyInjection.Abstractions to get the IServiceCollection interface. Now we can create a public static class called IServiceCollectionExtensions to create an extension method to work in the IServiceCollection:
public static class IServiceCollectionExtension
{
  public static IServiceCollection AddCsvFileConnector(this IServiceCollection services)
  {
    services.AddTransient<ICsvDataService, CsvDataService>();
    return services;
  }
}
Inside this method we do all the mappings from the interfaces to the concreate classes or all the other registrations to the DI container. Let's do the same to encapsulate all the services inside the SmallClient app and to keep the program.cs as small as possible:
public static class IServiceCollectionExtension
{
  public static IServiceCollection AddInternalServices(this IServiceCollection services)
  {
    services.AddTransient<IWriteSimpleDataService, WriteSimpleDataService>();
    return services;
  }
}
We can now use this methods in the program.cs of the SmallClient app to plug all that stuff together:
var services = new ServiceCollection();
services.AddInternalServices();
services.AddCsvFileConnector();

var provider = services.BuildServiceProvider();

var writer = provider.GetService<IWriteSimpleDataService>();
writer.write();
It looks much cleaner now. Maybe you remember the AddSomething methods? Exacctly, this is the same way, it is done in ASP.NET Core with e. g. the services.AddMvc() method.
We now need to do the same thing for the BigClient app and the SqlDatabaseConnector library. At first let's create the mapping for the SqlDatbaseConnector:
public static class IServiceCollectionExtension
{
  public static IServiceCollection AddSqlDatabaseConnector(this IServiceCollection services)
  {
    services.AddTransient<ISqlDataService, SqlDataService>();
    services.AddTransient<ISqlDataProvider, SqlDataProvider>();
    return services;
  }
}
We also need to create a extension method for the internal services:
public static class IServiceCollectionExtension
{
  public static IServiceCollection AddInternalServices(this IServiceCollection services)
  {
    services.AddTransient<IWriteExtendedDataService, WriteExtendedDataService>();
    services.AddTransient<INormalizedDataService, NormalizedDataService>();
    return services;
  }
}
Now let's plug that stuff together in the BigClient App:
var services = new ServiceCollection();
services.AddInternalServices();
services.AddCsvFileConnector();
services.AddSqlDatabaseConnector();

var provider = services.BuildServiceProvider();

var writer = provider.GetService<IWriteExtendedDataService>();
writer.write();
As you can see, the BigClient app uses the already existing services.AddCsvFileConnector() method.
Does it really work?
It does. Start the BigClient app in Visual Studio to see that it will work as expected:
This is a guest post, written by Olivier Giss about integrating Meetup events on your website. Olivier is working as a web developer at algacom AG in Basel and also one of the leads of the .NET User Group Nordwest-Schweiz
For two years, I am leading the .NET User Group Nordwest-Schweiz with Jürgen Gutsch that owns this nice blog. After a year, we decided also to use Meetup to get more participants.
Understanding the problem
But with each added platform where we post our events, we increased the workload to keep it all up to date. Jürgen had the great idea to read the Meetup events and list them on our own website to lower the work.
This is exactly what I want to show you.
The Meetup API
Before we start coding we should understand how the API of Meetup is working and what it does offer. The API of Meetup is well documented and supports a lot of data. What we want is to get a list of upcoming events for our meetup group and display it on the website without to be authenticated on meetup.com.
For our goal, we need the following meetup API method:
The parameter “:urlname” is the meetup group name. In the request body we could sort, filter and control paging what we don’t need. If we would execute that query, you get an authorization error.
However, we don’t want that the user must be authenticated to get the events. To get it to work we need to use a JSONP request.
Let’s getting it done
The simplest way doing a JSONP request is using jQuery:
Be aware: JSONP has some security implications. As JSONP is really JavaScript, it can do everything that is possible in the context. You need to trust the provider of the JSONP data!
After that call, we are getting the data from the Meetup API which can be used with simple data binding to display it on our website. You can choose any kind of MV* JS framework to do that. I used AngularJS.
<div class="row" ng-repeat="model in vm.Events track by model.Id" ng-cloak><a href="" target="_blank" title="Öffnen auf meetup.com"><h3></h3></a><label>Datum und Uhrzeit</label><p></p><label>Description</label><div ng-bind-html="model.Description"></div><label>Ort</label><p></p></div>
As you can see everything is One-Way bound because the data is never changed. The “ng-bind-html” binds HTML content from the meetup event description.
The Angular controller is simple, it uses the "$sce” service to ensure that the provided HTML content from the meetup API is marked as secure. When we change a model outside of angular, we must notify our changes with “vm.scope.$apply()”.
(function () {
  var module = angular.module('app', []);

  module.controller('MeetupEventsController', ['$scope', '$sce', MeetupEventsController]);

  MeetupEventsController.$inject = ['$scope', '$sce'];

  function MeetupEventsController($scope, $sce) {

    var vm = this;
    vm.Events = [];
    vm.scope = $scope;
    vm.loaded = false;

    vm.Refresh = function() {
      $.ajax({
        url: "https://api.meetup.com/Basel-NET-User-Group/events",
        jsonp: "callback",
        dataType: "jsonp",
        data: {
          format: "json"
        },
        success: function(response) {
          var events = response.data;

          for (var i = 0; i < events.length; i++) {
            var item = events[i];

            var eventItem = {
              Id: i,
              DisplayName: item.name,
              Description: $sce.trustAsHtml(item.description),
              Location: item.venue.name + " " + item.venue.address_1 + " " + item.venue.city,
              Time: new Date(item.time).toLocaleString(),
              Link :item.link,
            };
            vm.Events.push(eventItem)
          }
          vm.loaded = true;
          vm.scope.$apply();
        }
      });
    };
    function activate() {
      vm.Refresh();
    };
    activate();
  };
})();
Finally, we are finish. Not that complicated, right? Feel free to ask question or share your experience.
MSTest was just announced to be open sourced, but was already moved to .NET Core some months ago. It seems it makes sense to write another blog post about unit testing .NET Core applications and .NET Standard libraries using .NET Core tools.
In this post I'm going to use the dotnet CLI and Visual Studio Code completely. Feel free to use Visual Studio 2017 instead, if you want to and if you don't like to use the console. Visual Studio 2017 is using the same dotnet CLI and almost the same commands in the background.
Setup the system under test
Our SUT is a pretty complex class, that helps us a lot to do some basic math operation. This class will be a part of a super awesome library:
namespace SuperAwesomeLibrary
{
  public class MathTools
  {
    public decimal Add(decimal a, decimal b) =>  a + b;
    public decimal Substr(decimal a, decimal b) => a - b;
    public decimal Multiply(decimal a, decimal b) => a * b;
    public decimal Divide(decimal a, decimal b) => a / b;
  }
}
I'm going to add this class to the "SuperAwesomeLibrary" and a solution I recently added like this:
mkdir unit-tests & cd unit-tests
dotnet new sln -n SuperAwesomeLibrary
mkdir SuperAwesomeLibrary & cd SuperAwesomeLibrary
dotnet new classlib
cd ..
dotnet sln add SuperAwesomeLibrary\SuperAwesomeLibrary.csproj
The cool thing about the dotnet CLI is, that you are really able to create Visual Studio solutions (line 2). This wasn't possible with the previous versions. The result is a Visual Studio and MSBuild compatible solution and you can use and build it like any other solution in your continuous integration environment. Line 5 creates a new library, which will be added to the solution in line 7.
After this is done, the following commands will complete the setup, by restoring the NuGet packages and building the solution:
dotnet restore
dotnet build
Adding xUnit tests
The dotnet CLI directly supports to add XUnit tests:
mkdir SuperAwesomeLibrary.Xunit & cd SuperAwesomeLibrary.Xunit
dotnet new xunit
dotnet add reference ..\SuperAwesomeLibrary\SuperAwesomeLibrary.csproj
cd ..
dotnet sln add SuperAwesomeLibrary.Xunit\SuperAwesomeLibrary.Xunit.csproj
This commands are creating the new xUnit test project, adding a reference to the SuperAwesomeLibrary and adding the test project to the solution.
If this was done, I created the xUnit tests for our MathHelper using VSCode:
public class MathToolsTests
{
  [Fact]
  public void AddTest()
  {
    var sut = new MathTools();
    var result = sut.Add(1M, 2M);
    Assert.True(3M == result);
  }
  [Fact]
  public void SubstrTest()
  {
    var sut = new MathTools();
    var result = sut.Substr(2M, 1M);
    Assert.True(1M == result);
  }
  [Fact]
  public void MultiplyTest()
  {
    var sut = new MathTools();
    var result = sut.Multiply(2M, 1M);
    Assert.True(2M == result);
  }
  [Fact]
  public void DivideTest()
  {
    var sut = new MathTools();
    var result = sut.Divide(2M, 2M);
    Assert.True(1M == result);
  }
}
This should work and you need to call your very best dotnet CLI friends again:
dotnet restore
dotnet build
The cool thing about this commands is, it works in your solution directory and restores the packages of all your solution and it builds all your projects in your solution. You don't need to go threw all of your projects separately.
But if you want to run your tests, you need to call the library or the project directly, if you are not in the project folder:
dotnet test SuperAwesomeLibrary.Xunit\SuperAwesomeLibrary.Xunit.csproj
If you are in the test project folder just call dotnet test without the project file.
This command will run all your unit tests in your project.
Adding MSTest tests
Adding a test library for MSTest works the same way:
mkdir SuperAwesomeLibrary.MsTest & cd SuperAwesomeLibrary.MsTest
dotnet new mstest
dotnet add reference ..\SuperAwesomeLibrary\SuperAwesomeLibrary.csproj
cd ..
dotnet sln add SuperAwesomeLibrary.MsTest\SuperAwesomeLibrary.MsTest.csproj
Event the test class looks almost the same:
[TestClass]
public class MathToolsTests
{
  [TestMethod]
  public void AddTest()
  {
    var sut = new MathTools();
    var result = sut.Add(1M, 2M);
    Assert.IsTrue(3M == result);
  }
  [TestMethod]
  public void SubstrTest()
  {
    var sut = new MathTools();
    var result = sut.Substr(2M, 1M);
    Assert.IsTrue(1M == result);
  }
  [TestMethod]
  public void MultiplyTest()
  {
    var sut = new MathTools();
    var result = sut.Multiply(2M, 1M);
    Assert.IsTrue(2M == result);
  }
  [TestMethod]
  public void DivideTest()
  {
    var sut = new MathTools();
    var result = sut.Divide(2M, 2M);
    Assert.IsTrue(1M == result);
  }
}
And again our favorite commands:
dotnet restore
dotnet build
The command dotnet restore will fail in offline mode, because MSTest is not delivered with the runtime and the default NuGet packages, but xUnit is. This means, it needs to fetch the latest packages from NuGet.org. Kinda weird, isn't it?
The last task to do, is to run the unit tests:
dotnet test SuperAwesomeLibrary.MsTest\SuperAwesomeLibrary.MsTest.csproj
This doesn't really look hard.
What about Nunit?
Unfortunately there is no default template for a Nunit test projects. I really like Nunit and I used it for years. It is anyway possible to use NUnit with .NET Core, but you need to do some things manually. The first steps seem to be pretty similar to the other examples, except we create a console application and add the NUnit dependencies manually:
mkdir SuperAwesomeLibrary.Nunit & cd SuperAwesomeLibrary.Nunit
dotnet new console
dotnet add package Nunit
dotnet add package NUnitLite
dotnet add reference ..\SuperAwesomeLibrary\SuperAwesomeLibrary.csproj
cd ..
The reason why we need to create a console application is, that there is not yet a runner for visual studio available for NUnit. This also means dotnet test will not work. The NUnit Devs are working on it, but this seems to need some more time. Anyway, there is an option to use NUnitLite to create a self executing test library.
We need to use NUnitLight and to change the static void Main to a static int Main:
static int Main(string[] args)
{
  var typeInfo = typeof(Program).GetTypeInfo();
  return new AutoRun(typeInfo.Assembly).Execute(args);
}
This lines automatically executes all TestClasses in the current assembly. It also passes the NUnit arguments to NUnitLite, to e. g. setup the output log file, etc.
Let's add a NUnit test class:
[TestClass]
public class MathToolsTests
{
  [Test]
  public void AddTest()
  {
    var sut = new MathTools();
    var result = sut.Add(1M, 2M);
    Assert.That(result, Is.EqualTo(3M));
  }
  [Test]
  public void SubstrTest()
  {
    var sut = new MathTools();
    var result = sut.Substr(2M, 1M);
    Assert.That(result, Is.EqualTo(1M));
  }
  [Test]
  public void MultiplyTest()
  {
    var sut = new MathTools();
    var result = sut.Multiply(2M, 1M);
    Assert.That(result, Is.EqualTo(2M));
  }
  [Test]
  public void DivideTest()
  {
    var sut = new MathTools();
    var result = sut.Divide(2M, 2M);
    Assert.That(result, Is.EqualTo(1M));
  }
}
Finally we need to run the tests. But this time we cannot use dotnet test.
dotnet restore
dotnet build
dotnet run -p SuperAwesomeLibrary.Nunit\SuperAwesomeLibrary.Nunit.csproj
Because it is a console application, we need to use dotnet run to execute the app and the NUnitLite test runner.
What about mocking?
Currently creating mocking frameworks is a little bit difficult using .NET Standard, because there is a lot of reflection needed, which is not completely implemented in .NET Core or even .NET Standard.
My Favorite tool Moq is anyway available for .NET Standard 1.3, which means it should work here. Let's see how it works.
Lets assume we have a PersonService in the SuperAwesomeLibrary that uses a IPersonRepository to fetch Persons from a data storage:
using System;
using System.Collections.Generic;

public class PersonService
{
  private readonly IPersonRepository _personRepository;

  public PersonService(IPersonRepository personRepository)
  {
    _personRepository = personRepository;
  }

  public IEnumerable<Person> GetAllPersons()
  {
    return _personRepository.FetchAllPersons();
  }
}

public interface IPersonRepository
{
  IEnumerable<Person> FetchAllPersons();
}

public class Person
{
  public string Firstname { get; set; }
  public string Lastname { get; set; }
  public DateTime DateOfBirth { get; set; }
}
After building the library, I move to the NUnit test project to add Moq and GenFu.
GenFu is a really great library to create the test data for unit tests or demos. I really like this library and use it a lot.
Now we need to write the actual test using this tools. This test doesn't really makes sense, but it shows how Moq works:
using System;
using System.Linq;
using NUnit.Framework;
using SuperAwesomeLibrary;
using GenFu;
using Moq;

namespace SuperAwesomeLibrary.Xunit
{
  [TestFixture]
  public class PersonServiceTest
  {
    [Test]
    public void GetAllPersons()
    {
      var persons = A.ListOf<Person>(10); // generating test data using GenFu
      var repo = new Mock<IPersonRepository>();
      repo.Setup(x => x.GetAllPersons()).Returns(persons);

      var sut = new PersonService(repo.Object);
      var actual = sut.GetAllPersons();

      Assert.That(actual.Count(), Is.EqualTo(10));
    }
  }
}
As you can see the, Moq works the same was in .NET Core as in the full .NET Framework.
Now let's start the NUnit tests again:
dotnet build
dotnet run
Et voilà:
Image may be NSFW. Clik here to view.
Conclusion
Running unit tests within .NET Core isn't really a big deal and it is really a good thing that it is working with different unit testing frameworks. You have the choice to use your favorite tools. It would be nice to have the same choice even with the mocking frameworks.
In one of the next post I'll write about unit testing a ASP.NET Core application. Which includes testing MiddleWares, Controllers, Filters and View Components.
Since a while we use Git Flow in our projects at the YooApps. Git Flow is a add-in for Git, that helps us to follow the feature branch process in a standard way. We usually use our Jira ticket number as names for features, bugs or hotfix and we use the Jira Version as a Release name. This makes absolutely sense to us and makes the flow pretty transparent. We also use BitBucket to host our Git repositories, which is directly linked to Jira. That means on every Pull Request we have the direct link to the Jira ticket.
Using Git Flow to release new posts
My idea is to also use Git Flow to release new blog posts.
My blog is generated by Pretzel, which is a Jekyll clone written in C#. I host it on an Azure Web Site. I write my posts in GitHub style Markdown files and push them to GitHub. Every time I push a new post, the Azure Web Site starts a new build and runs Pretzel to generate the static blog.
Dear hackers and bots: Because it is a static web site, it doesn't make sense to search for WordPress login pages or WordPress APIs on my blog ;)
Since almost one and a halve year now, I use Git on GitHub to publish my posts, but I only use the master branch yet and I don't commit the drafts. I sometimes write two or three post in parallel and I anyway have around ten drafts in the Pretzels _drafts folder. This feels a bit messy and I will probably loose my drafted posts, if the machine crashes.
Using Git Flow, I don't need to use the _drafts folder anymore. Every unfinished feature branch is a draft. If I finish a post, I would just need to finish the feature branch. If I want to publish the posts, I can start a new release.
Maybe the release step is a bit too much. But currently I need to push explicitly to publish a new post and it shouldn't be a big deal to also create a new release to merge all finished posts from develop to master. If it doesn't fit, it would be easy to switch to the more simple feature branches.
Let's see how it works :-)
This blog post feature branch is created by using the following commands in the console:
git flow feature start blogging-with-git-flow
Now I'm in the draft mode and will create the blog post file, writing, adding images, linking between existing posts and so on. If this is done I do a first commit and publish the feature branch to GitHub:
git add _posts/*
git add img/*
git commit -m "new post about blogging with pretzel"
git flow feature publish
At this state I can change and commit as much as I want to. If I finish the blog post, I'm going to finish the post and push the current develop branch to GitHub:
git flow feature finish
git push
The last step is publishing the posts. I currently not sure, but I could probably use the number of posts as the minor version number, which will also be used as tag for the release:
(I possibly should create a batch command to execute the four lines to release new posts)
After that push, Pretzel will start "baking" the blog including the new blog post.
If I want to see the current drafts, I just need to display the existing branches:
Image may be NSFW. Clik here to view.
I'm sure this will be a clean way to publish and to handle the drafts and finished posts.
Versioning
While publishing the latest post like this, I realized that GitHub actually will display a release in the GitHub repository, this is quite nice. This is not really needed but a funny fact and a reason why I wanna think a little more about the version numbers, if I release a new article.
My idea is to change the Major version, if I do a huge change on the layout of the blog or if I add a new feature. Because the layout is still the first version and I only did some really small changes, I'll keep it as version 1. For the minor version I will use the number of published articles.
This doesn't really makes sense from the semver perspective, but blogging should also be fun and this really means is fun to me.
This means, with the latest post I published release 1.47.0 and this post will be in release 1.48.0 ;-)
Authoring
In the last post about writing blog posts using Pretzel, I wrote that I use MarkdownPad 2 to write my pots. Unfortunately it seems that this editor is not longer maintained, no new version was published for a while. I paid for it, to have some more extended feature to use. Anyway, a few months ago it crashes every time I opened it and there was no way to get an updated or fixed version. (I'm pretty sure it was related to the installation of CefSharp.) This is why I now use Typora, which is pretty minimalistic and lightweight. It works completely different, but in a pretty cool way. It doesn't use a splitted screen to edit and preview the content. With typora you write markdown code directly and it immediately translated it to the preview in the same editor view. It also supports custom CSS and different Markdown styles. It is real WYSIWYG.
Image may be NSFW. Clik here to view.
Any thoughts about it? Feel free to drop a comment and let me know :-)
Since years, I'm using a password manager to store and manage all my credentials for all the accounts I use. The usage of such a tool is pretty common for me and it is a normal flow for me to create a new entry in the password manager first before I create the actual account.
I'm always amazed, if I meet people, who don't use any tool to store and manage their credentials. They use the same password or the same bunch of passwords everywhere. This is dangerous and most of them already know about that. Maybe they are to lazy to spend one or two ours to think about the benefits and to search for the right tool or they simply don't know about such tools
For me the key benefits are pretty clear:
I don't need to remember all the passwords.
I don't need to think about secure passwords while creating new one
I just need to remember one single passphrase
Longer passwords are more secure than short ones, even if the short ones include special characters, numbers and upper case characters. But longer passwords are pretty hard to remember. This is why Edward Snowden proposed to use passphrases instead of passwords. Using passphrases like this, are easy to remember. But would it really makes sense to create a different pass-phrase for every credentials you use? I don't think so.
Image may be NSFW. Clik here to view.
I just created a single pass-phrase which is used with the password manager and I use the password manager to generate the long passwords for me. Most of the generated password are like this:
The tool I use is KeePass 2, which is available on almost all devices and OS I use. As small desktop app on Windows, Mac and Linux as an app on Windows phones and Android. (Probably on iOS too, but I don't use such a device). KeePass stores the passwords on a encrypted file. This file could be stored on a USB drive or on a shared folder in the cloud. I use the cloud way to share the file to every device. The cloud store itself is secured with a password I don't know and which is stored in that KeePass file.
What the F***, you really put the key to lock your house into a safe which is inside your house?
Yes!
The KeyPass file is synced offline and offline accessible on all devices. If the file changes it will be synched to all devices. I'm still able to access all credentials.
With the most password mangers, you are able to copy the username and the password, using shortcuts to the login forms. Some of them are able to automatically fill in the credentials. KeePass uses the clipboard, but deletes the values from the clipboard after a couple of seconds. Like this, no one else can access or reuse the credentials within the clipboard.
There are many more password manager out there. But KeePass - with the encrypted file - works best for me. I'm responsible to store the file on a save location and I can do that wherever I want.
Summary
Use a password manager! Spend the time to try the tools and choose the tools that fits you best. It is important! Once you use a password manager, you never want to work without one. It will make you live easier and hopefully more secure.
Since a couple of years I use FAKE (C# Make) to configure my builds. Also at the YooApps we use FAKE in some projects. One of the projects uses it since more than two years. FAKE is really great and I love to use it, but there is one problem with it: The most C# developers don't really like to use new things. The worst case for the most C# developers - it seems - is a new tool, that uses an exotic language like F#.
This is why I have to maintain the FAKE build scripts, since I introduced FAKE to the team.
It is that new tool and the F# language that must be scary for them, even if they don't really need to learn F# for the most common scenarios. That's why I asked the fellow developers to use CAKE (C# Make).
It is C# make instead of F# make
It looks pretty similar
It works the same way
It is a scripting language
It works almost everywhere
They really liked the idea to use CAKE. Why? just because of C#? It seems so...
It doesn't really makes sense to me, but anyway, it makes absolutely sense that the developers need to use and to maintain there own build configurations.
Image may be NSFW. Clik here to view.
How does CAKE work?
CAKE is built using a C# scripting language. It uses the Roslyn compiler to compile the scripts. Instead of using batch files, as FAKE does, it uses a PowerShell script (build.ps1) to bootstrap itself and to run the build script. The bootstrapping step loads CAKE and some dependencies using NuGet. The last step the PowerShell script does, is to call the cake.exe and to execute the build script.
The bootstrapping needs network access, to load all the stuff. It also loads the nuget.exe, if it's not available. If you don't like this, you can also commit the loaded dependencies to the source code repository.
If you know FAKE or even MSBuild it will look pretty familiar to you. Let's have a quick look into the first simple example of the getting started guide:
The first line retrieves the build target to execute from the command line arguments. Starting from line 3 we see a definition of a build target. This target just prints a "Hello World!" as a information message.
The last line starts the initial target by its name.
A more concrete code sample is the build script from the CAKE example (I removed some lines in this listing to get a shorter example):
This script uses another NuGet package to run the NUnit3 tests and references it. A nice feature is to configure the NuGet dependency at the beginning of the script.
This build script contains five targets. The method IsDependentOn("") wires the targets together in the right execution order. This way is a bit different to FAKE and maybe a little bit confusing. It needs to write the targets in the right execution order. If you don't write the script like this, you need to find the initial target and to follow the way back to the very first target. You will read the execution order from the last to the first target.
FAKE does this a little easier and wires the targets up in a single statement at the end of the file:
To run the build, just call .\build.ps1 in a PowerShell console:
Image may be NSFW. Clik here to view.
If you know FAKE, the results look pretty familiar:
Image may be NSFW. Clik here to view.
Conclusion
Anyway. I think CAKE gets pretty much faster accepted by the fellow developers at the YooApps than FAKE did. Some things will work a little easier in CAKE than in FAKE and some a little different, but the most stuff will work the same way. So it seems it makes sense to switch to use CAKE at the YooApps. So let's use it. :)
I'm sure, I will write down a comparison of FAKE and CAKE later, if I have used it for a few months.
The last couple of months I wanted to play around with Docker for Windows. It worked just twice. Once at the first try for just one or two weeks. Then I got an error, when Docker tries to initialize right after Windows starts. After I reinstalled Docker for Windows it runs the second time for a two or three weeks. I tried to reinstall all that stuff but I didn't get it running again on my machine.
Image may be NSFW. Clik here to view.
The error shown on this dialog is not really meaningful:
Object reference not set to an instance of an object...
Even the log didn't really help:
Version: 17.03.1-ce-win5 (10743)
Channel: stable
Sha1: b18e2a50ccf296bcd637b330c0ca9faaab9d790c
Started on: 2017/04/28 21:49:37.965
Resources: C:\Program Files\Docker\Docker\Resources
OS: Windows 10 Pro
Edition: Professional
Id: 1607
Build: 14393
BuildLabName: 14393.1066.amd64fre.rs1_release_sec.170327-1835
File: C:\Users\Juergen\AppData\Local\Docker\log.txt
CommandLine: "Docker for Windows.exe"
You can send feedback, including this log file, at https://github.com/docker/for-win/issues
[21:49:38.182][GUI            ][Info   ] Starting...
[21:49:38.669][GUI            ][Error  ] Object reference not set to an instance of an object.
[21:49:45.081][ErrorReportWindow][Info   ] Open logs
ASP.NET Core is pretty flexible, customizable and extendable. You are able to change almost everything. Even the logging. If you don't like the built-in logging, you are able to plug in your own logger or an existing logger like log4net, NLog, Elmah. In this post I'm going to show you how to add a custom logger.
The logger I show you, just writes out to the console, but just for one single log level. The feature is to configure different font colors per LogLevel. So this logger is called ColoredConsoleLogger.
General
To add a custom logger, you need to add an ILoggerProvider to the ILoggerFactory, that is provided in the method Configure in the Startup.cs:
The ILoggerProvider creates one or more ILogger which are used by the framework to log the information.
The Configuration
The idea is, to create different colored console entries per log level and event ID. To configure this we need a configuration type like this:
public class ColoredConsoleLoggerConfiguration
{
  public LogLevel LogLevel { get; set; } = LogLevel.Warning;
  public int EventId { get; set; } = 0;
  public ConsoleColor Color { get; set; } = ConsoleColor.Yellow;
}
This sets the default level to Warning and the color to Yellow. If the EventId is set to 0, we will log all events.
The Logger
The logger gets a name and the configuration passed in via the constructor. The name is the category name, which usually is the logging source, eg. the type where the logger is created in:
public class ColoredConsoleLogger : ILogger
{
  private readonly string _name;
  private readonly ColoredConsoleLoggerConfiguration _config;

  public ColoredConsoleLogger(string name, ColoredConsoleLoggerConfiguration config)
  {
    _name = name;
    _config = config;
  }

  public IDisposable BeginScope<TState>(TState state)
  {
    return null;
  }

  public bool IsEnabled(LogLevel logLevel)
  {
    return logLevel == _config.LogLevel;
  }

  public void Log<TState>(LogLevel logLevel, EventId eventId, TState state, Exception exception, Func<TState, Exception, string> formatter)
  {
    if (!IsEnabled(logLevel))
    {
      return;
    }

    if (_config.EventId == 0 || _config.EventId == eventId.Id)
    {
      var color = Console.ForegroundColor;
      Console.ForegroundColor = _config.Color;
      Console.WriteLine($"{logLevel.ToString()} - {eventId.Id} - {_name} - {formatter(state, exception)}");
      Console.ForegroundColor = color;
    }
  }
}
We are going to create a logger instance per category name with the provider.
The LoggerProvider
The LoggerProvider is the guy who creates the logger instances. Maybe it is not needed to create a logger instance per category, but this makes sense for some Loggers, like NLog or log4net. Doing this you are also able to choose different logging output targets per category if needed:
  public class ColoredConsoleLoggerProvider : ILoggerProvider
  {
    private readonly ColoredConsoleLoggerConfiguration _config;
    private readonly ConcurrentDictionary<string, ColoredConsoleLogger> _loggers = new ConcurrentDictionary<string, ColoredConsoleLogger>();

    public ColoredConsoleLoggerProvider(ColoredConsoleLoggerConfiguration config)
    {
      _config = config;
    }

    public ILogger CreateLogger(string categoryName)
    {
      return _loggers.GetOrAdd(categoryName, name => new ColoredConsoleLogger(name, _config));
    }

    public void Dispose()
    {
      _loggers.Clear();
    }
  }
There's no magic here. The method CreateLogger creates a single instance of the ColoredConsoleLogger per category name and stores it in the dictionary.
Usage
Now we are able to use the logger in the Startup.cs
public void Configure(IApplicationBuilder app, IHostingEnvironment env, ILoggerFactory loggerFactory)
{
  loggerFactory.AddConsole(Configuration.GetSection("Logging"));
  loggerFactory.AddDebug();
  // here is our CustomLogger
  loggerFactory.AddProvider(new ColoredConsoleLoggerProvider(new ColoredConsoleLoggerConfiguration
  {
    LogLevel = LogLevel.Information,
    Color = ConsoleColor.Blue
  }));
  loggerFactory.AddProvider(new ColoredConsoleLoggerProvider(new ColoredConsoleLoggerConfiguration
  {
    LogLevel = LogLevel.Debug,
    Color = ConsoleColor.Gray
  }));
But this doesn't really look nice from my point of view. I want to use something like this:
This means we need to write at least one extension method for the ILoggerFactory:
public static class ColoredConsoleLoggerExtensions
{
  public static ILoggerFactory AddColoredConsoleLogger(this ILoggerFactory loggerFactory, ColoredConsoleLoggerConfiguration config)
  {
    loggerFactory.AddProvider(new ColoredConsoleLoggerProvider(config));
    return loggerFactory;
  }
  public static ILoggerFactory AddColoredConsoleLogger(this ILoggerFactory loggerFactory)
  {
    var config = new ColoredConsoleLoggerConfiguration();
    return loggerFactory.AddColoredConsoleLogger(config);
  }
  public static ILoggerFactory AddColoredConsoleLogger(this ILoggerFactory loggerFactory, Action<ColoredConsoleLoggerConfiguration> configure)
  {
    var config = new ColoredConsoleLoggerConfiguration();
    configure(config);
    return loggerFactory.AddColoredConsoleLogger(config);
  }
}
With this extension methods we are able to pass in an already defined configuration object, we can use the default configuration or use the configure Action as shown in the previous example:
This is how the output of that nonsense logger looks:
Image may be NSFW. Clik here to view.
Now it's up to you to create a logger that writes the entries to a database, log file or whatever or just add an existing logger to your ASP.NET Core application.
ASP.NET Core is pretty flexible, customizable and extendable. You are able to change almost everything. Even the built-in dependency injection container can be replaced. This blog post will show you how to replace the existing DI container with another one. I'm going to use Autofac as a replacement.
Why should I do this?
There are not many reasons to replace the built-in dependency injection container, because it works pretty well for the most cases.
If you prefer a different dependency injection container, because of some reasons, you are able to do it. Maybe you know a faster container, if you like the nice features of Ninject to load dependencies dynamically from an assembly in a specific folder, by file patterns, and so on. I really miss this features in the built in container. It is possible to use another solution to to load dependencies from other libraries, but this is not as dynamic as the Ninject way.
Setup the Startup.cs
In ASP.NET Core the IServiceProvider is the component that resolves and creates the dependencies out of a IServiceCollection. The IServiceCollection needs to be manipulated in the method ConfigureServices within the Startup.cs if you want to add dependencies to the IServiceProvider.
The solution is to read the contents of the IServiceCollections to the own container and to provide an own implementation of a IServiceProvider to the application. Reading the IServiceCollection to the different container isn't that trivial, because you need to translate the different mappings types, which are probably not all available in all containers. E. g. the scoped registration (per request singleton) is a special one, that is only needed in web applications and not implemented in all containers.
Providing a custom IServiceprovider is possible by changing the method ConfigureServices a little bit:
The method now returns a IServiceprovider, which is created in the last line out of the IServiceCollection. It is needed to add the contents of the service collection to the container you want to use, because ASP.NET actually adds around 40 dependencies before this method is called:
140 more services gets added by the AddMvc() method. And even more, if you want to use more components and frameworks, like Identity and Entity Framework Core.
Because of that, you should use the common way to add framework services to the IServiceCollection and read the added services to the other container afterwards.
The next lines with dummy code, shows you how the implementation could be look like:
public IServiceProvider ConfigureServices(IServiceCollection services)
{
  // Add framework services.
  services.AddDbContext<ApplicationDbContext>(options =>
    options.UseSqlite(Configuration.GetConnectionString("DefaultConnection")));

  services.AddIdentity<ApplicationUser, IdentityRole>()
    .AddEntityFrameworkStores<ApplicationDbContext>()
    .AddDefaultTokenProviders();

  services.AddMvc();
  services.AddOtherStuff();

  // create custom container
  var container = new CustomContainer();

  // read service collection to the custom container
  container.RegisterFromServiceCollection(services);

  // use and configure the custom container
  container.RegisterSingelton<IProvider, MyProvider>();

  // creating the IServiceProvider out of the custom container
  return container.BuildServiceProvider();
}
The details of the implementation depends on how the container works. E. g. If I'm right, Laurent Bugnion's SimpleIOC already is a IServiceProvider and could be returned directly. Let's see how this works with Autofac:
Replacing with Autofac
Autofac provides an extension library to support this container in ASP.NET Core projects. I added both the container and the extension library packages from NuGet:
I also added the related usings to the Startup.cs:
using Autofac;
using Autofac.Extensions.DependencyInjection;
Now I'm able to create the Autofac container in the ConfigureServices method:
public IServiceProvider ConfigureServices(IServiceCollection services)
{
  // Add framework services.
  services.AddDbContext<ApplicationDbContext>(options =>
    options.UseSqlite(Configuration.GetConnectionString("DefaultConnection")));

  services.AddIdentity<ApplicationUser, IdentityRole>()
    .AddEntityFrameworkStores<ApplicationDbContext>()
    .AddDefaultTokenProviders();

  services.AddMvc();
  services.AddOtherStuff();

  // create a Autofac container builder
  var builder = new ContainerBuilder();

  // read service collection to Autofac
  builder.Populate(services);

  // use and configure Autofac
  builder.RegisterType<MyProvider>().As<IProvider>();

  // build the Autofac container
  ApplicationContainer = builder.Build();

  // creating the IServiceProvider out of the Autofac container
  return new AutofacServiceProvider(ApplicationContainer);
}

// IContainer instance in the Startup class
public IContainer ApplicationContainer { get; private set; }
With this implementation, Autofac is used as the dependency injection container in this ASP.NET application.
If you also want to resolve the controllers from the container, you should add this to the container too Otherwise the framework will resolve the Controllers and some special DI cases are not possible. A small call adds the Controllers to the IServiceColection:
Fortunately Autofac supports the .NET Standard 1.6 and there is this nice extension library to get it working in ASP.NET too. Some other containers don't and it needs some more effort to get it running.
Currently ASP.NET Core - Microsoft's new web framework - can be used on top of .NET Core and on top of the .NET Framework. This fact is pretty nice, because you are able to use all the new features of ASP.NET Core with the power of the huge but well known .NET Framework. On the other hand, the new cross-platform .NET Core is even nice, but with a smaller set of features. Today you have the choice between of being x-plat or to use the full .NET Framework. This isn't really bad.
Actually it could be better. Let's see why:
What is the issue?
Microsoft removed the support of the full .NET Framework for ASP.NET Core 2.0 and some developers are not really happy about that. See this Github Issue thread. ASP.NET Core 2.0 will just run on .NET Core 2.0. This fact results in a hot discussion within that GitHub issue.
It also results in some misleading and confusing headlines and contents on some German IT news publishers:
I followed the discussion and thought a lot about it. And yes, it starts to make sense to me.
NET Standard
What many people don't recognize or just forget about, is the .NET Standard. The .NET Standard is a API definition that tries to unify the APIs of .NET Core, .NET Framework and Xamarin. But it actually does a little more, it provides the API as a set of Assemblies, which forwards the types to the right Framework.
Currently ASP.NET Core runs on top of .NET Core and .NET Framework, but actually uses a framework that is based on .NET Standard 1.4 and higher. All the referenced libraries, which are used in ASP.NET Core are based on .NET Standard 1.4 or higher. Let's call them ".NET Standard libraries" ;) This libraries contain all the needed features, but doesn't reference a specific platform, but the .NET Standard API.
You are also able to create those kind of libraries with Visual Studio 2017.
By creating such libraries you provide your functionality to multiple platforms like Xamarin, .NET Framework and .NET Core (depending on the .NET Standard Version you choose). Isn't that good?
And in .NET Framework apps you are able to reference .NET Standard based libraries.
About runtimes
.NET Core is just a runtime to run Apps on Linux, Mac and Windows. Let's see the full .NET Framework as a runtime to run WPF apps, Winforms apps and classic ASP.NET apps on Windows. Let's also see Xamarin as a runtime to run apps on iOS and Android.
Let's also assume, that the .NET Standard 2.0 will provide the almost full API of the .NET Framework to your Application, if it is finished.
Do we really need the full .NET Framework for ASP.NET Core, in this case? No, we don't really need it.
What if ...
... .NET Framework, .NET Core and Xamarin are just runtimes?
... .NET Standard 2.0 is as complete as the .NET Framework?
.. .NET Standard 2.0 libraries will have the same features as the .NET Framework?
.. ASP.NET 2.0 Core uses the .NET Standard 2.0 libraries?
Do we really need the full .NET Framework as a runtime for ASP.NET Core?
I think, no!
Does it also makes sense to use the full .NET Framework as a runtime for Xamarin Apps?
I also think, no.
Conclusion
ASP.NET Core and .NET Core shouldn't be really shipped as one product, as David said. Because it is on top of .NET Core and maybe another technology could also be on top of .NET Core in the future. But maybe it makes sense to ship it as one product, to tell the people that ASP.NET Core 2.0 is based on top of .NET Core 2.0 and needs the .NET Core runtime. (The classic ASP.NET is also shipped with the full .NET Framework.)
.NET Core, Xamarin and the full .NET Framework are just a runtimes.
The .NET Standard 2.0 will almost have the same API as the .NET Framework.
The .NET Standard 2.0 libraries will have the same set of features as the .NET Framework
ASP.NET Core 2.0 uses NET Standard 2.0 libraries as a framework.
With this facts, Microsoft's decision to run ASP.NET Core 2.0 on .NET Core 2.0 only, doesn't sound that evil anymore.
From my perspective, ASP.NET is not in trouble and it's all fine and it makes absolutely sense. The troubles are only in the discussion about that on GitHub and on Twitter :)
Yesterday in an official blog post of announcing ASP.NET Core 2.0 preview1, (Announcing ASP.NET 2.0.0-Preview1 and Updates for .NET Web Developers) Jeff Fritz wrote, that the preview 1 is limited to .NET Core 2.0 only. The overall goal is to put ASP.NET Core 2.0 on top of .NET Standard 2.0. This means it will be possible to run ASP.NET Core 2.0 apps on .NET Core, Mono and the full .NET Framework.
A few weeks ago, I found some time to have a look at GraphQL and even at the .NET implementation of GraphQL. It is pretty amazing to see it in actions and it is easier than expected to create a GraphQL endpoint in ASP.NET Core. In this post I'm going to show you how it works.
The Graph Query Language
The GraphQL was invented by Facebook in 2012 and released to the public in 2015. It is a query language to tell the API exactly about the data you wanna have. This is the difference between REST, where you need to query different resources/URIs to get different data. In GrapgQL there is one single point of access about the data you want to retrieve.
That also makes the planning about the API a little more complex. You need to think about what data you wanna provide and you need to think about how you wanna provide that data.
While playing around with it, I created a small book database. The idea is to provide data about books and authors.
Let's have a look into few examples. The query to get the book number and the name of a specific book looks like this.
{
  book(isbn: "822-5-315140-65-3"){
    isbn,
    name
  }
}
This look similar to JSON but it isn't. The property names are not set in quotes, which means it is not really a JavaScript Object Notation. This query need to be sent inside the body of an POST request to the server.
The Query gets parsed and executed against a data source on the server and the server should send the result back to the client:
To learn more about GraphQL and the specifications, visit http://graphql.org/
The Book Database
The book database is just fake. I love to use GenFu to generate dummy data. So I did the same for the books and the authors and created a BookRepository:
public class BookRepository : IBookRepository
{
  private IEnumerable<Book> _books = new List<Book>();
  private IEnumerable<Author> _authors = new List<Author>();

  public BookRepository()
  {
    GenFu.GenFu.Configure<Author>()
      .Fill(_ => _.Name).AsLastName()
      .Fill(_=>_.Birthdate).AsPastDate();
    _authors = A.ListOf<Author>(40);

    GenFu.GenFu.Configure<Book>()
      .Fill(p => p.Isbn).AsISBN()
      .Fill(p => p.Name).AsLoremIpsumWords(5)
      .Fill(p => p.Author).WithRandom(_authors);
    _books = A.ListOf<Book>(100);
  }

  public IEnumerable<Author> AllAuthors()
  {
    return _authors;
  }

  public IEnumerable<Book> AllBooks()
  {
    return _books;
  }

  public Author AuthorById(int id)
  {
    return _authors.First(_ => _.Id == id);
  }

  public Book BookByIsbn(string isbn)
  {
    return _books.First(_ => _.Isbn == isbn);
  }
}

public static class StringFillerExtensions
{
  public static GenFuConfigurator<T> AsISBN<T>(
    this GenFuStringConfigurator<T> configurator) where T : new()
  {
    var filler = new CustomFiller<string>(
      configurator.PropertyInfo.Name,
      typeof(T),
      () =>
      {
        return MakeIsbn();
      });
    configurator.Maggie.RegisterFiller(filler);
    return configurator;
  }
  public static string MakeIsbn()
  {
    // 978-1-933988-27-6
    var a = A.Random.Next(100, 999);
    var b = A.Random.Next(1, 9);
    var c = A.Random.Next(100000, 999999);
    var d = A.Random.Next(10, 99);
    var e = A.Random.Next(1, 9);
    return $"{a}-{b}-{c}-{d}-{e}";
  }
}
GenFu provides a useful set of so called fillers to generate data randomly. There are fillers to generate URLs, emails, names, last names, states of US and Canada and so on. I also need a ISBN generator, so I created one by extending the generic GenFuStringConfigurator.
The BookRepository is registered as a singleton in the Dependency Injection container, to work with the same set of data while the application is running. You are able to add some more information to that repository, like publishers and so on.
GraphQL in ASP.NET Core
Fortunately there is a .NET Standard compatible implementation of the GraphQL on GitHub. So there's no need to parse the Queries by yourself. This library is also available as a NuGet package:
The examples provided on GitHub, are pretty easy. They directly write the result to the output, which means the entire ASP.NET Applications is a GraphQL server. But I want to add GraphQL as a ASP.NET Core MiddleWare, to add the GraphQL implementation as a different part of the Application. Like this you are able to use REST based POST and PUT request to add or update the data and to use the GraphQL to query the data.
I also want that the middleware is listening to the sub path "/graph"
public class GraphQlMiddleware
{
  private readonly RequestDelegate _next;
  private readonly IBookRepository _bookRepository;

  public GraphQlMiddleware(RequestDelegate next, IBookRepository bookRepository)
  {
    _next = next;
    _bookRepository = bookRepository;
  }

  public async Task Invoke(HttpContext httpContext)
  {
    var sent = false;
    if (httpContext.Request.Path.StartsWithSegments("/graph"))
    {
      using (var sr = new StreamReader(httpContext.Request.Body))
      {
        var query = await sr.ReadToEndAsync();
        if (!String.IsNullOrWhiteSpace(query))
        {
          var schema = new Schema { Query = new BooksQuery(_bookRepository) };
          var result = await new DocumentExecuter()
            .ExecuteAsync(options =>
                          {
                            options.Schema = schema;
                            options.Query = query;
                          }).ConfigureAwait(false);
          CheckForErrors(result);
          await WriteResult(httpContext, result);
          sent = true;
        }
      }
    }
    if (!sent)
    {
      await _next(httpContext);
    }
  }

  private async Task WriteResult(HttpContext httpContext, ExecutionResult result)
  {
    var json = new DocumentWriter(indent: true).Write(result);
    httpContext.Response.StatusCode = 200;
    httpContext.Response.ContentType = "application/json";
    await httpContext.Response.WriteAsync(json);
  }

  private void CheckForErrors(ExecutionResult result)
  {
    if (result.Errors?.Count > 0)
    {
      var errors = new List<Exception>();
      foreach (var error in result.Errors)
      {
        var ex = new Exception(error.Message);
        if (error.InnerException != null)
        {
          ex = new Exception(error.Message, error.InnerException);
        }
        errors.Add(ex);
      }
      throw new AggregateException(errors);
    }
  }
}

public static class GraphQlMiddlewareExtensions
{
  public static IApplicationBuilder UseGraphQL(this IApplicationBuilder builder)
  {
    return builder.UseMiddleware<GraphQlMiddleware>();
  }
}
With this kind of MiddleWare, I can extend my applications Startup.cs with GraphQL:
app.UseGraphQL();
As you can see, the BookRepository gets passed into this Middleware via constructor injection. The most important part is that line:
var schema = new Schema { Query = new BooksQuery(_bookRepository) };
This is where we create a schema, which is used by the GraphQL engine to provide the data. The schema defines the structure of the data you wanna provide. This is all done in a root type called BooksQuery. This type gets the BookRepostory.
This Query is a GraphType, provided by the GraphQL library. You need to derive from a ObjectGraphType and to configure the schema in the constructor:
public class BooksQuery : ObjectGraphType
{
  public BooksQuery(IBookRepository bookRepository)
  {
    Field<BookType>("book",
                    arguments: new QueryArguments(
                      new QueryArgument<StringGraphType>() { Name = "isbn" }),
                      resolve: context =>
                      {
                        var id = context.GetArgument<string>("isbn");
                        return bookRepository.BookByIsbn(id);
                      });

    Field<ListGraphType<BookType>>("books",
                                   resolve: context =>
                                   {
                                     return bookRepository.AllBooks();
                                   });
  }
}
Using the GraphQL library all types used in the Query to define the schema are any kind of GraphTypes, even the BookType:
public class BookType : ObjectGraphType<Book>
{
  public BookType()
  {
    Field(x => x.Isbn).Description("The isbn of the book.");
    Field(x => x.Name).Description("The name of the book.");
    Field<AuthorType>("author");
  }
}
The difference is just the generic ObjectGraphType which is also used for the AuthorType. The properties of the Book, which are simple types like the name or the ISBN are mapped directly with the lambda. The complex typed properties like the Author are mapped via another generic ObjectGraphType, which is ObjectGraphType in that case.
Like this you need to create your Schema, which can be used to query the data.
This are my first steps using GraphQL and I really like it. I think this is pretty useful and will reduce the effort on both the client side and the server side a lot. Even if the effort to create the schema is lot more than creating just a Web API controller, but usually you need to create a lot more than just one single Web API controller.
This also reduces the amount of data between the client and the server, because the client could just load the needed data and don't need to GET or POST all unneeded stuff.
I think, I'll use it a lot more in the future projects.
At the Build 2017 conference Microsoft announced the preview 1 versions of .NET Core 2.0, of the .NET Standard 2.0 and ASP.NET Core 2.0. I recently had a quick look into it and want to show you a little bit about it with this post.
.NET Core 2.0 Preview 1
Rich Lander (Program Manager at Microsoft) wrote about the release of the preview 1, .NET Standard 2.0, tools support in this post: Announcing .NET Core 2.0 Preview 1. It is important to read the first part about the requirements carefully. Especially the requirement of Visual Studio 2017 15.3 Preview. At the first quick look I was wondering about the requirement of installing a preview version of Visual Studio 2017, because I have already installed the final version since a few months. But the details is in the numbers. The final version of Visual Studio 2017 is the 15.2. The new tooling for .NET Core 2.0 preview is in the 15.3 which is in preview currently.
So if you want to use .NET Core 2. preview 1 with Visual Studio 2017 you need to install the preview of 15.3
The good thing is, the preview can be installed side by side with the current final of Visual Studio 2017. It doesn't double the usage of disk space, because both versions are able share some SDKs, e.g. the Windows SDK. But you need to install the add-ins you want to use for this version separately.
After the Visual Studio you need to install the new .NET Core SDK which also installs NET Core 2.0 Preview 1 and the .NET CLI.
The .NET CLI
After the new version of .NET Core is installed type dotnet --version in a command prompt. It will show you the version of the currently used .NET SDK:
Image may be NSFW. Clik here to view.
Wait. I installed a preview 1 version and this is now the default on the entire machine? Yes.
The CLI uses the latest installed SDK on the machine by default. But anyway you are able to run different .NET Core SDKs side by side. To see what versions are installed on our machine type dotnet --info in a command prompt and copy the first part of the base path and past it to a new explorer window:
Image may be NSFW. Clik here to view.
Image may be NSFW. Clik here to view.
You are able to use all of them if you want to.
This is possible by adding a "global.json" to your solution folder. This is a pretty small file which defines the SDK version you want to use:
Inside the folder "C:\git\dotnetcore", I added two different folders: the "v104" should use the current final version 1.0.4 and the "v200" should use the preview 1 of 2.0.0. to get it working I just need to put the "global.json" into the "v104" folder:
Image may be NSFW. Clik here to view.
The SDK
Now I want to have a look into the new SDK. The first thing I do after installing a new version is to type dotnet --help in a command prompt. The first level help doesn't contain any surprises, just the version number differs. The most interesting difference is visible by typing dotnet new --help. We get a new template to add an ASP.NET Core Web App based on Razor pages. We also get the possibility to just add single files, like a razor page, "NuGet.config" or a "Web.Config". This is pretty nice.
Image may be NSFW. Clik here to view.
I also played around with the SDK by creating a new console app. I typed dotnet new console -n consoleapp:
Image may be NSFW. Clik here to view.
As you can see in the screenshot dotnet new will directly download the NuGet packages from the package source. It runs dotnet restore for you. It is not a super cool feature but good to know if you get some NuGet restore errors while creating a new app.
When I opened the "consoleapp.csproj", I saw the expected TargetFramework "netcoreapp2.0"
To create a new ASP.NET Web App, I need to type dotnet new mvc -n webapp in a command prompt window. This command immediately creates the web app and starts to download the needed packages:
Image may be NSFW. Clik here to view.
Let's see what changed, starting with the "Program.cs":
public class Program
{
  public static void Main(string[] args)
  {
    BuildWebHost(args).Run();
  }

  public static IWebHost BuildWebHost(string[] args) =>
    WebHost.CreateDefaultBuilder(args)
      .UseStartup<Startup>()
      .Build();
}
The first thing I mentioned is the encapsulation of the code that creates and configures the WebHostBuilder. In the previous versions it was all in the static void main. But there's no instantiation of the WebHostBuilder anymore. This is hidden in the .CreateDefaultBuilder() method. This look a little cleaner now, but also hides the configuration from the developer. It is anyway possible to use the old way to configure the WebHostBuilder, but this wrapper does a little more than the old configuration. This Method also wraps the configuration of the ConfigurationBuilder and the LoggerFactory. The default configurations were moved from the "Startup.cs" to the .CreateDefaultBuilder(). Let's have a look into the "Startup.cs":
public class Startup
{
  public Startup(IConfiguration configuration)
  {
    Configuration = configuration;
  }

  public IConfiguration Configuration { get; }

  // This method gets called by the runtime. Use this method to add services to the container.
  public void ConfigureServices(IServiceCollection services)
  {
    services.AddMvc();
  }

  // This method gets called by the runtime. Use this method to configure the HTTP request pipeline.
  public void Configure(IApplicationBuilder app, IHostingEnvironment env)
  {
    if (env.IsDevelopment())
    {
      app.UseDeveloperExceptionPage();
    }
    else
    {
      app.UseExceptionHandler("/Home/Error");
    }

    app.UseStaticFiles();

    app.UseMvc(routes =>
               {
                 routes.MapRoute(
                   name: "default",
                   template: "{controller=Home}/{action=Index}/{id?}");
               });
  }
}
Even this file is much cleaner now.
But if you now want to customize the Configuration, the Logging and the other stuff, you need to replace the .CreateDefaultBuilder() with the previous style of bootstrapping the application or you need to extend the WebHostBuilder returned by this method. You could have a look into the sources of the WebHost class in the ASP.NET repository on GitHub (around line 150) to see how this is done inside the .CreateDefaultBuilder(). The code of that method looks pretty familiar for someone who already used the previous version.
BTW: BrowserLink was removed from the templates of this preview version. Which is good from my perspective, because it causes an error while starting up the applications.
Result
This is just a first short glimpse into the .NET Core 2.0 Preview 1. I need some more time to play around with it and learn a little more about the upcoming changes. For sure I need to rewrite my post about the custom logging a little bit :)
BTW: Last week, I created a 45 min video about it in German. This is not a video with a good quality. It is quite bad. I just wanted to test a new microphone and Camtasia Studio and I chose ".NET Core 2.0 Preview 1" as the topic to present. Even if it has a awful quality, maybe it is anyway useful to some of my German speaking readers. :)
I'll come with some more .NET 2.0 topics within the next months.
The feedback about my last blog post about the GraphQL end-point in ASP.NET Core was amazing. That post was mentioned on reddit, many times shared on twitter, lInked on http://asp.net and - I'm pretty glad about that - it was mentioned in the ASP.NET Community Standup.
Because of that and because GraphQL is really awesome, I decided to make the GraphQL MiddleWare available as a NuGet package. I did some small improvements to make this MiddleWare more configurable and more easy to use in the Startup.cs
NuGet
Currently the package is a prerelease version. That means you need to activate to load preview versions of NuGet packages:
You still need to configure your GraphQL schema using the graphql-dotnet library, as described in my last post. If this is done open your Startup.cs and add an using to the GraphQl.AspNetCore library:
using GraphQl.AspNetCore;
You can use two different ways to register the GraphQl Middleware:
Personally I prefer the second way, which is more readable in my opinion.
The root graph type needs to be passed to the GraphQlMiddlewareOptions object, depending on the implementation of your root graph type, you may need to inject the data repository or a EntityFramework DbContext, or whatever you want to use to access your data. In this case I reuse the IBookRepository of the last post and pass it to the BooksQuery which is my root graph type.
Another valid option is to also add the BooksQuery to the dependency injection container and inject it to the Configure method.
Options
The GraphQlMiddlewareOptions are pretty simple. Currently there are only three properties to configure
RootGraphType: This configures your GraphQL query schema and needs to be set. If this property is unset an ArgumentNullException will be thrown.
GraphApiUrl: This property defines your GraphQL endpoint path. The default is set to /graph which means your endpoint is available under //yourdomain.tld/graph
FormatOutput: This property defines whether the output is prettified and indented for debugging purposes. The default is set to false.
This should be enough for the first time. If needed it is possible to expose the Newtonsoft.JSON settings, which are used in GraphQL library later on.
One more thing
I would be happy, if you try this library and get me some feedback about it. A demo application to quickly start playing around with it, is available on GitHub. Feel free to raise some issues and to create some PRs on GitHub to improve this MiddleWare.
I'm pretty proud about that and I'm happy to be part of the great MVP community one year more. I'm also looking forward to the Global MVP Summit in March to meet all the other MVPs from around the world.
Image may be NSFW. Clik here to view.
Not really a fan-boy...?
I'm also proud of that, because I don't really call me a Microsoft fan-boy. And sometimes, I also criticize some tools and platforms built by Microsoft (feel like a bad boy). But I like most of the development tools build by Microsoft and I like to use the tools, and frameworks and I really like the new and open Microsoft. The way how Microsoft now supports more than its own technologies and platforms. I like using VSCode, Typescript and Webpack to create NodeJS applications. I like VSCode and .NET Core on Linux to build Applications on a different platform than Windows. I also like to play around with UWP Apps on Windows for IoT on a Raspberry PI.
There are much more possibilities, much more platforms, much more customers to reach, using the current Microsoft development stack. And this is really fun to play with it, to use it in real project, to write about it in .NET magazines, in this blog and to talk about it in the user groups and on conferences.
Thanks
But I wouldn't get honored again without such a great development community. I wouldn't continue to contribute to the community without that positive feedback and without that great people. This is why the biggest "Thank You" goes to the development community :)
Sure, I also need to say "Thank You" to my great family (my lovely wife and my three kids) which supports me in spending som much time to contribute to the community. I also need to say Thanks to my company and my boss for supporting me and allowing me to use parts of my working time to contribute the the community.
Until now it is pretty hard to move an existing more complex .NET Framework library to .NET Core or .NET Standard 1.x. More complex in my case just means, e. g. that this specific library uses reflection a little more than maybe some others. I'm talking about the LightCore DI container.
I started to move it to .NET Core in November 2015, but gave up halve a year later. Because it needs much more time to port it to NET Core and because it makes much more sense to port it to the .NET Standard than to .NET Core. And the announcement of .NET Standard 2.0 makes me much more optimistic to get it done with pretty less effort. So I stopped moving it to .NET Core and .NET Standard 1.x and was waiting for .NET standard 2.0.
LightCore is back
Some weeks ago the preview version of .NET Standard 2.0 was announced and I tried it again. It works as expected. The API of .NET Standard 2.0 is big enough to get the old source of LightCore running. Also Rick Strahl did some pretty cool and detailed post about it:
I created .NET Standard 2.0 libraries for the most of the projects. I didn't change most parts of the code. The XAML configuration stuff was an exception.
I also ported the existing unit tests to .NET Core Xunit test libraries and the tests are running. That means LightCore is definitely running with .NET Core 2.0.
We'll get one breaking change: I moved the file based configuration from XAML to JSON, because the XAML serializer is not (maybe not yet) supported in .NET Standard.
We'll get another breaking change: I don't want to support Silverlight anymore.
Silverlight users should use the old packages instead. Sorry about that.
Roadmap
I don't really want to release the new version until the .NET Standard 2.0 is released. I don't want to have the preview versions of the .NET Standard libraries referenced in a final version of LightCore. That means, there is still some time to get the open issues done.
2.0.0-preview1
End of July 2017
Uses the preview versions of .NET Standard 2.0 and .NET Core 2.0
2.0.0-preview2
End of August 2017
Uses the preview versions of .NET Standard 2.0 and .NET Core 2.0. Maybe the finals, if they are released until that.
2.0.0
September 2017
depends on the release of .NET Standard 2.0 and .NET Core 2.0
Open issues
The progress is good, but there is still something to do, before the release of the first preview:
We need to have the same tests in .NET Framework based unit tests to be sure
We need to complete the ASP.NET Core integration package to get it running in ASP.NET Core
Needs some more time, because it needs a generic and proper way to move the existing service registrations from the ASP.NET Core's IServiceCollection to LightCore
I'd like to call for contributions. Try LightCore, raise Issues, create PRs and whatever is needed to get LightCore back to life and whatever is needed to make it a lightweight, fast and easy to use DI container.
I think, everyone who followed the last couple of ASP.NET Community Standup session heard about Razor Pages. Did you try the Razor Pages? I didn't. I focused completely on ASP.NET Core MVC and Web API. With this post I'm going to have a first look into it. I'm going to try it out.
I was also a little bit skeptical about it and compared it to the ASP.NET Web Site project. That was definitely wrong.
You need to have the latest preview on Visual Studio 2017 installed on your machine, because the Razor Pages came with ASP.NET Core 2.0 preview. It is based on ASP.NET Core and part of the MVC framework.
Creating a Razor Pages project
Using Visual Studio 2017, I used "File... New Project" to create a new project. I navigate to ".NET Core", chose the "ASP.NET Core Web Application (.NET Core)" project and I chose a name and a location for that project.
Image may be NSFW. Clik here to view.
In the next dialogue, I needed to switch to ASP.NET Core 2.0 to see all the new available project types. (I will write about the other one in the next posts.) I selected the "Web Application (Razor Pages)" and pressed "OK".
Image may be NSFW. Clik here to view.
Program.cs and Startup.cs
I you are already familiar with ASP.NET core projects, you'll find nothing new in the Program.cs and in the Startup.cs. Both files look pretty much the same.
public class Program
{
  public static void Main(string[] args)
  {
    BuildWebHost(args).Run();
  }

  public static IWebHost BuildWebHost(string[] args) =>
    WebHost.CreateDefaultBuilder(args)
    .UseStartup<Startup>()
    .Build();
}
The Startup.cs has a services.AddMvc() and an app.UseMvc() with a configured route:
That means the Razor Pages are actually part of the MVC framework, as Damien Edwards always said in the Community Standups.
The solution
But the solution looks a little different. Instead of a Views and a Controller folders, there is only a Pages folder with the razor files in it. Even there are known files: the _layout.cshtml, _ViewImports.cshtml, _ViewStart.cshtml.
Image may be NSFW. Clik here to view.
Within the _ViewImports.cshtml we also have the import of the default TagHelpers
This makes sense, since the Razor Pages are part of the MVC Framework.
We also have the standard pages of every new ASP.NET project: Home, Contact and About. (I'm going to have a look at this files later on.)
As every new web project in Visual Studio, also this project type is ready to run. Pressing F5 starts the web application and opens the URL in the browser:
Image may be NSFW. Clik here to view.
Frontend
For the frontend dependencies "bower" is used. It will put all the stuff into wwwroot/bin. So even this is working the same way as in MVC. Custom CSS and custom JavaScript ar in the css and the js folder under wwwroot. This should all be familiar for ASP.NET Corer developers.
Also the way the resources are used in the _Layout.cshtml are the same.
Welcome back "Code Behind"
This was my first thought for just a second, when I saw the that there are nested files under the Index, About, Contact and Error pages. At the first glimpse this files are looking almost like Code Behind files of Web Form based ASP.NET Pages, but are completely different:
public class ContactModel : PageModel
{
    public string Message { get; set; }

    public void OnGet()
    {
        Message = "Your contact page.";
    }
}
They are not called Page, but Model and they have something like an handler in it, to do something on a specific action. Actually it is not a handler, it is an an method which gets automatically invoked, if this method exists. This is a lot better than the pretty old Web Forms concept. The base class PageModel just provides access to some Properties like the Contexts, Request, Response, User, RouteData, ModelStates, ViewData and so on. It also provides methods to redirect to other pages, to respond with specific HTTP status codes, to sign-in and sign-out. This is pretty much it.
The method OnGet allows us to access the page via a GET request. OnPost does the same for POST. Gues what OnPut does ;)
Do you remember Web Forms? There's no need to ask if the current request is a GET or POST request. There's a single decoupled method per HTTP method. This is really nice.
On our Contact page, inside the method OnGet the message "Your contact page." will be set. This message gets displayed on the specific Contact page:
As you can see in the razor page, the PageModel is actually the model of that view which gets passed to the view, the same way as in ASP.Net MVC. The only difference is, that there's no Action to write code for and something will invoke the OnGet Method in the PageModel.
Conclusion
This is just a pretty fast first look, but the Razor Pages seem to be pretty cool for small and low budget projects, e. g. for promotional micro sites with less of dynamic stuff. There's less code to write and less things to ramp up, no controllers and actions to think about. This makes it pretty easy to quickly start a project or to prototype some features.
But there's no limitation to do just small projects. It is a real ASP.NET Core application, which get's compiled and can easily use additional libraries. Even Dependency Injection is available in ASP.NET Core RazorPages. That means it is possible to let the application grow.
Even though it is possible to use the MVC concept in parallel by adding the Controllers and the Views folders to that application. You can also share the _layout.cshtml between both, the Razor Pages and the VMC Views, just by telling the _ViewStart.cshtml where the _layout.cshtml is.
In the comments of my last post, I got asked to write about, how to create a email form using ASP.NET Core Razor Pages. The reader also asked about a tutorial about authentication and authorization. I'll write about this in one of the next posts. This post is just about creating a form and sending an email with the form values.
Creating a new project
To try this out, you need to have the latest Preview of Visual Studio 2017 installed. (I use 15.3.0 preview 3) And you need .NET Core 2.0 Preview installed (2.0.0-preview2-006497 in my case)
In Visual Studio 2017, use "File... New Project" to create a new project. Navigate to ".NET Core", chose the "ASP.NET Core Web Application (.NET Core)" project and choose a name and a location for that new project.
Image may be NSFW. Clik here to view.
In the next dialogue, you probably need to switch to ASP.NET Core 2.0 to see all the new available project types. (I will write about the other ones in the next posts.) Select the "Web Application (Razor Pages)" and pressed "OK".
Image may be NSFW. Clik here to view.
That's it. The new ASP.NET Core Razor Pages project is created.
Creating the form
It makes sense to use the contact.cshtml page to add the new contact form. The contact.cshtml.cs is the PageModel to work with. Inside this file, I added a small class called ContactFormModel. This class will contain the form values after the post request was sent.
public class ContactFormModel
{
  [Required]
  public string Name { get; set; }
  [Required]
  public string LastName { get; set; }
  [Required]
  public string Email { get; set; }
  [Required]
  public string Message { get; set; }
}
To use this class, we need to add a property of this type to the ContactModel:
[BindProperty]
public ContactFormModel Contact { get; set; }
This attribute does some magic. It automatically binds the ContactFormModel to the view and contains the data after the post was sent back to the server. It is actually the MVC model binding, but provided in a different way. If we have the regular model binding, we should also have a ModelState. And we actually do:
public async Task<IActionResult> OnPostAsync()
{
  if (!ModelState.IsValid)
  {
    return Page();
  }

  // create and send the mail here

  return RedirectToPage("Index");
}
This is an async OnPost method, which looks pretty much the same as a controller action. This returns a Task of IActionResult, checks the ModelState and so on.
Let's create the HTML form for this code in the contact.cshtml. I use bootstrap (just because it's available) to format the form, so the HTML code contains some overhead:
This also looks pretty much the same as in common ASP.NET Core MVC views. There's no difference.
BTW: I'm still impressed by the tag helpers. This guys even makes writing and formatting code snippets a lot easier.
Acessing the form data
As I wrote some lines above, there is a model binding working for you. This fills up the property Contact with data and makes it available in the OnPostAsync() method, if the attribute BindProperty is set.
[BindProperty]
public ContactFormModel Contact { get; set; }
Actually, I expected to have a model, passed as argument to the OnPost, as I saw it the first time. But you are able to use the property directly, without any other action to do:
var mailbody = $@"Hallo website owner,

This is a new contact request from your website:

Name: {Contact.Name}
LastName: {Contact.LastName}
Email: {Contact.Email}
Message: ""{Contact.Message}""


Cheers,
The websites contact form";

SendMail(mailbody);
That's nice, isn't it?
Sending the emails
Thanks to the pretty awesome .NET Standard 2.0 and the new APIs available for .NET Core 2.0, it get's even nicer:
// irony on
Finally in .NET Core 2.0, it is now possible to send emails directly to an SMTP server using the famous and pretty well known System.Net.Mail.SmtpClient():
private void SendMail(string mailbody)
{
  using (var message = new MailMessage(Contact.Email, "me@mydomain.com"))
  {
    message.To.Add(new MailAddress("me@mydomain.com"));
    message.From = new MailAddress(Contact.Email);
    message.Subject = "New E-Mail from my website";
    message.Body = mailbody;

    using (var smtpClient = new SmtpClient("mail.mydomain.com"))
    {
      smtpClient.Send(message);
    }
  }
}
Isn't that cool?
// irony off
It definitely works and this is actually a good thing.
In previews .NET Core versions it was recommended to use an external mail delivery service like SendGrid. This kind of services usually provide a REST based API , which can be used to communicate with that specific service. Some of them also provide various client libraries for the different platforms and languages to wrap that APIs and makes them easier to use.
I'm anyway a huge fan of such services, because they are easier to use and I don't need to handle message details like encoding. I don't need to care about SMTP hosts and ports, because it is all HTTPS. I don't really need to care as much about spam handling, because this is done by the service. Using such services I just need to configure the sender mail address, maybe a domain, but the DNS settings are done by them.
SendGrid could be bought via the Azure marketplace and contains huge number of free emails to send. I would propose to use such services whenever it's possible. The SmtpClient is good in enterprise environments where you don't need to go threw the internet to send mails. But maybe the Exchanges API is another or better option in enterprise environments.
Conclusion
The email form is working and it is actually not much code written by myself. That's awesome. For such scenarios the razor pages are pretty cool and easy to use. There's no Controller to set-up, the views and the PageModels are pretty close and the code to generate one page is not distributed over three different folders as in MVC. To create bigger applications, MVC is for sure the best choice, but I really like the possibility to keep small apps as simple as possible.